
| Type | |
|---|---|
| Environment | |
| AI Type | Celestial Tower AI |
| Max Life | 20000 |
| Immune to | All debuffs |
The Celestial Towers (also known as the Lunar Pillars) are four mini-bosses that appear during the Lunar Events, when the Lunatic Cultist has been defeated. They appear at four locations equally spaced across the map (see Pillar Spawning Mechanics), and do not move horizontally thereafter. Each pillar takes control of the map for a large area around them, around 500 tiles in each direction. The affected area will show that pillar's background and spawn the pillar's specific enemies in large numbers.
The 4 Celestial Towers are the Vortex Pillar, the Stardust Pillar, the Nebula Pillar and the Solar Pillar. The craftable gear from the Pillars correspond to the 4 main classes in the game; Vortex for ranged, Stardust for summoner, Nebula for magic, and Solar for melee.
Initially, the Celestial Towers have a large force field around them, which prevents them from taking any damage. In order to remove the force field, the player needs to defeat 100 / 150 enemies that correspond to that particular Tower. After doing that, the Tower can be damaged until it dies. Enemies will continue to spawn until the Pillar is defeated. If the player exits the game without destroying a Tower, all damage done to it will be reset, and the kill count needed to remove the shield will also reset. When finally slain, the Celestial Towers each drop between 12 - 60 / 18 - 90 Lunar Fragments of their type.
The bosses themselves are fairly easy, having only 20000 HP each and dealing no melee damage on contact. While they may not be a direct threat, the minions they spawn can deal high amounts of damage, move very fast or shoot fast moving projectiles, inflict debuffs, and can easily swarm the player if not dealt with swiftly.
Defeating each Pillar triggers the following status messages:
- First Pillar defeated: "Your mind goes numb..."
- Second Pillar defeated: "You are overwhelmed with pain..."
- Third Pillar defeated: "Otherworldly voices linger around you..."
- Fourth Pillar defeated: "Impending doom approaches..."
There is no set order in which the Celestial Towers must be defeated. However, players usually go for whichever pillar is closest or is weakest to their class. These status messages will appear from whichever towers are taken down first, second, third, and fourth.
After defeating all four Celestial Towers, the screen will start to vibrate and become slightly dim, and the music volume will lower somewhat, indicating that the Moon Lord is about to spawn. There will also be a message saying "Impending doom approaches". It will spawn after about a minute. It is advised to prepare during this minute.
Quick Answers

What triggers the appearance of the Celestial Pillars in Terraria?

What is the significance of the 'your mind goes numb' message in relation to the Celestial Pillars?
What are the differences between the Stardust Pillar and the Vortex Pillar?
What happens when a Celestial Pillar takes control of a map area?
Vortex Pillar
| Type | |
|---|---|
| Environment | |
| AI Type | Celestial Tower AI |
| Damage | 0 |
| Max Life | 20000 |
| Defense | 20 |
| KB Resist | 100% |
| Immune to | All debuffs |
- Item (Quantity)Rate
 Vortex Fragment
(12-60 / 18-90)100%
- Internal NPC ID: 422
The Vortex Pillar is the ranger-themed Celestial Tower, with fast, mobile minions capable of projectile attacks. When nearby, the background will display a green planet with lightning. It drops Vortex Fragments after it is defeated.
It will occasionally open a portal above the player that will spawn 2 Alien Hornets. This attack is incredibly dangerous, especially in Expert mode, as it can reach the player almost anywhere near the pillar, rendering closed in "safe zones" useless.
The minions spawned by the Vortex Pillar usually move fast, fly towards players, and attack with long ranged projectiles.
- Vortexians are usually pretty easy to deal with. On death they summon a portal that shoots a lightning bolt that deals relatively low damage.
- Storm Divers shoot a small volley of projectiles that deal very high damage.
- The Alien Queens can fire stingers that cause the Distorted debuff, which causes the player to be unable to fly upwards or fall downwards for a few seconds, by distorting gravity around them. This forces the player to only be able to move horizontally, and make them easy targets for attacks from all of the minions.
- The Alien Queen spawns 3 Alien Larva when killed, which will grow to Alien Hornets and into more Alien Queens if they are left for too long.
Summons :
| Storm Diver | |
| Vortexian | |
| Alien Queen | |
| Alien Larva | |
| Alien Hornet |
Stardust Pillar
| Type | |
|---|---|
| Environment | |
| AI Type | Celestial Tower AI |
| Damage | 0 |
| Max Life | 20000 |
| Defense | 20 |
| KB Resist | 100% |
| Immune to | All debuffs |
- Item (Quantity)Rate
- Stardust Fragment
(12-60 / 18-90)100%
- Internal NPC ID: 493
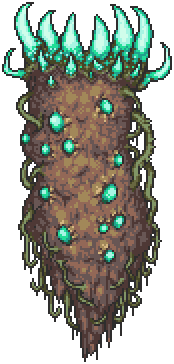
The Stardust Pillar is the summoner-themed Celestial Tower, bringing large swarms of enemies that spawn smaller, weaker entities to attack. When nearby, the background will display a cyan moon and a sparkling effect. It drops Stardust Fragments when it is defeated.
The Stardust Pillar is able to spawn enemies above the pillar on screen . The Stardust Pillar will spawn multiple energy orbs above it, and will link together with lines and then disappear. Shortly after, the energy orbs will disappear and spawn in a random enemy.
Some of the minions spawned by the Stardust Pillar have abilities or attacks that occur after they die.
- The Star Cell enemy, if killed, will split into smaller sized versions that grow into full sized versions after a few seconds, which can cause enemies to fill the screen. This can be very dangerous if the player can't dodge them effectively, or attack multiple enemies at once. However, leaving the baby Star Cells alone is an effective way to remove the Pillar's shield more quickly, since the full-grown Star Cells will contribute to the kill count needed before the pillar can take damage.
- The Flow Invader will summon smaller creatures around it, which will shoot themselves like projectiles at the player after there are three around the Flow Invader. The smaller creatures around it will become projectiles and shoot towards the player after the Flow Invader is killed.
Summons :
| Star Cell | |
| Flow Invader | |
| Twinkle Popper | |
| Twinkle | |
| Milkyway Weaver | |
| Stargazer |
Tips
It is recommended that you face this one first.
Nebula Pillar
| Type | |
|---|---|
| Environment | |
| AI Type | Celestial Tower AI |
| Damage | 0 |
| Max Life | 20000 |
| Defense | 20 |
| KB Resist | 100% |
| Immune to | All debuffs |
- Item (Quantity)Rate
- Nebula Fragment
(12-60 / 18-90)100%
- Internal NPC ID: 507
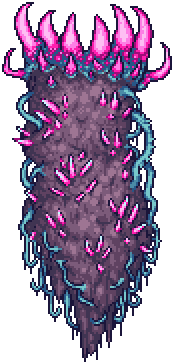
The Nebula Pillar is the magic-themed Tower, with minions capable of flight, teleportation, and other unusual attacks and abilities. When nearby, the background will display a purple planet with beams of energy pulling debris into the sky. It drops Nebula Fragments after it's defeated.
The Nebula Pillar is the only Pillar that doesn't have any kind of attack, although it is best that the player still watch out for its minions.
- The Brain Sucklers can attach themselves to the player, inflicting the Obstructed debuff and dealing damage.
- The Evolution Beast shoots projectiles that chase the player and deal high damage multiple times.
- Nebula Floater shoots lasers that move very fast and deal large amounts of damage. The Nebula Floater will teleport around the player, making it more difficult to dodge its projectiles.
- Predictor shoots 4 fast-moving projectiles at a time that deal very high damage.
Summons
| Brain Suckler | |
| Evolution Beast | |
| Nebula Floater | |
| Predictor |
Solar Pillar
| Type | |
|---|---|
| Environment | |
| AI Type | Celestial Tower AI |
| Damage | 120 (solar fragment) |
| Max Life | 20000 |
| Defense | 20 |
| KB Resist | 100% |
| Immune to | All debuffs |
- Item (Quantity)Rate
- Solar Fragment
(12-60 / 18-90)100%
- Internal NPC ID: 517
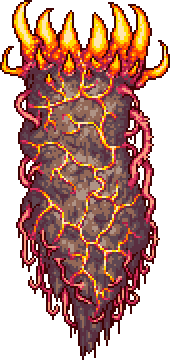
The Solar Pillar is the melee-themed Tower, bringing minions with strong defensive abilities, heavy contact damage, and few projectile attacks. When nearby, the background will display a massive orange planet, with a shower of falling meteors.
It drops Solar Fragments after it's defeated.
The Solar Pillar will continuously spawn fireballs from the top, which deal high contact damage.
- The Corites deal larger amounts of damage and dash directly at the player when above them, plus they can travel through blocks, making them harder to escape without coming across Crawltipedes.
- The Crawltipedes that the Solar Pillar spawns can be devastating to players using flight, as they deal high damage and are very agile. However, despite their high health, the damage they take is multiplied by 10, and they stop attacking players that land on the ground. The damage multiplication makes healing weapons like Vampire Knives extremely effective. They can only be damaged on their tail, where they have an orb that gets redder when they take more damage.
- When fighting the Solar Pillar, take into account that the Crawltipede does not target players on blocks and platforms. The Scutlix Mount is recommended, as it allows you to stay on the ground while also providing additional weaponry (lasers).
- The Selenian can reflect certain projectiles back towards the player and roll towards them at high speed, which all can make the fight very dangerous out in the open.
- The Srollers can deal very high amounts of damage if they land on the player while spinning.
Summons :
| Corite | |
| Crawltipede | |
| Drakanian | |
| Drakomire | |
| Drakomire Rider | |
| Selenian | |
| Sroller |
Tips
All Pillars
- The longer the time taken to defeat a Pillar, the deeper it will sink into the ground, but very slowly.
- A player can tell if they have reached the kill count or not by seeing if after killing an enemy, a colored line travels from the corpse to the Pillar. When those lines stop being created, the kill count has been reached. As well, the shield surrounding the Celestial Towers becomes more transparent as it becomes closer to breaking. If the player is using the lighting type "Color," they can look for the shockwave that the pillar sends in all directions before breaking.
Equipment and tactics
- Before starting the Lunar Events, it's worthwhile to lay a teleporter line across the map, with enough stations that the player can at least choose which pillar to approach first.
- For the first few runs (before the player can overmaster the pillar zones) the best strategy is to start by "kiting" their minions: Begin just outside one of the pillars' zones, step into the zone long enough to spawn a few enemies, then retreat to "neutral" ground to kill those. Repeat until the colored lines stop appearing (indicating that the shield is down), then make a fast run to the pillar to kill it, perhaps using one of the strategies below.
- Repetitively throwing Vampire Knives will keep the player healed most of the time, and if health falls below 150 hp, use a Greater Healing Potion or better (Beetle armor is probably best for this strategy). Alternatively, Spectre armor with hood can be useful, especially with "ongoing" spells such as the Nimbus Rod.
- Another strategy is to use the Nimbus Rod and/or Crimson Rod (the Rainbow Gun might help as it lasts a few seconds) as the player can summon two above the Pillar and let it deal constant damage. If the player leaves a nimbus cloud above the tower and teleport away, it will still do damage until either the tower dies or the cloud runs out. This tactic can be combined with Spectre armor and a Spectre Hood for long distance healing, as the healing effect has a very long range.
This strategy can also work by using sentries such as the Ballista sentry summons; however, beware Selenians reflecting sentry missiles back at the player.
- The easiest way for players to deal with the Celestial Towers is to use a weapon which can hit through blocks (Minions, Death Sickle, Flying Dragon, Spore Sac, etc.), and mine tunnels starting from just outside the event zone until the player can reach the pillar with their chosen weapon. All that's left to do is to grind though any enemies which converge above the player's location. "Skyfall" weapons such as the Daedalus Stormbow are also good for this tactic.
- However, some enemies can travel or attack through blocks -- this tactic works well for the Vortex and Stardust pillars, but not so much for the Nebula or Solar pillars.
- The weapons gained from defeating the first pillar(s) can be very helpful in defeating the others. The Solar Pillar yields the Solar Eruption and/or Daybreak, the Vortex Pillar gives the Phantasm and/or Vortex Beater, the Nebula Pillar provides the Nebula Arcanum and/or Nebula Blaze, and the Stardust Pillar enables the Stardust Dragon Staff and/or Stardust Cell Staff.
- Of these, the Solar Eruption is probably the most generally useful in taking down the other pillars, which is one reason to take the Solar Pillar down first; however, the Solar Pillar may be the most difficult to defeat.
- It may be best simply to target the pillar matching the player's preferred class, thus gaining at least one powerful weapon of that class.
- For repeat engagements, some of the pillars and their enemies seem to be particularly weak against their own weapons. For example, the Nebula Pillar is weak to the Nebula Blaze and Nebula Arcanum.
- Players can use the GPS to know the height of one Pillar, build/expand a nearby building to provide a firing platform at this depth, then pelt the Pillars with a Rocket Launcher, optionally backed by a Sniper Rifle. Use Rocket IV to destroy the obstacles, then Sniper Rifle/Rocket III will kill the Pillar. The time the rocket takes to reach pillar can be long : in a large map, a rocket IV takes ~1 min to travel from the center of the map to the farthest Pillar.
Vortex Pillar
- If the player sees a swirling portal form in midair, they should keep their distance and move quickly. The portal will either shoot a lightning bolt similar to the Lunatic Cultist's attack or spawn an Alien Hornet. When the portal shoots a lightning bolt, there will be a blue swirling marker pointing towards the direction the lightning bolt will strike at. Lighting bolts will only shoot downwards. The Vortex Pillar will always spawn Alien Hornets on back-walls with a direct line towards the player if there are any on the player's screen. If not, it can spawn Alien Hornets anywhere within an approximate 300 block radius of the tower.
- Because most of the enemies try to stay at the same elevation as the player, with the exception of Alien Queens, staying on the ground removes much of the mobility that Alien Hornets and Storm Divers have.
- This is the only pillar where no enemies or projectiles can travel through blocks, making the strategy of taking cover very effective. However, it is somewhat slow as many enemies keep their distance.
- Avoid getting swarmed by Alien Queens, as they easily grow from Alien Larvae and Alien Hornets and the Distorted debuff greatly decreases the player's flighting and agility. If overwhelmed, explosives may prove effective.
Stardust Pillar
- Using splash-damage weapons on Star Cells is perhaps the easiest way to kill them, as it will destroy all of the split cells as well as the initial cell.
- A quick and easy way to break the shields (especially on expert worlds) is to lead a star cell away from the tower, pop it into its smaller orbs, then let those orbs grow into full star cells. This creates an infinite loop, and the new star cells will also count towards the breaking of the shields.
- On death, the Flow Invader will hurl up to three projectiles directly at the player (potentially fewer if it is freshly spawned and hasn't yet accumulated its full contingent of orbiters). Be ready to dodge when the player kills this creature.
- Milkyway Weavers can be easily slain by using splash-damage weapons on them as soon as they burrow out of the ground. This will ensure that even if the projectile doesn't strike their head directly, it will still deal splash damage as it hits the ground next to it.
Nebula Pillar
- When fighting, take caution to avoid getting hit by a Brain Suckler. They cause the Obstructed debuff, which is similar to Blindness but with a darker shader. It will persist until the player kills the Brain Suckler stuck to them, and for a moment thereafter.
- Be very wary of Nebula Floaters. They do high damage with high accuracy, and their tendency to teleport - especially when harmed - can make them unpredictable. Nothing prevents a Floater from teleporting directly in front of the player and firing at point blank; if the player wouldn't survive another shot and can't heal up, it may be best to retreat and recover.
- Kill Evolution Beasts quickly, because once they get in range they will fire a slow but highly damaging ball of energy that tracks the player, passes through walls, can deal continuous damage, and only expires after a few seconds. These will force the player to move around into other hazards and enemies.
- Keep an eye out for Predictors because they will stay at distance, not attempting to get close to the player, and shoot several Nebula Piercers in a similar fashion to how Storm Drivers fire their shotguns.
- KEEP MOVING. While digging a bunker and attacking from there works for the most part for the other pillars, the Nebula Floater will make short work of the player if they try that approach here.
Solar Pillar
- While fighting the Solar Pillar enemies, it is highly recommended to stay grounded. Airborne players are easy prey for the Crawltipede minions, who do an excessive amount of damage but only attack airborne players.
- If the player has a skybridge set up in their world, standing on it will allow them to shoot down at enemies on the ground and even the pillar without being targeted by the Crawltipedes. Keep in mind Srollers will still be able to jump up to the platform and roll towards the player.
- If the player already has problems killing the enemies to get the shield down, an easy solution is to dig a tunnel under the Pillar and use weapons that go through walls like the Death Sickle or the Nettle Burst. It will help a lot using the Spore Sac (Plantera Expert Item) and a random minion. The player can also kill the Pillar using a wall-piercing weapon. If it is stuck on a hill, the player can build a non-platform bridge to it without being assaulted by Crawltipedes. It may be wise to prioritize Corites, as they can and will attack the player without regard to intervening terrain.
- If the player is low on health, and they are wearing wings, a good strategy for regaining health is to alert a crawltipede and hit it with Vampire Knives. Due to the fact that they take ten times as much damage as any other enemy and have a high amount of health, it is a good way to build up health fast; provided the player can dodge the Crawltipede itself. However, if the player is struck by the Crawltipede with low health, they will most likely be slain.
- It is highly suggested not to use bullets, arrows, or most other projectlies, at least not on Selenians as they can reflect projectiles that deal the same damage they would have dealt to the enemy. Powerful weapons of those varieties can easily be turned against the player and they can die very quickly. Selenians, however, cannot reflect Rockets, so it is suggested to use those against them if the player is to play ranged. The Terra Blade, Influx Waver, and (if available) Flairon are not reflected, so these are good options for melee. Beware that sentry projectiles can also be reflected! After the Moon Lord has been beaten, several of his weapons can also be used for the next round. Also safe are "thrown" weapons such as the Possessed Hatchet.
- If the player has a Neptune's Shell, a combined accessory with its effect, or Gills Potions, then standing in a large pool of water under or near the pillar will allow them to move around off the ground, without being targeted by Crawltipedes. In addition, this will also cause most enemies, with the exception of Corites, to move slower, and make it easier to target them. This strategy also works well with Vampire Knives, allowing the player to heal more efficiently. Can be done easily with pre-Plantera armors, such as Chlorophyte.
- If available, the Scutlix Mount improves forward firepower and ground maneuverability considerably, making the fight much easier.
- When fighting the Solar Pillar, try building a small building with doors, platforms, and make it two floors tall, right on the edge of where the tower starts spawning enemies, to help block off some enemies from swarming the player (especially the Srollers who can deal very large amounts of damage on Expert mode), and to force them into a small and easy to defend area. Only the Corites will fly through walls.
- Oddly, the enemies that the Solar Pillar spawns are not immune to the On Fire! debuff.
- A Razorblade Typhoon can help out a lot, as it has a high velocity and fast homing effect, meaning it can quickly stunlock several enemies at once and keep them away from the player.
Pillar Spawning Mechanics
When it is time for the 4 pillars to spawn, the game follows these steps: (The coordinates are in tiles)
- Randomly arrange the order of the 4 pillars.
- Multiply the width of the world by 0.2, 0.4, 0.6, and 0.8 to find rough spawn locations for the pillars, equally spaced from each other and the world's edges.
(For example, a large world is 8400 tiles in width, so the 4 pillars will be spawned at somewhere near x=1680, x=3360, x=5040 and x=6720) - For each pillar:
- Pick a random x1 coordinate in the range [x0 - 100, x0 + 100], where x0 represents the x coordinate of the location the Pillar was assigned to.
- Try to find out a possible y1 to spawn the pillar at (x1, y1). The y1 is processed from the 0' surface point to somewhere 100 tiles below the top of the world, from low to high. This place is a valid spawning space for a pillar if:
- There are no solid blocks (doesn't include platforms and other similar tiles) in the rectangle of x coordinate [x1 - 10, x1 + 10], y coordinate [y1 - 20, y1 + 15] (the smaller the y is, the higher height the spot lies)
- The pillar will be outside the player's sight, checking whether tiles (x1 - 10, y1), (x1 + 10, y1), (x1 - 10, y1 - 20), (x1 + 10, y1 - 20) are all outside a rectangle centered at the player with a width of 1920*1.2 pixels and a height of 1080*1.2 pixels.
- If a y1 works then the pillar spawns at (x1, y1).
- If none of the valid y1 works, go back to the first step
- If all steps have been run 15 times and failed, give up and just spawn at a settled point: (x0, y0 - 40), in which case the Pillar will always spawn at 80' Surface at a fixed x coordinate.
Notes
- This is one of the only events, along with the Old One's Army, during which enemies don't drop coins.
- The Nebula Pillar is the only pillar to not have an attack that damages directly, as the Solar Pillar attacks with solar fragments, the Vortex Pillar summons portals that spawn Alien Hornets, and the Stardust Pillar attacks by summoning white portals that spawn any enemy.
- Reversing gravity with a Gravitation Potion or Gravity Globe has a strange effect on a pillar's shield. Instead of being stationary around the pillar like it normally would, its vertical position changes according to its relation to the player. This is only cosmetic, as the pillar cannot be attacked when the shield appears to be removed.
- If a pillar has no shield and the world is closed, it will have full health and the shield will be restored when the world is reopened.
- An NPC won't try to attack the pillar even if they are in range.
Trivia
- All of the towers have a humanoid enemy. Vortex Pillar: Vortexian and Storm Diver; Stardust Pillar: Stargazer; Solar Pillar: Selenian and Drakanian; and Nebula Pillar: Predictor.
- If the Lighting mode is set to color or white, the shield will have a distort pulse effect, making players around it have a shockwave effect. And when the shield is down, the area nearby gets the shockwave effect. When the lighting is on retro or trippy, these effects won't occur.
- The towers, Moon Lord and Martian Saucer seem to have a higher resolution than most sprites. (Most Terraria enemies are visibly pixelated.)
- Correspondences
- As noted above, both the craftable gear and the enemies from the Pillars, correspond to the 4 main classes in the game: Vortex=ranged, Stardust=summoner, Nebula=magic, and Solar=melee.
- When in a lunar area, the entire area nearby will turn the pillar's color: solar=orange, vortex=teal, nebula=magenta, stardust=blue). This effect will only occur if the lighting mode is on "color" or "white".
- The four pillars could be linked to the four classical elements of western culture. (Solar = fire, stardust = earth, vortex = air and nebula = water)
- The four pillars could also be based off of the lifespan of a star: Nebula - the birth of a star, Solar - a lively star, Vortex - a collapsing star as it dies, and finally, Stardust - the remains of a star's corpse.
Achievements

History
- Desktop 1.3.0.4: Vortex Pillar summons portals faster.
- Desktop 1.3.0.2: Buffed health from 15000 to 20000.
- Desktop 1.3.0.1: Introduced.
- Console 1.0.933.1: Introduced. ()
- Console 1.0.750.0: Introduced. ()
- Anomura Fungus
- Antlion
- Bat
- Bee
- Blood Crawler
- Crab
- Crimera
- Demon Eye
- Devourer
- Eater of Souls
- Face Monster
- Fungi Bulb
- Giant Worm
- Granite Elemental
- Granite Golem
- Harpy
- Hoplite
- Hornet
- Jellyfish
- Man Eater
- Meteor Head
- Mushi Ladybug
- Piranha
- Skeleton ()
- Shark (
- Orca
-
- Slime
- Snatcher
- Snow Flinx
- Tomb Crawler
- Undead Viking
- Vulture
- Wall Creeper
- Zombie
- Angler Fish
- Angry Trapper
- Arapaima
- Armored Skeleton
- Armored Viking
- Bat
- Black Recluse
- Blood Feeder
- Chaos Elemental ()
- Clinger
- Corruptor
- Derpling
- Digger
- Floaty Gross
- Gastropod ()
- Giant Fungi Bulb
- Giant Tortoise (
- Ice
-
- Herpling
- Ice Elemental
- Ichor Sticker
- Icy Merman
- Jellyfish
- Jungle Creeper
- Moss Hornet
- Pigron
- Pixie
- Possessed Armor
- Skeleton Archer
- Slime
- Unicorn
- Wandering Eye
- Werewolf
- Wraith
- Wolf
- Alien Skater
- Baby Dinosaur
- Baby Eater
- Baby Face Monster
- Baby Grinch
- Baby Hornet
- Baby Imp
- Baby Ogre
- Baby Penguin
- Baby Red Panda
- Baby Skeletron Head
- Baby Snowman
- Baby Truffle
- Baby Werewolf
- Black Cat
- Bunny
- Cursed Sapling
- Destroyer-Lite
- Dynamite Kitten
- Eater of Worms
- Estee
- Everscream Sapling
- Eyeball Spring
- Fennec Fox
- Flying Piggy Bank
- Glittery Butterfly
- Hoardragon
- Honey Bee
- Ice Queen
- Itsy Betsy
- Lil' Harpy
- Lizard
- Mini Minotaur
- Mini Prime
- Moonling
- Parrot
- Phantasmal Dragon
- Plantera Seedling
- Plantero
- Puppy
- Propeller Gato
- Rez and Spaz
- Sapling
- Shadow Mimic
- Shark Pup
- Skeletron Jr.
- Slime Prince
- Slime Princess
- Spider
- Spider Brain
- Squashling
- Sugar Glider
- Suspicious Eye
- Tiki Spirit
- Turtle
- Tiny Fishron
- Void Bag
- Volt Bunny
- Zephyr Fish
- Bat
- Guinea Pig
- Slime
- Tiphia
- Werewolf
- Zombie
- Android
- Cupid
- Elfa
- Leprechaun o'Fyffe