Fishing |
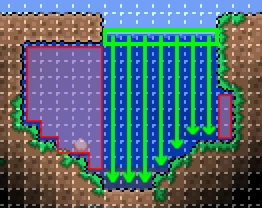 Surface width is determined first (green rectangle), then the depth below those tiles (arrows). Tiles falling outside the originally calculated surface width are not counted (red areas). |
“The World is filled to the brim with the most outlandish kinds of fish!
Fishing is accomplished by using a Fishing Pole at a body of liquid (water, honey, or lava) while having Bait in the player's inventory. While near the body of liquid, clicking a point over the liquid will cast a line into the liquid. Click again when the bobber moves up and down in order to reel in the line and, hopefully, an item will come up with the line.
Requirements
75 connected tiles of liquid are required (1,000 for oceans, 50 for honey) in order for fishing to work. The width of the top row of continuous liquid tiles (the row where the fishing bobber sits) determines the calculated pond width, and then the depth directly below those is counted. If the pond becomes wider at lower depths, that additional width is not counted. The player may successfully fish in a 1 tile-wide pond, as long as it's 75 tiles deep. The distance of the bobber to the shoreline does not matter.
It is not possible to fish when the player is submerged in liquid, even partially, and even within a completely disconnected body of water. Fishing can however be done while moving, flying, while grappled to blocks, while floating on water with the Slime Mount, or while standing on top of water, eg. using Water Walking Boots. Fishing can be done in Lava, but will only work with the Hotline Fishing Hook.
Fishing Quests
Catching a quest fish for the Angler NPC requires fishing in the proper biome and height for the day's current quest, which can be determined by talking to the Angler. Quest fish cannot be caught if the player already has that particular quest fish in their inventory, or if the quest fish was already turned in that day. However, if you put the Quest fish in your safe/bank then you may catch another Quest Fish. You can then transfer the Quest Fish to a chest if you wish. The Angler gives out special rewards when a proper quest fish is turned in. You don't need to speak with him beforehand, nor have even encountered him, but the chances of finding the correct area to fish for a quest are much lower without speaking to him first.
Factors
Given the prerequisites for fishing are fulfilled, a number of factors influence the quality/rarity of the caught item. There is a variety of relevant equipment:
- A half-dozen accessories are useful, all of which are quest rewards from the Angler (Later combined into just two, at the Tinkerer's Workshop.)
- Three potions help with fishing, all of which can be crafted or received from the Angler.
- Fishing Poles can be crafted, received as Angler rewards, or even bought from other NPCs.
- Bait comes from multiple sources: Captured Critters, Angler rewards, and Crates, and even crafting.
All the factors are combined into a total "Fishing Skill" or "Fishing Power" that determines the chances of higher-quality catches. Percentages in the tables below that influence Fishing Skill are marked green or red.
- The Fishing Power of the Fishing Pole used.
- The Bait Power of the Bait used.[fb 1]
- Equipped items and Potions.
- The time the player is fishing. (note that all the factor of time is multiplied by the bait power above, and will round down after the calculation of each one).
- The size of the lake. Lakes with fewer than 300 tiles incur a Fishing Power penalty.
- When fishing without the High Test Fishing Line, or Angler Tackle Bag, there is always a 1 in 7 chance that the fishing line will break on reel-in, forfeiting the caught item. Chances of consuming bait remain the same even if the line breaks. With the High Test Fishing Line equipped, the line never breaks.
|
| |||||||||||||||||||||||||||||||||||||||||||||||||||||||||||||||||||||
| ||||||||||||||||||||||||||||||||||||||||||||||||||||||||||||||||||||||
- ↑ % Bait Power also means % Fishing Power, and is combined with all other Fishing Power factors, such as the Fishing Pole's power and the Time factor, etc. Bait Power additionally determines the chances that the Bait item will be consumed from the player's inventory. Items with higher Bait Powers will tend to last through more fishing attempts: Higher Bait Power means lower chance of consumption.
- ↑ 2.0 2.1 Moon phases are numbered according to the graphic shown on the Moon Phase page.
- ↑ Lake sizes listed here are example numbers to illustrate the lake size effect, and are not thresholds. The penalty is actually determined by an equation:
(tiles / 300) * Fishing Power. In effect, a lake n times smaller than 300 tiles (200 for honey) results in n times less Fishing Power. Any increase or decrease in total tiles between 75 and 300 will alter the lake size penalty.
For example, if you have the Golden Fishing Rod, Master Bait, full Angler set and Angler Earring equipped, with the buff of the Fishing Potion, and it's Raining, at 5:00 am, at New Moon, your fishing power will be calculated as following:
- Add the fishing power of the Fishing Rod, Bait, Equipment and buff, so it's 50+50+(5+5+5+10)+15=140.
- Apply the influence of the weather: 140*(1+20%)=168.
- Apply the influence of the time: 168*(1+30%)=218.4, round down, 218.
- Apply the influence of the Moon Phase: 218*(1-10%)=196.2, round down, 196.
This gives a total of 196 fishing power.
Fishing Poles
Fishing Poles are used with Bait for Fishing. Some are craftable, while others are either sold by NPCs, found in Chests, or are awarded by the Angler.
| ||||||||||||||||||||||||||||||||||||||||||||||||||||||||||||||||||||||||||||||||||||||||||||||||||||||||||||||||||||||||
Bait
For more information, see Bait.
| ||||||||||||||||||||||||||||||||||||||||||||||||||||||||||||||||||||||||||||||||||||||||||||||||||||||||||||||||||||||||||||||||||||||||||||||||||||||||||||||||||||||||||||||||||||||||||||
Catches
 Fish
Fish
These items can be caught at any time. Most can serve as crafting material for Food (Cooked Fish) and other Potions. Some can also craft other item types. Jellyfish can be used as bait. Most can be sold to NPCs.
Quest fish
These are fish items that can be caught only when their particular quest is active, and serve no purpose other than acquiring quest rewards. Their catch chance is around 1:10. You can determine the day's quest by speaking to the Angler NPC. There are 39 distinctive variants of quest fish.
Usable Items
These items can be used directly without further crafting. Most are Tools or Weapons, many of which are best-in-class for large parts of the game. There are also a couple of Accessories offering jump boosts, an improvement on Healing Potions, a Pet , and in Hardmode a mount summon. The Angler's rewards fill out the set somewhat, with an early mount, a top-tier (pre-Hardmode) Hook, and too many items to help with fishing.
Crates
Crates are grab-bag type items that can each contain random loot. They can be right-clicked from within the player's inventory, which will unload their contents. Rarer Crate types contain more valuable loot. Each Crate type can be stacked up to 99 in a single inventory slot. The biome crates can provide items otherwise found only in the matching biome chests, including Crimson Hearts/Shadow Orbs. (Not all special chests have matching crates.)
 |
Fishing Internal Item ID: 2334–2336, 3203–3208, 3979–3987, 4405–4408, 4877, 4878, 5002, 5003
|
- | No value |
Crates are grab bag-type items which can be caught while fishing, containing random loot such as ores, bars, potions, accessories, and other items. In addition, biome-specific crates can contain biome-specific loot. Their content can be unloaded by pressing the ⚷ Interact button, either on their icon in the inventory or while holding them. Some kinds of crates can be caught anywhere, while the rest can only be caught when fishing in a certain biome. Wooden Crates, Iron Crates, and Golden Crates ( Crates are caught every 1 in 10 catches, on average; with a Crate Potion, the chance is doubled to 1 in 5. The kind of crate the player obtains is dependent on their Fishing Power, with higher Fishing Power increasing the probabilities of rarer crates. As an example, fishing with a Fishing Power of 100 in a lake of at least 300 valid water tiles in the Corruption would yield crates with the following probabilities: Golden Crate: Types
CraftingRecipesNotes
Tips
History
References
Consumables:
Potions Health Potions Mana Potions Restoration Potions Teleportation Other Potions Permanent Power-Ups Power-Ups Buff Potions Defense Detection and Vision
Weapons Other Consumable Weapons Ammunition Seeds Materials Found Bought Drops Ores and Bars Ores Hardmode Bars Other Crafting Stations Themed Light Sources Placeable Suitable for housing Unsuitable for housing Storage Items Other Items Floor & Citeming
Functional
Wiring
|
Junk
These items have no use or coin value. They can each be stacked up to 99 in a single inventory slot. You will only "catch" these if a lake is too small or if your Fishing Power is too low. When a lake is at least 300 tiles (200 for honey) in size or your total fishing power is at least 50 you will no longer catch junk.
| Type | Value | Rarity | Height | Biome | |
|---|---|---|---|---|---|
| Template:Il2cn | 0 | Any | Any | ||
| Template:Il2cn | 0 | Any | Any | ||
| Template:Il2cn | 0 | Any | Any | ||
Note that the Seaweed junk item should not be confused with the ![]() Seaweed pet summon item, which is not found by fishing. Although the tooltip in the
Seaweed pet summon item, which is not found by fishing. Although the tooltip in the ![]() Mobile version says that a Turtle pet is summoned upon use, this is incorrect.
Mobile version says that a Turtle pet is summoned upon use, this is incorrect.
Crafting
Used in
Template:Crafts top Template:Crafts row Template:Crafts row Template:Crafts row Template:Crafts row Template:Crafts row Template:Crafts row Template:Crafts row Template:Crafts row Template:Crafts row Template:Crafts row Template:Crafts row Template:Crafts row Template:Crafts row Template:Crafts row Template:Crafts row Template:Crafts row Template:Crafts row Template:Crafts row Template:Crafts row Template:Crafts row Template:Crafts row Template:Crafts row Template:Crafts row Template:Crafts row Template:Crafts row Template:Crafts row Template:Crafts row Template:Crafts row Template:Crafts row Template:Crafts bottom |
Mechanics
Catch Frequency
When fishing, there is a hidden catch counter which tracks your progress toward making a catch. The counter starts at 0 and increases over time. When it exceeds 660, there is a ((75 + Fishing Skill) / 2) % chance that a fish will bite, capping out at 125 Fishing Skill. The counter then resets to 0, regardless of whether or not there was a bite.
The catch counter increases every tick (there are 60 ticks per second) according to these factors:
- 1-2 points by default (average 1.5 points per tick)
- A 1 in 60 chance of 60 points (average 1 point per tick)
- Fishing Skill / 30 points per tick (e.g. 1.667 points per tick at 50 Fishing Skill)
- A (Fishing Skill / 3) % chance of increasing an additional 1-2 points (e.g. an average of 0.25 points per tick at 50 Fishing Skill)
For example, with a Fishing Skill of 125, you can expect to catch a fish around once every 1.5 seconds:
- (1.5 + 1 + (125 / 30) + 1.5 * (125 / 3)% ~= 7.29 catch counter per tick
- 660 / 7.29 ~= 90.5 ticks per bite
- 90.5 / 60 ~= 1.5 seconds per bite
Biomes
A player can be eligible for catching fish from multiple biomes at once; however, certain biomes take priority over others. The priority order is:
- Lava
- Honey
- Corruption = Crimson (when in both, there is a 50% chance of each, except for crates for which Corruption takes priorityVerify)
- Hallow
Dungeon (crates only)- Snow
- Jungle
- Mushroom
- Ocean
- Sky (Forest)
- Underground/Cavern (Forest)
- Surface (Forest)
Note that the background and music playing have a different priority order and will not necessarily match which biome is used for generating fish; for example, if Jungle music is playing but there is enough Snow nearby, you will not be able to find Jungle quest fish and will get Snow catches instead. Additionally, Mushroom Biome catches require 200 mushroom tiles nearby, which is more than is needed to display the mushroom biome background and music.
If a player is in multiple biomes but the higher priority biome does not generate a fish, the game will proceed to checking for fish in subsequent biomes. The one exception is that Corruption and Crimson biomes will skip over Hallow in subsequent checks.
Layers
The height requirement (Sky/Surface/Underground/Cavern) is set by the height of the surface of the water, not by the position of the player. This can be taken advantage of by creating two adjacent pools of water on different layers. This allows the player to fish in either while standing at the same spot.
There are five height zones for fishing (see Layers):
| Zone | Height |
|---|---|
| Sky | Fishing Surface > 50% above Surface Level to the top of the world |
| Surface | Surface Level < Fishing Surface ≤ 50% above Surface Level |
| Underground | Cavern layer < Fishing Surface ≤ Surface Level |
| Caverns | 300' above world bottom < Fishing Surface ≤ Cavern layer |
| Underworld | Fishing Surface ≤ 300' from the world bottom |
Catch Quality
There are 6 different catch quality slots for catches, each with its own associated probability:
| Catch Quality | Probability |
|---|---|
| Plentiful | Default catch |
| Common | 1 in (150 / Fishing Skill), capped at 1 in 2 |
| Uncommon | 1 in (300 / Fishing Skill), capped at 1 in 3 |
| Rare | 1 in (1050 / Fishing Skill), capped at 1 in 4 |
| Very Rare | 1 in (2250 / Fishing Skill), capped at 1 in 5 |
| Extremely Rare | 1 in (4500 / Fishing Skill), capped at 1 in 6 |
These values are rounded down. A Fishing Skill of 85, for example, would have a 1 in 52 chance of an Extremely Rare catch.
When a new fish is generated, each different catch quality is checked for success, separately from one another. For example, the Uncommon, Rare, and Very Rare rolls might all succeed, while the Common and Extremely Rare rolls fail. Then, depending on which roll(s) succeed as well as factors such as height and biome, the game will generate a fish.
With some exceptions, the highest catch quality roll that succeeded will take priority over lower catch quality slots in determining which fish a player receives. However, not every catch quality slot will contain a fish that can be caught; in that case, the game will move on to checking lower catch qualities. Success at the higher catch quality roll will not carry down to lower quality slots. For example, if the Rare roll succeeded but there is no Rare fish available to be caught, the game will move on to checking whether or not the Uncommon roll succeeded; if the Uncommon roll failed, it will move on to checking Common.
Each biome has a list of available biome-specific fish that can be caught there, based on the catch quality rolls and other factors. If no biome-specific fish is generated, the game will move on to checking subsequent, lower priority biomes. Many of the fish available in catch quality slots vary based on randomness, so succeeding at a catch quality roll in a specific biome does not guarantee that you will get a specific fish of that quality, or any fish of that quality at all. If no fish is selected for the slot, the game will proceed to check more common slots instead, and move on to subsequent biomes if and only if none of those slots contain fish either.
When fishing in water, a successful Extremely Rare roll will always check for a special catch first (Frog Leg, Balloon Pufferfish, and Zephyr Fish, in that order). If none of these checks succeed, the game will then check for biome-specific fish.
All quest fish occupy the Uncommon slot, except the Mirage Fish and Pixiefish, which are Rare.
There are only two Very Common fish: Bass and Trout. If all other checks fail and you are fishing in water, you will catch one of these by default: Trout if fishing in the Ocean, and Bass otherwise. If fishing in lava or honey, no fish will be generated and there will not be a bite.
Crates
There is a separate roll to determine if a Crate is caught, defaulting to 10% (or 20% with a Crate Potion active). An Extremely Rare or Very Rare catch will generate a Golden Crate, a Rare catch will generate a biome-specific crate (if applicable, otherwise it will generate an Iron Crate), an Uncommon catch will generate an Iron Crate, and a Wooden Crate otherwise. Fishing in lava or honey will never generate a crate.
Stack Sizes
Stackable fish (i.e. Bomb Fish and Frost Daggerfish) generate in stacks that vary based on your Fishing Skill. These can vary significantly, with higher Fishing Skill levels generating higher minimum stack sizes as well as significantly higher maximum stack sizes.
Notes
- For pre-hardmode players, fishing can be a good way of earning money.
- The bobber will move two or three times per bite, after which the fish will go away, but the line will remain cast. As long as the reel-in occurs before this animation ends, the timing of the click doesn't affect the quality of the catch (the Sonar Potion shows this plainly).
- It is possible to get a day's quest fish without having asked the Angler about it, though that would be a lucky event since the player won't know where to fish for it. Taking it to him will then successfully complete the quest.
- Time must pass naturally from 04:29-04:30 (new day) before another quest begins.
- However, with an Enchanted Sundial, you can get a new quest immediately.
- The maximum possible fishing power is 282.
- Crate contents are determined upon opening them. Crates caught in normal mode can therefore yield Hardmode items when stockpiled and opened in Hardmode.
- Ocean-only catches, including the Capn' Tunabeard quest fish, cannot be obtained from a Hallowed or Corrupted Ocean shoreline, but may be obtainable further out towards the map edge, where Corrupted or Hallowed sand is farther from the water surface. When the Ocean Biome music plays, Ocean fish can be caught.
- Possible catches are determined by the biome that the player is currently within, rather than the biome the liquid body is in.
- However, the height of the bobber is what determines the height requirements of the catch, not the height of the player.
- There are a total of 16 different fishing locations that can yield distinct catches: Surface: Forest, Ocean, Jungle, Corruption, Crimson, Hallow, Snow, Honey; Underground: Forest, Snow, Hallow, Jungle; Cavern: Snow + Hallow/Corruption/Crimson; Floating Island; Any Layer: Lava, Mushroom.
- On the 3DS version, you can catch many different fish in the Ocean Biome, even those not native to it, including the Jewelfish and Golden Carp.
Tips
- There are a number of decent ways to collect bait, and the presence of NPCs will shift to Critter spawning allowing for large amounts of bait to be collected in relative safety.:
- The Forest in general seems to be the best biome for bait:
- When it rains, Worms are plentiful (and collecting large numbers will also net the player some Gold Worms).
- Once you have surplus Fallen Stars, you can enhance your worms into Enchanted Nightcrawlers.
- Fireflies have somewhat less bait power, but are especially common on new moon nights.
- In the Hallow, Lightning Bugs will replace Fireflies -- these have better bait value, and also swarm at the new moon.
- Some Butterflies also have good bait values, higher than the Worm's 25%.
- Wearing Flower Boots (obtained from a Jungle Shrine) and destroying the plants spawned by the boots will generate many Worms and Grasshoppers.
- Shooting a Flare Gun at the player's feet can produce a massive stream of bait creatures.
- In the Jungle, a "grass farm" will provide many large plants, many of which will drop bait when destroyed. Sluggy matches the Worm's bait value, and Buggy is even better.
- Water Candles and Battle Potions can be used to increase the spawn rate of critters, while the NPCs still prevent enemy spawns.
- A Crate Potion will increase the number of crates a player catches, which will include Journeyman Bait and Master Bait. With a very high fishing power (Master Bait, Golden Fishing Rod, along with fishing buffs and equipment) the player can have a net gain of Master Bait from the crates obtained.
- The Angler himself will also reward the player with bait.
- The Forest in general seems to be the best biome for bait:
- With Worms and a Reinforced Fishing Pole, the player's base fishing power will be 40. The player will catch a fair bit of junk, especially during the "bad" times of day and near the new moon. However, their odds can be improved by focusing on the "good" times during the daily peaks before dawn and after dusk, during rain, and near the full moon.
- The Angler gives six different accessories as rewards, but with the Tinkerer's Workshop those can be combined into one functional and one informational accessory:
- The Tackle Box, High Test Fishing Line, and Angler Earring combine into the Angler Tackle Bag. Note that the Tackle Bag can stack its fishing-power bonus with another Angler Earring.
- The Fisherman's Pocket Guide, Weather Radio, and Sextant combine into the Fish Finder. This in turn is one component of the PDA, which can then be crafted into the Cell Phone.
- Use of a Sonar Potion can save time and bait, by pulling in only crates and the desired fish.
- However, with high enough fishing skill, it may actually be faster to pull in a catch and cast again immediately, than to wait out an unwanted catch.
- It is even faster to change to a different weapon, then back to the rod and cast again, as soon as the player sees an unwanted item - but there is a risk of accidentally discarding good catches this way!
- If a player gets no bites at all, they should check if they still have bait in their inventory. In Hardmode, make sure the Truffle Worm is not the first (upper-left) bait item -- if it is, move it so a real bait item is first.
- While quest fish cannot be fished or picked up (from the ground) when that fish is already in the player's inventory, it's easy enough to stash the fish in a Chest, Piggy Bank, or suchlike, and take it back when the player is done fishing (duplicates can be taken out of a chest). This trick is useful since quests often repeat. However, note that quest fish do not stack.
- One pre-hardmode way to tell if it's a full moon, and thus an ideal night to fish, would be to use a Deathweed's blooming as an indicator. A Deathweed only blooms under either a full moon or a Blood Moon, therefore (unless a Blood Moon is currently occurring) if a potted Deathweed is in bloom, it means the Moon is full. (Note that the herb must also be full-grown!)
- Once the player has plentiful ore and bait, it's a good idea to save crates for opening in Hardmode, when crates drop hardmode ores and bars. This can make it substantially less difficult to start Hardmode, especially in an Expert world.
- In multiplayer, the daily quest is the same for every character. Since the quest fish can be stored in a chest, use one character to fish up and piggy bank the quest fish, and then fish up another and bank it over and over, then move the fish from the piggy bank to a chest back in the house. Then use other characters to log in, grab the fish, and complete the quest. Rather than making different worlds to do the daily quest, a player can use different characters to drastically increase the number of fishing completes per in-game day.
Trivia
- The Neon Tetra and Golden Carp have no use, aside from their coin value. The Golden Carp is especially valuable at 10.
- The Clownfish quest description is a reference to the 2003 Pixar film, Finding Nemo.
- The Batfish quest description is a reference to the iconic Batman Theme.
- The Double Cod is required to make an Ammo Reservation Potion, possibly a reference to the acronym for the popular first-person shooter Call of Duty.
History
- Desktop 1.3.0.5: Seedler can no longer be obtained through fishing.
- Desktop 1.3.0.4: Loot from fishing is now properly highlighted in highlight system.
- Desktop 1.3.0.1:
- Added Jungle Crate, Sky Crate, Corrupt Crate, Crimson Crate, Hallowed Crate, and Dungeon Crate.
- Sky quest fish can no longer be found on the surface.
- Reduced the number of water tiles needed to fish successfully in the sky.
- Desktop 1.2.4.1:
- Fixed bug where repeated clicks after your line broke would nevertheless produce a catch.
- Fixed bug causing Seaweed (junk) to turn into Seaweed (pet item) if in the inventory of a dying Mediumcore character (the Seaweed now simply disappears).
- Desktop 1.2.4: Introduced.
- Console 1.07 Holiday Update: Introduced fishing, including Fishing Poles, 24 various fish (and fish recipes), various tools, weapons, accessories, and junk that can be "caught", Scaly Truffle (mount), Zephyr Fish (pet), crates (Wooden, Iron, and Golden), jellyfish bait (Blue, Green, and Pink), crafted Jellyfish Jars, the Angler NPC, various fishing gear, fishing quests, and fishing quest rewards.
- 3DS-Release: Introduced.
Template:Navbox Template:Translation project