This Guide covers all Events currently implemented in Terraria up until 1.3.5.3.
Blood Moon
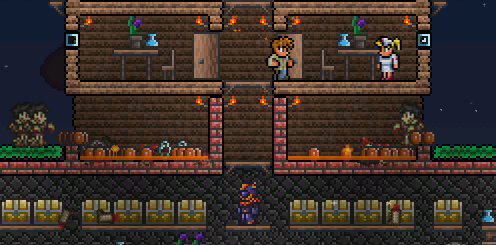
Blood Moons are events that have a 1/10 chance of occuring each night once the Player has 120 life or more, and can be a hassle for newer players who are caught unaware. Not only does the monster spawn rate increase dramatically during a Blood Moon, but the maximum amount of enemies that can be on screen also rises significantly, allowing swarms of enemies to appear at one time. Additionally, monster spawns completely ignore reduced spawn rates by way of NPCs. Zombies can break open doors during this event, posing significant danger to NPCs inside houses.
However, there are ways to profit from Blood Moons if one is prepared, especially thanks to rare spawns such as The Groom.
Generally, Blood Moons can be done safely through by simply staying in your base, as long as all doors are either prevented from opening inwards or simply barricaded by blocks.
In Hardmode, Clowns will spawn during the Blood Moon.
Goblin Army
Goblins will appear at the spawn point and kill any NPCs they find. They will continually spawn until the progress bar is full, at which they are defeated. They can be spawned by using the ![]() Goblin Battle Standard, or with a 1/20 chance at dawn by smashing at least one
Goblin Battle Standard, or with a 1/20 chance at dawn by smashing at least one ![]() Shadow Orb /
Shadow Orb / ![]() Crimson Heart and one player with at least 200 HP.
Crimson Heart and one player with at least 200 HP.
This group has multiple types of units with different attack patterns, so strategies for dealing with them will differ depending on the type of goblin.
- The Goblin Sorcerer will teleport no matter where the player(s) are and will shoot a projectile at you.
- The Goblin Thief is a fast paced enemy that can jump high and open doors faster than other goblins.
- The Goblin Peon is 2 blocks tall and can destroy doors.
- The Goblin Warrior has more health and does more contact damage to players.
- The Goblin Archer will shoot wooden arrows at the player(s).
- The Goblin Summoner is a Hardmode-exclusive mini Boss that is much stronger than the others, and drops unique loot.
If the player is strong enough to easily handle the goblins, a long, flat field near the base would be the best place to deal with the army, as it would be close enough to the spawn point to appear while keeping the goblins away from the NPCs. Weapons that can do damage to multiple enemies at once such as the Space Gun or Jester's Arrows are useful for taking out crowds.
Digging a pit on both sides of your base is a simple but effective way of holding back most of the goblins, save for sorcerer and archer goblins. Just simply dig a hole five deep by six wide or dig the pit next to a wall so when the goblins try to jump the pit they will hit the wall and fall into the pit. The downside to using a pit by itself, (without lava or other traps), is that after taking out the sorcerers and archers you still need to take care of the goblins in the pit. However, you can use the Spiky Balls dropped from the goblins you already killed and throw them into the pit to take them out from a safe distance.
Old One's Army
Pirate Invasion
The Pirate Invasion is the Hardmode version of the Goblin Army at it's simplest. It can be spawned:
- By smashing at least one
 Demon Altar /
  Crimson Altar and then it has ~4% chance to happen if it has yet to be defeated, subsequently having a ~2% chance to happen;
 - Use
 Pirate Map.
A step up from goblins, these guys will give you a hard time if you don't know how to effectively deal with them. The Pirate Invasion has multiple types of units with different attack patterns. The event currently contains six (seven on PC, Console, Mobile, Old Chinese, tModLoader, and tModLoader Legacy) enemies:
- The Pirate Crossbower;
- The Parrot;
- The Pirate Deckhand;
- The Pirate Deadeye;
- The Pirate Corsair;
- The Pirate Captain;
- The Flying Dutchman
.
If you want to face the pirates head-on you must be prepared. Defeating these pirates is not an easy feat for a fresh hardmode player: you will want to use weapons that pierces multiple enemies at once, such as Jester's Arrows or the Magical Harp. Alternatively, you can make sure the Pirates stay below you, with you on a wooden platform. Then use a powerful Spear to slay the attackers. If you have the Clockwork Assault Rifle, it is a good tactic to continually fly over the pirates and shoot at them.
When a Captain appears, focus all of your attention on him, because he will stop attacking when damaged.
On the PC, Console, Mobile, Old Chinese, tModLoader, and tModLoader Legacy versions, the Flying Dutchman will rain down cannonballs on you while spawning more of the basic Pirates. To defeat it, stand next to it and use a piercing weapon to hit multiple Cannons at once. When you take out all 4 cannons, the ship will explode.
Solar Eclipse
The monsters spawned during a Solar Eclipse are very powerful. The Reaper acts similarly to a Wraith, but with higher stats. The Swamp Things are extremely fast, and they are as common as zombies. Vampires are equally as common as zombies, and can turn into bats if the player is above them. Eyezors are not very common during a Solar Eclipse, but they can shoot lasers from their eyes, making them formidable enemies. They are slightly faster than regular zombies. Frankensteins are common as zombies, but move much faster.
The Solar Eclipse strategy is simple to understand. Every enemy but the Reapers and Vampires use standard Fighter AI, and even have the same jump range as basic Zombies and Goblins. They will walk into pits just like any other zombie. Lava pit traps will destroy the whole invasion force but the reapers. Hence, the easiest way to nullify most of the threat is to dig a simple tunnel underneath a small lava pit on some leveled terrain, while collecting all the drops. That allows players to simply focus on fighting the Reapers and Mothrons if all three Mechanical Bosses have been defeated.
However, as of 1.3, this event is significantly more dangerous, especially after the bosses are defeated, as more powerful enemies will spawn, though the drops are also worth the trouble. Mothrons are considered mini-bosses, so always prioritize them when they spawn. Nailheads and Dr. Man Flies should be tackled at range. Nailheads have 4000 health (8000 in expert mode), but their nails are far less damaging than touching them. While Dr. Man Flies have less health, their flasks deal heavy area damage and serve as a constant distraction. Deadly Spheres, as their name implies, should be taken with care due to their small size, high damage and defense. Failing to do so often results in serious hits, if not death. Butchers and Psychos, while only having melee range, are not to be underestimated as they can chip off quite some health if left unhindered.
Another strategy consists of using Wings to fly above enemies and hitting them with debuff-inflicting weapons, such as Cursed Flames, and then hitting them with a stronger weapon to finish them off. It is preferred to use a Daedalus Stormbow with Cursed Arrows and a Meteor Staff to destroy the enemies. This does require some mana potions but works effectively if you don't want or need an arena.
Frost Legion
There are three unique monsters in the Frost Legion, named Mister Stabby, Snowman Gangsta, and Snow Balla. The Frost Legion does not happen on its own. The player has to obtain a Snow Globe from a Present to summon them. The summon item can only be obtained in Hardmode, but the Legion can still be summoned and defeated in a non-Hardmode world. Mister Stabby is a threat due to his high contact damage, and it is suggested to fight the entire event with ranged weapons. However, the enemies deal medium to high damage, so sets with a higher defense value are suggested.
For the Frost Legion, if you're far enough underground, then the snowmen won't spawn, even after getting the message that they've arrived, so you don't have to head back to your house immediately upon receiving message of an imminent attack. However, they will remain and will appear if you surface. The Snowmen are incapable of jumping down from simple wooden platforms, meaning it is possible to construct a basic trench with a wooden platform above it, and be completely out of harms way.
If you place lava pits on either side of your house, you can defeat most of the snowmen that spawn, however, Snow Ballas may block up the traps, inhibiting the trap from killing any more snowmen. Filling the empty space of any traps with Wooden Beams will prevent Snow Ballas from blocking up the traps. The beams occupy the same layer as other furniture and do not block movement.
Pumpkin Moon
The Pumpkin Moon is a Hardmode Post-Plantera event, in which Halloween-themed enemies invade the world. It can only be started by crafting and using a ![]() Pumpkin Moon Medallion during night.
Pumpkin Moon Medallion during night.
Some Pumpkin Moon enemies are susceptible to the Ichor debuff, making Flask of Ichor useful in earlier waves. Towards the later waves, the player will mostly be attacking Mourning Woods and Pumpkings, which are immune to Ichor, making the debuff less useful.
It is a good idea to place Spear Traps over areas where enemies will be congregating. They work best when wired to different Timers, as a row of spears firing at the same time can only hit an enemy once.
End-game gear is highly recommended, with post-Golem or Duke Fishron weapons.
Frost Moon
The Frost Moon is a Hardmode Post-Plantera event, in which Christmas-themed enemies invade the world. It can only be started by crafting and using a ![]() Naughty Present during night.
Naughty Present during night.
Martian Madness
The smaller enemies can be easily defeated using a generic trap, one of which would be a platform above a lava pit, which may or may not have Dart Traps, or traps from the Lihzahrd, built in. It is also advisable to have some heart and/or star statues hooked up to a timer.
The only hard part about the event is the Martian Saucer. However, almost all damage from it can be avoided by simply building a roof over the player's head. Almost all of the Saucer's attacks can not go through blocks (with the exception of the rockets' AoE damage), and it will always hover a given height over the player, so a roof can easily be constructed between. All the player needs is a weapon that can go through blocks. The Blizzard Staff, or the Nettle Burst will suffice, though the Blizzard Staff is the best choice. Alternatively, minions or a yo-yo can be maneuvered around a roof, to hit the saucer. The Daedalus Stormbow can also take down the Saucer while the player stays sheltered. Since the Saucer is immune to debuff, pick arrows for damage; Holy Arrows are a good standby. If you are a summoner, you can very easily farm this event by sealing yourself in a box that is small, but not small enough so that the Martian Saucer's missiles can harm you through the walls with splash damage. If your summons cannot pass through solid blocks, then be sure to summon them outside of the box so they can reach the enemies.
An example of a lava pit, complete with heart/star statues and traps hooked up to a timer.
Lunar Events
General Strategies
General Tips
There are many things in Terraria which are not evident from the get-go, and many other things that a player would definitely do differently on a rerun of the game. It is true that much of the joy lies in exploring, but sometimes some helpful advice is in order.
Items
- If the player can't find a
 Magic Mirror or Ice Mirror
, then they can find or craftRecall Potions. They have the same effect and have a quicker use time. - The player can make a Gem Hook after getting 15 Gems of the same kind. This makes exploration of caves much easier, and it does not require a Hook, an uncommon drop from skeletons and piranhas.
- Stacks of items can be bought and crafted quickly by holding the ⚷ Interact button.
- There are a wide variety of items in Terraria. It is best to separate chests into categories. Chests containing crafting materials are best kept near the crafting station where they will be needed - one for ores and bars, next to an Anvil and Furnace; one for potion materials, next to a Placed Bottle or Alchemy Table; one for potions, one for weapons, one for equippable items next to a Tinkerer's Workshop, and one or two for miscellaneous crafting materials.
- All Piggy Banks, Safes, Defender's Forges
andVoid Vaults(collectively, "personal storage") retain their items when broken. The player can put them into their inventory and place them at any time for access. This effectively triples () / quadruples () / quintuples () the amount of items a player can carry.- The Piggy Bank requires a flat furniture surface to set on; a Work Bench or two platforms will do. In most versions, you can get the Money Trough
during a Blood Moon. This item summons a floating Piggy Bank that does not need to be placed. - In current versions, the Void Bag
similarly acts as a mobile Void Vault; it also automatically collects items into the Vault when the player's inventory is full. - If the player dies, they will lose at least half the money they are carrying, and will likely have trouble retrieving it. Regularly stash money in a Piggy Bank, Safe, etc.; when buying items a player can automatically draw on any money stashed in their personal storage.
- The Piggy Bank requires a flat furniture surface to set on; a Work Bench or two platforms will do. In most versions, you can get the
- Even with full health, Heart Crystals are still useful to craft Heart Lanterns, which provide health regeneration when placed.
- Additionally, collecting Heart Crystals wherever found, allows for the Metal Detector
to detect other, potentially more useful, items.
- Additionally, collecting Heart Crystals wherever found, allows for the
The player can place Banners around areas where their respective monsters spawn, for buffs against those monsters.Fishing up aReaver Shark from the Ocean, while possibly being time-consuming, allows the player to skip all the mandatory pre-Hardmode pickaxes – it has the same pickaxe power as the Molten Pickaxe and is faster. (In later versions the Reaver Shark has been nerfed -- still a good pickaxe, but not a sequence breaker.)- Try not to fight Voodoo Demons above lava, otherwise they will drop the Guide Voodoo Doll into it, and the Wall of Flesh will spawn. The guide has to be alive for the boss to spawn though, but this enemy is uncommon.
Mining
- With few exceptions, you should upgrade your pickaxe whenever possible: not only will better pickaxes mine blocks faster, but certain tiles (especially ores) can only be mined with stronger tools.
- The same goes for pickaxes/drills in Hardmode. They are mandatory for progressing to the next ore tier. The order is: Cobalt / Palladium, Mythril / Orichalcum, and finally Adamantite / Titanium. Adamantite and Titanium Ore should not be crafted into tools, as they do not unlock access to better ores.
- The same goes for pickaxes/drills in Hardmode. They are mandatory for progressing to the next ore tier. The order is:
- Do not jump down a large hole or cave without an extra jump, Umbrella, Featherfall Potion, Wings, or Lucky Horseshoe. If you do not have those, consider using Rope and platforms to safely descend.
- As a rule of thumb, you should not jump down terrain if you cannot see the glow of a torch or glowstick that you threw down without a way to stop falling.
- Use Spelunker Potions or throw Spelunker Glowsticks
if you're unable to find anything of value: they highlight any valuable treasure and ores that are on your screen. - Mining Potions
and theAncient Chiselincrease mining speed directly. - The Light modifier (and any other modifiers that increase the speed of the pickaxe/drill) will greatly increase the mining speed of tools.
- When the Minimap is expanded, hovering over an ore pocket will display its name next to the cursor.
- Using items that light through walls such as the Starfury and Firecracker will light up the map, allowing the player to locate and distinguish ores.
Pressing the Left Ctrl (pressing down the right joystick on Xbox) key changes your mining style to Smart Cursor, which is extremely useful for strip mining.- You can descend relatively fast by auto-focusing the mining and digging a 2-block-wide shaft.
- Using Mining Armor is useful when mining. The helmet is especially useful as it mostly eliminates the need for torches.
- For quick trips to the various layers of the world, a hellevator can be a very useful structure. Dig a vertical shaft from underneath your base down to The Underworld and consider placing Ropes or platforms to conveniently ascend and descend (note that rope is faster).
- Do not look for Hardmode ores in the Underground Corruption, Crimson, or Hallow when you first start Hardmode unless you are very confident in your skill. Instead, if you have dug one, a hellevator is a good place to start looking.
- Hardmode ores cannot be found in all layers:
- Cobalt / Palladium Ore can be found in all Underground layers;
- Mythril / Orichalcum Ore can be found in Cavern layers;
- Adamantite / Titanium Ore can only be found in the lower Cavern layer (which is where Lava replaces Water).
Combat
- For nocturnal bosses, starting the battle just after the sun sets (7:30 PM) will provide the maximum amount of time to defeat the boss. In Hardmode, the Moon Charm and/or Moon Stone and their upgrades are also useful at night.
- Boss battles can be won or lost before the battle ever starts. Choose your equipment and have it ready; find and/or make potions and placed buffs;
use the highest-tier food you have available; set up an arena appropriate to the boss; learn the strategies for the boss you're facing. - Prepare your Boss-fighting arena with adequate lighting, Campfires and Heart Lanterns for health regeneration, and Stars in Bottles for mana regeneration if you use magic. Bast Statues
will provide a significant defensive boost.Garden Gnomesand (if underground) proper torch placementwill reduce damage taken and increase damage dealt due to the luck. Note Torch God's Favor helps with this.Honey pools can also be used for extra health regeneration. - Sunflowers provide the Happy! buff to players within a 50-tile radius, which grants a +10% movement speed bonus and 17% reduction in enemy spawn rate.
- Always carry around a stack of the highest-tier healing potion available, as relying only on natural Health Regeneration is not a good idea. Depending on the game stage, this can include items such as Mushrooms or Honeyfins. On the PC, Console, Mobile, and tModLoader versions, Restoration Potions are healing potions with a shorter cooldown.
- Likewise carry mana potions, if you use Magic.
- The Strange Brew
is also an option, but its weak healing effect will trigger the Potion Sickness cooldown as well as Mana Sickness. On the Old-gen console version, Windows Phone version, Old Chinese version, Nintendo version, and tModLoader 1.3-Legacy version, Restoration Potions can save a slot, but will likewise trigger both cooldowns.
- It is suggested to build houses for the Dryad and the Nurse NPCs in your arena. The former casts the Dryad's Blessing
buff, which increases your defense and provides you with a thorns-like effect, while the latter can heal and remove debuffs instantly, at the cost of somecoins. - Bosses are displayed on the Minimap: Follow the boss's icon to track it when you're struggling to find it. You can identify the boss icons by checking their respective wiki pages.
- Once you have freed the Mechanic in the Dungeon, you can use Wire to enhance your arena with Traps and helpful Heart and Star Statues. The former helps to damage the enemies, though be careful to set them up correctly in order not to hurt yourself during the battle. The latter will spawn heart and star pickups, respectively. Connect these devices to timers.
- It may be useful to summon and kill the Eye of Cthulhu or King Slime before summoning any harder boss in order to spawn an extra one-use pool of Hearts. Note that this will prevent any Heart Statues from spawning new Hearts.
- Remember to use the Sharpening Station
,Ammo Box,Crystal Ball, Bewitching Table, andSlice of Cakebefore you go to explore or battle bosses/invasions. These will give boosts that are useful to take, with the first four being class-specific. They giveSharpened,Ammo Box,Clairvoyance, Bewitched, andSugar Rush, respectively.
Travel
- There are various items and accessories that can affect movement speed:
- The various Boots, allow the player to run faster, cutting travel time. Various upgrades provide a double-jump and other mobility features.
- Swiftness Potions are common and easily brewed, and sharply increase movement speed (for a limited time). With boots, they allow reaching sprint speed more quickly.
- The Aglet and Anklet of the Wind improve movement speed by 5% and 10%, respectively. Both stack with each other, and even with a Swiftness Potion. Once you get the Tinkerer's Workshop both accessories can be combined into Lightning Boots.
- Any accessory can provide a minor movement-speed modifier: In order of increasing speed, these modifiers include Brisk, Fleeting, Hasty, and Quick.
- Several items are used for mostly-vertical travel: Jumping, safe falling, and/or flying.
- If you can withstand screen flips, Gravitation Potions can be your best friend for vertical mobility. With precautions and practice, this can easily eliminate the need for an arena and can save you some resources to explore the Space biome.
- A Featherfall Potion or an Umbrella effectively extends flight time by causing players to fall slower; the effects are even more pronounced when holding the UP directional key. This will also eliminate all fall damage risk from using a Gravitation Potion. The Djinn's Curse
acts as a permanent Featherfall Potion when worn in the armor slot. - Several "Bottles" provide an extra jump of varying strengths: Cloud in a Bottle, Blizzard in a Bottle, Sandstorm in a Bottle,Tsunami in a Bottle
, orFart in a Jar. (Comparison)
- The bottles can be tinkered with a Shiny Red Balloon for their Balloon variants, which add fall damage protection. You can combine the Cloud, Blizzard, and Sandstorm balloons to create a Bundle of Balloons.
- The bottles can be tinkered with a
- The ascent speed of Wings can be greatly increased by equipping a Frog Leg. Balloon accessories provide a similar, though less dramatic bonus.
- If you can withstand screen flips,
- A Hook can be used to grapple across gaps, including upward and downward. On flat open areas they can be used to pull a player across the ground, by shooting it at the ground ahead and then releasing it while being pulled in. This allows the various Boots to get to full speed without having to build up beforehand.
- There are several options for teleportation, each with different limits and trade offs:
- Several items allow teleportation to the player’s spawn point: Magic Mirror/Ice Mirror, Cell Phone, Recall Potion, Potion of Return. This point defaults to the middle of the map at the surface, but the player can choose almost any other point using a bed. The Potion of Return also supplies a return portal.
- The Magic Conch allows teleporting to either seashore (the outermost standable block). The Demon Conch allows going to the middle of the Underworld, but the player may need to provide a surface there.
- The Pylons
provide a point-to-point network. You can place one pylon per major biome, plus one more for underground. Each pylon requires 2 NPCs nearby in order to work. the universal pylon works in any biome and does not require two NPCs. Their can still only be one universal pylon in a world though - Teleporters become available in Hardmode, and can be used to setup point-to-point links or complex networks. The main catch is that you need to place wire between the teleporters.
Buffs
Each player is limited to 22 active buffs and debuffs at a time (10 on 3DS), and exceeding that will cancel buffs (but not debuffs) from the left of the bar. This looks like a lot, but once you start setting up "buff stations" and summoning pets and minions, they can add up to the point where even your own potions can interfere with other buffs, let alone if an enemy hits you with a debuff. Here is a list of common buffs to consider, some of which are clearly dispensable:
- Summons: Pet, Light pet, Minion, Mount (Up to 4 buffs).
- Of these, the pet and perhaps the light pet are irrelevant in combat, so you might want to dismiss them for a major fight.
- The minion and mount are another story: Overflowing the buff/debuff bar can unexpectedly desummon them -- and then re-summoning them will eliminate some other buff that you might have been counting on! Note that mixing multiple minion types takes a slot for each type.
- Furniture: Ammo Box, Bewitching Table, Sharpening Station, Crystal Ball, Slice of Cake. Four class specific buffs, and one short-lived generic one; stick to the ones you'll actually be using.
- Area buffs: Campfire, Sunflower, Heart Lantern, Star in a Bottle, Bast Statue, Peace Candle (and/or Water Candle), Banners (any number of them count for one slot), Honey (from taking a dip or certain accessories), Dryad's Blessing. That's 5-7 general buffs that can turn on or off as you move around, another that may be unexpected, and one triggered by an NPC. Maybe don't get greedy at your arena....
- Equipment: Various accessories, and mid- to late-game armor or weapons (especially whips) can all trigger buffs at odd moments, often when you hit an enemy or take damage. Keep track of which equipment can trigger a buff.
- Food buffs count, and you'll usually have one. So does Tipsy if you use that. A Flask imbue counts too.
Loading up on the above can add up to 18-20 buffs even before you start actually fighting, and several more that can be triggered at odd moments. All this before you start drinking potions, or getting debuffed by enemies!
If you're using the "Quick buff" control, be careful what potions are in your main inventory; fishing, building, and most "mobility" potions can be stashed in the Piggy Bank or such, along with options meant for other classes. Potions such as Feather Falling, Gills, or Spelunker can be saved for situations where they're warranted, and their places on the buff bar reclaimed if needed. Many mobility and defensive potions can be replaced by accessories, other equipment, or changes in tactics. Remember that using Healing or Mana potions will also trigger a cooldown debuff, as will a Rod of Discord.
You do get one freebie: Most luck effects (ladybugs, torches, garden gnomes) do not appear on the buff/debuff list, though a Luck Potion will.
Other
- Always use Background Walls in your buildings, as they stop Enemies to spawn in those areas.
You will be getting a lot of NPCs – arrange a building that you can keep expanding; upwards is best, however Wyverns may cause problems on small worlds.- To avoid possible Corruption/Crimson contamination of NPC houses in the future, it can be helpful to dig a 4-5 block trench around them; allow yourself some extra space for tree farms.
You can right click with any Summon weapon on an enemy or boss to have your minions target it. You can tell an enemy is targeted when a purple circle appears over it and the enemy or boss starts trailing purple particles.- If your mouse has side-buttons you can rebind them to restore Health, use Buff items or to restore Mana.
- Getting started
- Practical tips
- Walkthrough
- Mining techniques
- Invasion events
Cannons
The Cannon and the Bunny Cannon, purchased from the Pirate, bring a lot of firepower to protect a base. Keep in mind that you have to be next to the cannon (and have ammunition for it) to use it effectively; when used remotely with wires the cannon's projectiles do not inflict any damage. A cannon placed on platforms cannot aim down, however firing straight up will result in the cannonball eventually falling back straight down.
Lava
Lava is a useful tool for thinning out the numbers of enemies. By placing a single bucket of lava in a sufficiently wide 1-block-deep trench, it is possible to create a pool shallow enough to kill off most enemies while preserving their loot (such traps can be tested easily by throwing cheap items into the trench—if they burn up, widen the trench). This is a common way to burn enemies to death while allowing their item drops to collect as they approach your home. Other variations include "waterfalls" of lava or even entire moats, albeit using large bodies of lava means any item drops will be destroyed as well, though it is always fun to watch zombies pour into a pit of lava in masses.
Note that enemies killed by lava will not be counted on the monster kill tallies and will not contribute to banners.
Lava Moat
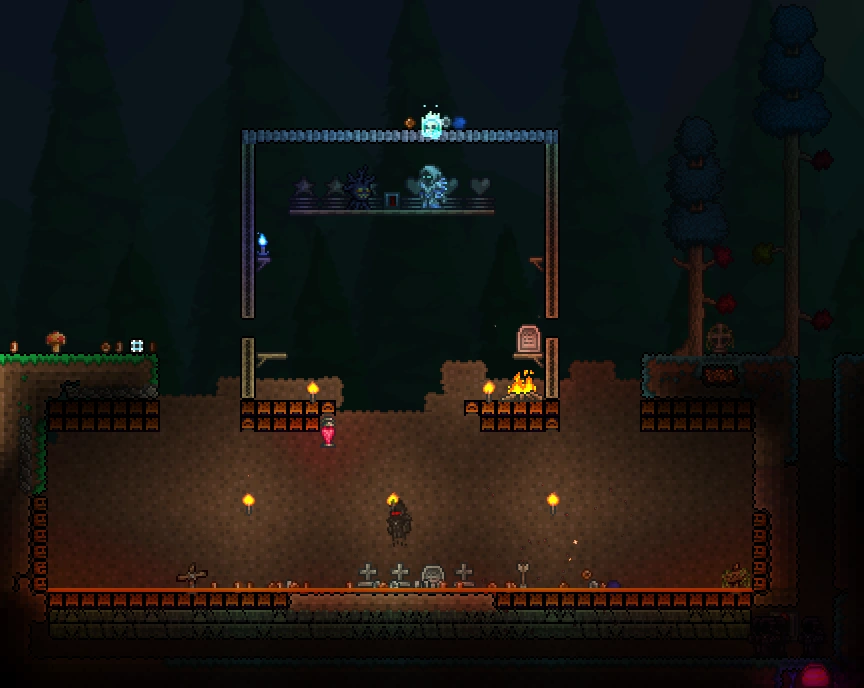
Since monsters cannot spawn on lava, you can force monsters to spawn in a reduced area to more effectively affect them with traps, sentries, and other attacks. Create a "spawn surface" ten-to-fifteen blocks wide. Surrround it by lava moats about 40 blocks wide on both sides, and fill up any nearby holes or cave. While the event is happening, make sure to keep the spawn surface out of sight, for instance by standing on a platform high enough above it. (If you have unlimited flight, a platform is still useful as a visual marker.) Since enemies are concentrated in a small area, they can be easily mowed down by traps and sentries, and since you do not have to move around a lot to fight stragglers you only need one at most of the heart lantern, star in a bottle and campfire, as well as heart statue and star statue.
Sentries
Events are the ideal situation for using sentry summons, as they are powerful but stationary defenses, and you have to defend an area. Using an armor set from the Tavernkeep to allow to summon several sentries will let you take care of most regular enemies as quickly as they arrive, allowing you to concentrate on the stronger menaces. With a Bewitching Table and a Summoning Potion you can combine sentries with a few more mobile minions for assistance. Sentries can also be combined with weapons that have a lasting area of effect, such as the Nimbus Rod and the Rainbow Gun.
Traps
Traps can be used to help damage enemies. Dart Traps can be found throughout the Underground and especially in the Dungeon, Geysers are found in the Underground, and Super Dart Traps, Flame Traps, Spear Traps, and Spiky Ball Traps are all found in the Lihzard Temple.
| Trap | Cooldown | Direction | Range | Damage | Debuff |
|---|---|---|---|---|---|
| 3.333 | Up, Down, Left, or Right | 2700 | 20 | ||
| 3.333 | Left or Right |
20 | 40 | ||
| 4.0 | Up or Down | 20 | 80 | ||
| 1.5 | Up, Down, Left, or Right | 20 | 60 | ||
| 5.0 | Up or Down |
Unlimited | 40 | ||
| 3.333 | Left or Right |
2700 | 40 |
When multiple traps are used, they should be staggered so as not to all hit at the same time: an enemy hit by a trap will be briefly invulnerable, so if a monster is hit by two simultaneous darts, only one will damage it.
Dart Traps and Super Dart Traps can protect the sides of your base from low-level threats, such as the Blood Moon zombies, especially if rigged to automatic activation mechanisms (such as Timers, or Pressure Plates in an engine). Flame Traps, Geysers, Spear Traps, and Spiky Ball Traps are more powerful but are best used with methods to keep enemies clustered in a small area, such as a death pit, a hole deep enough that they cannot jump out. A thin layer of lava at the bottom of the death pit will make it even more efficient. To protect Town NPCs and critters, the death pit can be covered by actuated blocks, allowing to quickly open or close it by flicking a switch.
Traps can be placed in the background by using Actuators, actuating them once, then removing the actuators so that further activations will not place them back in the foreground. This is useful for staggering traps, as a background traps will not block the path of another trap's dart, spear, spiky balls, or flames.
Note that enemies killed by traps will not be counted on the monster kill tallies and will not contribute to banners.
Active Stone Blocks and Actuators
If you have the mechanic it's easy. Place the active stone block one side of the door and wire it to a switch. It will block zombies,most goblins, and if you're quick, even Swamp Things. You could even make the "door" out of active blocks and turn them off when you need to go through. The same effect can be achieved with actuators.
By using actuators and Grey, Brown, Blue or Lihzahrd pressure plates, you can create a player only door that doesn't even require you to use your cursor. Set up the door as you would an active stone/actuator door and because Grey, Brown, Blue or Lihzahrd pressure plates can only be activated by the player nothing else is able to enter (Or escape). This also works with active stone blocks, which will not look at all weird if your house is made of stone!
Tower of Death
If you are in hardmode and have acquired the Nimbus Rod and Wings or anything that allows flight, there's a very efficient and safe way to farm or survive most of these events by making a tall tower, 20 blocks or higher,at least 4 blocks wide, with two entrances from the ground for enemies to come in. At the top of the tower(inside), fly to the top (don't end up killing yourself by using rod of discord), and place some Platforms right under you, enough to cover the width of the tower. Place some torches, if needed. Whenever an event occurs, go to this tower, stand there, constantly summon the clouds, and watch as enemies walk in to their miseries. Note: this method is not perfect, but would cover most of the harms during an event, especially in hardmode. This is very useful during Solar Eclipses, considering you need to worry about the Reapers. The Crimson Rod is not recommended for hardmode Events because of it's low damage output. This also works well with the Water Candle and Battle Potions, if you don't mind the risks of higher spawn rates. You can also make some add-ons to the entrances, making them extend outwards to keep out flying enemies, except the Reapers and wraiths, but due to their movement, they still pose little threat to your tower.
Invincibility Machine

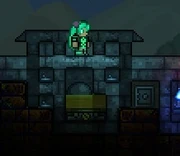
Image of the invincibility machine (not in use).
This technique involves overriding all forms of damage with the temporary invincibility granted when damage is taken from a weak enemy such as a statue-spawned slime. This is useful when dealing with Moon events, such as the Pumpkin Moon and Frost Moon, though it also works against bosses (with the exception of the Moon Lord, for whom special measures were put in place to prevent this). The machine fails if the protective slime is killed.
The machine consists of a small 5x6 box half-filled with Honey, such that the player will receive the Honey Regeneration buff, but without drowning. A Teleporter provides an easy way into the machine, and various switches are available to toggle traps and the actuated spawn surface. The Teleporter is optional; you could just actuate yourself in from the top.
It's important to note that the machine will only work if the protective slime is the oldest enemy on-screen. This way, the slimes spawned from the statue will have damage priority over any other mobs that spawn thereafter. Lastly, reactivate the spawn surface before starting the event. If any NPC is killed while the machine is in use, then it will fail.
The downside of an invincibility machine is that the player's options become limited. Generally, the best approach is to use a summoner build with the highest-damage summoning armor available and five damage-increasing accessories (Summoner Emblem, Papyrus Scarab, Necromantic Scroll, Hercules Beetle, and Avenger Emblem - all with the Menacing Modifier). Most summoning weapons can attack enemies outside while preserving the protective slime. The exceptions are the Tempest Staff, Stardust Dragon Staff, and Rainbow Crystal Staff. The Stardust Guardian will kill the slime if placed too close to the player, but it is okay to summon it at a distance.
One of the few weapons that can be used from within the box is the Blizzard Staff, as its projectiles cannot enter the invincibility machine. The Meteor Staff can be used the same way, but the box must be constructed with a thicker ceiling, because the explosions can potentially kill the slime. Spears cannot be used, as the slime will periodically jump near the player's head area and enter the damage hitbox of the spear. In the late game, one can also set up a Staff of the Frost Hydra and Lunar Portal Staff for free damage. The Lunar Flare may be used to eliminate faraway enemies to either side, but any explosion that occurs too close to the machine will kill the slime. It also might not be a bad idea (if the player does not have the Cobalt Shield or any of its upgrades) to grapple to the side of the machine, because being knocked around by a slime is a little bit annoying (though it won't compromise the integrity of the machine). You can also simply place two target dummies next to each other, then build a row of any kind of block (with the the exception of falling blocks and platforms) 8 tiles above the ground you put the target dummies on. Next step: get yourself a slimy saddle, and hop on the target dummies. Be careful not to hit the dummies with any weapons. Besides, you won't need weapons anyways. The slime will damage anything that hovers close to your player.
A better option may be is to place 2 target dummies close to each other then placing any blocks 4 blocks above the dummies. Now ride the slimy saddle and you will be invincible to most attacks. When a player bounces onto an enemy while riding a slimy saddle, both player and the enemy will gain an invincibility frame. Since the enemy gains a longer invincibility frame, by setting up two target dummies, you will always be invincible. Just do not use any piercing damage or else you will fall and you will take damage. Note that this tactic does not work for the Moon Lord and the dungeon guardian.
Another idea would be to set up a teleporter circuit that constantly teleports you between rooms with heart statues lined up on the walls in each. This could also be combined with the idea above. With this setup, the player could teleport around, avoiding attacks and healing while under the immunity of the slime's attacks. However, this would make the project harder to set up as the player would have to build multiple copies of each room.
- Getting started
- Practical tips
- Walkthrough
- Mining techniques
- Invasion events