Terraria diyarına hoş geldiniz! Kimse başlangıçta ne yapacağını bilmez, ama biz sizi düşünerek oyuna başladığında neler yapabileceğinizi gösteren bu rehberi hazırladık. Bu rehberi hazırlamamızdaki diğer amaç ise, Terraria hakkında hiçbir bilgisi olmayan birini, bir Terraria avcısı haline getirmekti!
Karakter ve dünya yaratma
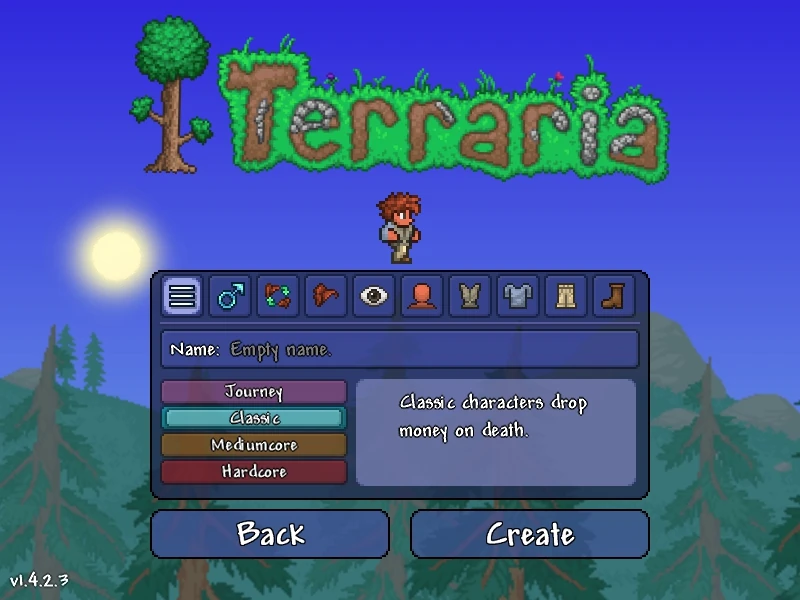
Karakter yaratma ekranı
Karakter yaratabilmek için, oyuncu önce bir oyun modu seçmelidir: Tek Kişilik veya Çok Kişili. Eğer oyuncu Terraria'yı ilk defa oynuyorsa, tek kişilik modu seçmesi önerilir. Oyun modu seçildikten sonra; karakter yaratmak için Karakter Yarat tuşuna basılmalıdır.
Karakter yaratma bölümüne girildiğinde; karşınıza dört seçenek çıkar: Saç, Gözler, Ten, ve Giysiler. Toplamda 36 adet renkleri değiştirebiliren Saç Şekli vardır. Giysiler menüsünde dört seçenek vardır. Ancak bu ayarlar oyuna estetiksel bir görüntü katmak haricinde bir işe yaramaz. Kıyafetlerin rengini seçmek için, Kırmızı/Yeşil/Mavi (RGB) değerlerine, 0 ile 255 arasında bir sayı girilmelidir. Örneğin, beyaz rengini elde etmek için, değerler Kırmızı: 255, Yeşil: 255, Mavi: 255 olmalıdır. Yine de, bütün slotların değerleri toplamı en az 254 olmalıdır. Ek olarak, cinsiyetinizi seçmelisiniz. Şu an dişi ile erkek arasındaki tek fark, hasar aldıkları zaman çıkardıkları sestir. Bunların ardından, oyunun zorluk seviyesini seçmelisiniz. Eğer ilk karakterinizi yaratıyorsanız, doğal olarak, SoftCore en kolayıdır. Ve son olarak, karakter isminizi seçiniz.
Artık dünyanızı yaratabilirsiniz. Ama daha önce dünyanın büyüklüğünü seçmek zorundasınız: Küçük, Orta, veya Büyük.
- Küçük boyutlu dünyalar derli topludur. Okyanuslar başlangıç noktasına daha yakındır, ve dünya derin değildir. Bozulmalar sadece bir iki yerde meydana gelir.
- Orta boyutlu dünyalar her şeye tam orantılıdır. Dünyanın bir ucundan diğer ucuna gitmek neredeyse bir oyun-içi gün sürecektir, tabii bu karakterin nasıl giyindiğine göre değişebilir. Bozulmalar iki veya üç yerde gerçekleşir.
- Büyük boyutlu dünyalar adı üstünde kocamandır. Haritanın en derinine gitmek için bayağı bir süre gerekir, ve okyanuslar arası gidip gelebilmek günler alabilir. Bozulmalar üç veya dört yerde oluşur.
Ve son olarak, dünyanıza bir isim verin. Bunu da bitirince, Terraria oynamaya başlayabilirsiniz!
Yeni bir dünyada başlamak
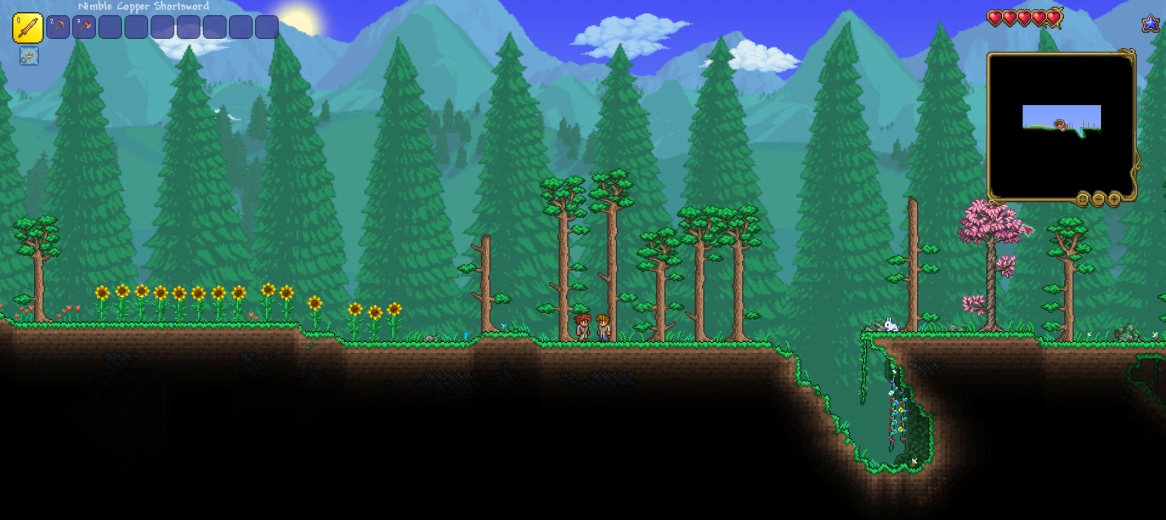
A sample Terraria world
Bir dünyaya girdiğinizde karakteriniz toprak üstünde, genelde ağaçlarla çevrili bir yerde ortaya çıkacaktır. Bu nokta siz başlangıç noktasını değiştirene kadar, oyunu açıp belirli bir dünyaya girdiğiniz her seferinde başlangıç noktanız olacaktır.
Karakteriniz
Ekranın sol üst köşesinde on adet kutu bulunur. Bu kutular envanter slotlarını temsil eder. Her bir kutu birden sıfıra kadar olan numaralarla, farenin orta tuşuyla veya kutulara tıklayarak değiştirilebilir. Esc tuşuna basıldığında, envanterin geri kalanı da gözükecektir. Eğer otomatik-duraklama özelliği aktif ise (normalde aktif değildir), oyun envanterinize her ulaştığınızda duraklayacaktır.
Numaralarla değiştirilen eşyaları düzenlemek veya değiştirmek için, envanteri açın ve kullanmak istediğiniz eşyaya tıklayın. Daha sonra hotbardaki kaldırmak istediğiniz eşyanın üzerine tıklayın. Kullanmak istediğiniz eşya hotbarda yerini alacak, çıkardığınız eşya ise elinizde kalacaktır. Bu eşyayı boş olan envanter slotlarından birine koyabilirsiniz. Bu işlem silah ve kürek gibi eşyaları kolay erişilebilir kutulara koymak için iyi bir yöntemdir.
Envanterin karşısında kalpler karakterin sağlığını temsil eder, başlangıçta karakterinizin en fazla 100 sağlık puanı olabilir. Her bir kalp 20 sağlık puanını temsil eder. Karakter sağlık puanı kaybettikçe, kalpler teker teker yavaşça solmaya başlar. Eğer belli bir süre boyunca hasar almazsanız, iyileşmeye başlarsınız. Ne kadar uzun süre hasar almazsanız, o kadar hızlı iyileşirsiniz. Ayrıca hareket etmez iken de daha hızlı iyileşirsiniz.
The lower left section of the inventory screen is the crafting interface, and the lower right section contains the equipment slots. As you craft and equip armor and other accessories, you may see an increase in the defense value displayed here. Since the game is not in the same vein as traditional CRPGs there is no experience meter and thus no "leveling up" mechanics; your character's strength and abilities depend almost entirely on your equipment.
Movement in the game is done by using A (to go left) and D (to go right). The space bar is used for jumping. Q will throw the currently selected item to the ground (it may fall into a hole, so be careful). These buttons can be customized in the settings menu before entering a world. For a quick recap of the available keys please refer to the game controls page.
By default new characters will start with the following tools in their hotbar slots: a Copper Pickaxe, a Copper Axe and a Copper Shortsword . The pickaxe is used to dig up dirt and stone, which are the most common types of materials that can be dug up. It can also be used to dig many more block types. The axe is mainly used for chopping down trees. The sword is used for fending off mobs, especially slimes. If you are missing these items, you will have to make a new character or give yourself them.
First things first
During the first day, it is best to cut down some trees immediately and start storing wood. If an enemy approaches you simply turn towards it and swing your weapon at it. At this point it is unlikely to be anything other than a slime so a few hits should suffice to kill it. More information about the combat system will be explained in detail later.
It has probably not escaped your attention that another character appeared somewhere nearby your character when you first entered the world. This is the NPC (Non-Player Character) known as the Guide. You can interact with him just like with every other NPC by right-clicking your cursor on him, although you need to move your character close enough that a speech bubble appears above the Guide's head when you move your mouse cursor over him. This is true for interacting with any NPC (as well as for reading signs).
As his name suggests, the role of the Guide is to give you useful tips for playing the game. You can't actually ask him questions - he just reels off tips in a predetermined order from a list which will repeat once he reaches the last tip. As a bonus he is the first NPC you can build a house for. You can also talk to him and click Crafting and put any item in the slot to see what you can craft with it.
İlk Eviniz
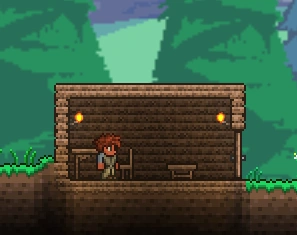
A basic house for the first night in Terraria
100 e yakın odun topladıysanız,ev inşa etmenin zamanı geldi demektir. Güzel bir yer bulun ve Bakır Kazmanızla o alanı düzleştirin. Eğer yolunuzda bir çukur varsa; encanterinizi açın ve toprak veya taşı elinize alın. Blokların koyulabilmesi için bir duvara yada bitişiklerinde bir bloğa ihtiyaçları vardır.
Düz bir alan yapmayı bitirdiğinizde; odunu elinize alın. Sonra zemini, duvarı, tavanı (Karakterinizin sığabilmesine dikkat edin), ve üç boşlukla (karakterin büyüklüğü) birlikte başka bir duvar. gap left between it and the floor. This is the frame of the house. If a piece of wood is misplaced somewhere, simply use the axe to chop it out. Wood chopped like this does not disappear and can be picked up again.
It's time to do some crafting. Push escape and look down at the bottom left corner. This is the crafting corner and will changed based upon which crafting stations the character is close to. There are two or three things available at this time: Torches (If there is any Gel available which comes from killing slimes), Wood Platforms, and a Workbench. The workbench is an important crafting tool. To make one, simply click it once or scroll using the mouse wheel to select it, and one more to make it. Drag the newly crafted item to the hot bar and select it. Click a spot in the home to set it. Now when pushing escape, there will be quite a few more crafting items available as long as the character is next to the workbench. Clicking and holding the right mouse button on the item to craft allows creating a large number of similar items.
A Door is needed to protect the house. Open the inventory while standing next to the workbench. There will be many craftable items, but a door is what is needed. Moving through the crafting menu can be done in two ways: Click the item furthest on the list to bring it to the middle and then repeat, or use the mouse scroll wheel to go through the menu. About four items up there is a wooden door. Select it and make it, then once again drag it to the hot bar.
To place the door, head to the three space opening that we left on one wall, and place the door there. Once placed, it can be opened by right clicking on it. To shut the door, simply right click on it again. Doors cannot be opened by enemies except for very specific events (Blood moons or Goblin Invasions which happen rarely).
To finally get the house secure, it's time to make some backwalls. Without backwalls, monsters are free to spawn inside the home. To craft backwalls, walk up to a workbench and build either wood walls, stone walls, or dirt walls. Quite a bit is needed, so don't be afraid to build 60 or 70 backwalls.
If during the building process a hill was leveled notice how the back Dirt Wall is still visible. Naturally occurring Dirt Walls do not count for protection, unlike ones you create. In order for us to remove it we must make a hammer; which requires the workbench. Once crafted, it can be used to remove the dirt backwalls left behind as well as furniture. If the workbench is hit by the hammer; simply replace it down once removing the backwalls are done. Backwalls work differently than other blocks by overlapping with themselves and going through other blocks. Simply place the walls until all sides of the house are filled, and all cracks in the wall are filled. Note that the walls do not have to go outside the building itself.
This house is now considered safe: Monsters cannot spawn in it. Now it's time to do some exploring (and killing!)
Defending your home
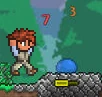
The red numbers are the damage dealt to the character; the orange numbers are the damage done to monsters
The battle system in Terraria is simple. When wielding a tool or weapon, left click will cause the weapon to swing or be thrown (in the case of a Shuriken). This means you may attack mobs even with an axe or a hammer, but a dedicated weapon is usually the best. Using just wood, you can create a Wooden Sword at your Workbench to replace your Copper Shortsword. The Wooden Sword, like other longswords, is swung overhand in an arc rather than just being stabbed forward. This allows it to protect you from far more angles of attack, which is important as Slimes move by jumping around and may often attack from above. In addition, the Wooden Sword deals more damage as well.
Depending on the time of day, there will be different kinds of enemies. Slimes are prevalent during the day hours, and will drop Gels, which are used to create Torches. It's a good idea to keep a few of these handy, as when night falls the screen will only show places lit by light. They can also be placed on blocks, which will permanently illuminate the surrounding area (range may differ based on surrounding terrain, obstructions, etc.) until either removed by the player or detached by a water flow.
At night, two different monsters will spawn in place of the slimes: Zombies and Demon Eyes. Zombies are aggressive and will try to get to the character whenever they can. They may drop Shackles, which are an Accessory. When put into an Accessory slot, they give one Defense. Demon Eyes will float around and occasionally try to ram the character. They will drop Lenses, which are useful for later down the road. If you manage to collect 2 lenses you can craft a pair of Goggles, which is likely to be your very first headgear; it gives one defense.
All monsters in the game drop Coins. The three monsters listed above will drop a few Copper Coins and rarely some Silver Coins, which are used later to buy supplies from NPCs.
Taking damage and dying will be an inevitable part of early life in Terraria. At the start of the game a good way to gain health is by eating Mushrooms. When a mushroom is found simply swing a weapon or a tool at it. It can then be picked up and consumed to recover 15 health. Consumables like these have a 60 second cooldown between uses, so it's a good idea to keep the character's health as high as you can.
The punishment for death depends on the difficulty you chose before you started. In softcore, you will drop coins, in mediumcore, you will drop items, and in hardcore, your character will die permanently. All coins and items are merely dropped, and thus can be retrieved later on (so best be careful when exploring far from the spawn point, or deep underground where it may be difficult to return to). The effects of death can be lessened by periodically depositing all money and items into a Chest or a Piggy Bank at your home, where it will be kept safely regardless of an unfortunate demise.
Blood Moons are random events that can happen anytime night is approaching and it isn't a new moon. Players are notified of this with the message 'The Blood Moon is rising...'. During this time, zombies will swarm in greater numbers and will have the ability to open doors. To safely wait out a Blood Moon, just place a block on the inside of the door. Zombies cannot destroy blocks, so they will not be able to get in. Additionaly putting furniture around doors can prevent zombies from entering. The Blood Moon article has more strategies for offense as well as more tips on defense.
The mining adventure

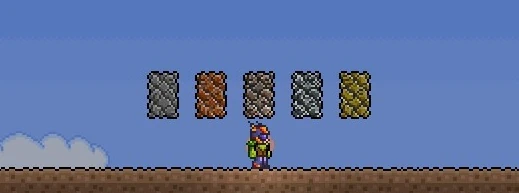
1. Ore types from left to right:Stone, Copper, Iron, Silver and Gold

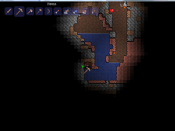
2. Digging out an air pocket.

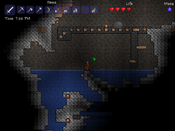
3. A gapped bridge, also a Mother Slime.
It's time to begin the wonderful process that is getting upgrades, as there are no advancement paths apart from the power that comes from better gear. However, a Workbench will not be enough to craft our gear; a Furnace is needed. A Furnace will serve to transform Ore into Bars; which are the main building materials of weapons, tool, and armor. Venture out and find deposits of Stone, and mine up at least 20 blocks of stone. Torches are also needed for creating a Furnace, so make sure to kill a few slimes to get a bit of Gel. Finally, a small bit of Wood is all that's needed. Head to the Workbench and craft a Furnace, then place it down.
Ore is a fundamental part of Terraria, and in order to reach the higher sections of the game one must forge and create a ton of Bars. While exploring the world; keep an eye out for odd colored soils as these will most likely be deposits. The picture to the right (1) shows the four most common types of ore and Stone.
We also need to make an Iron Anvil. Anvils are used to create items from Bars. Go out and find some Iron Ore. In order to smelt one Iron Bar, three Iron ore must be present. As we need five bars total; to successfully create the Anvil we need 15 Iron Ore. Once the ore is gathered and smelted at the Furnace, head to the workbench and create an Iron Anvil. When placed down preferably next to the Furnace, an entire new set of Recipes become available. The surface has its share of ore, but in order to get the best items in the game, it's now time to dig a bit deeper.
It is highly advisable to begin gathering materials for a few Buffs. A fresh character on a new map can quickly gather Sand and Daybloom necessary for some early buff potions, as well as the Daybloom Seeds and Clay used to begin Gardening with Clay Pots. All Buff potions used Bottled Water, at least one of the six Herbs, and in most cases another item such as Ore, enemy drops, or other naturally occurring objects. Two of the earliest buffs that can be easily concocted are the Regeneration Potion and the Ironskin Potion, and for the early game can significantly improve your survivability.
There are a few options when choosing how to dig: Digging straight down or searching for a open cave to explore. At this early stage in the game use caution when digging holes. Using the blocks picked up while digging or creating Wood Platforms, you can construct a way back. Another thing to watch out for is deep caverns. When falling great distances the character will take damage.
While mining underground it is possible to come across pools of water. Torches do not work underwater. Glowsticks work underwater, but they cannot be crafted and must be found at this stage of the game. Also, they cannot be attached to blocks. You can throw them, but they will bounce and move around and may be hard to place exactly where you want them. You can craft Sticky Glowsticks anywhere by combining Gel with a Glowstick; these will stick to walls when thrown, making them easier to place. No matter which you use, however, glowsticks are not permanent when thrown, unlike placed torches, though they do last for 5 minutes.
When stepping into a pool of water the character will sink as if weighted down. Don't fear diving down underwater to continue moving downwards, as the character has a rather large air meter. However, if close to running out of air there is a way to regain air quickly. First either find a wall or make a small shaft at the bottom of the water. (The shaft should be around 10 squares deep) Then dig a 3 high 1 wide hole in the wall and then a 4-6 high and 2 or more wide hole in this wall. The water will not fill the upper squares. As the air supply runs low jump into the hole. This will restart the meter. (2)
There are many deep chasms inside the caves. A good way to traverse them is to create a gapped bridge (3). To do this create a background wall of any material. Stone and dirt will be in excess so those are recommended. Place a strip as far as the character can reach then build stepping stones at least one block apart. There are two benefits to this:
- Light can still reach below the blocks.
- Most enemies cannot actually pass through the blocks.
Alternately, you can avoid placing the back wall if you build out from existing ground. Place a solid floor starting from any spot you like. Blocks will attach to each other even without a back wall present. Then cut away every other block to form the gaps. This keeps you from having to lug around wall blocks, thus saving inventory space and the time it takes to craft the wall blocks. Plus, you can use any blocks you have dug out while mining, so it's very convenient.
Note that the character cannot pass through the one space gaps either; so it would be a good idea to leave an opening somewhere along the bridge.
More information
For more advanced information, please check out the guides listed below.
Crafting 101 - This is the introductory crafting guide. It contains a detailed explanation of how crafting works, and the ideal crafting station setup.
Bases - How to create an effective homebase.
Mining techniques - This guide goes into detail on easy and efficient ways to mine ore, and what to expect when venturing deeper into Terraria.
Farming - How to grow gardens of Trees, Mushrooms, and other less savory things. This is a wonderful guide for learning how to properly organize and maintain a garden.
PvP - A great place to start when looking for information on Player vs. Player combat. Not quite for beginners, however it's a great read for those who would like to study beforehand.
Eye of Cthulhu Boss Fight - Considered by many to be the first boss players will face and kill. Bosses are powerful monsters that have a lot of health and do devastating damage to the unprepared.
Video guides
-
 Getting started
 - Practical tips
- Walkthrough (
- Game progression
- Progression graph
-
- Mining techniques
- Invasion events
- Class setups (
- Weapon playthroughs
- Armor progression
-
- Inventory management
- Money
- Enemies
- Biome Keys or Key Molds
- Resources
- Crafting 101 (Quick reference)
- Night's Edge
- Frostspark Boots
- Terraspark Boots
- Cell Phone
- Ankh Shield
- Terra Blade
- Zenith
- Arena
- Artificial biomes
- Bases
- Travel
- Wiring
- Corruption
- Crimson
- Desert
- Zindan
- Jungle
- Ocean
- Underworld
- The Constant
- King Slime
- Eye of Cthulhu
- Eater of Worlds
- Brain of Cthulhu
- Deerclops
- Queen Bee
- Lepus
- Skeletron
- Turkor the Ungrateful
- Wall of Flesh
- Getting started (Walkthrough)
- Maintaining purity
- Hallow
- Jungle Temple
- Queen Slime
- The Twins
- The Destroyer
- Skeletron Prime
- Plantera
- Empress of Light
- Golem
- Ocram
- Duke Fishron
- Lunatic Cultist
- Moon Lord
- Kan Ayı
- Goblin Army
- Old One's Army
- The Torch God
- Pirate Invasion
- Pumpkin Moon
- Frost Moon
- Martian Madness
- Lunar Events
- Setting up a Terraria server
- Setting up Steam Multiplayer
- Capture the Gem
- PvP
- "Beating" the Tutorial
- Completing the Bestiary
- Dungeon Guardian
- Expert Mode
- Hardcore
- Hardcore Master Mode
- NPC Happiness
- Obtaining a Terraprisma
- Skipping ahead
- Teleporter network
- Ideas
- Vanity