Note: This Guide was originally written for version 1.3.5, while Terraria has since updated to version 1.4. While the general trends may hold, a number of specific exploits have been fixed. In particular:
The Granite Golem statue is known to have been nerfed.
While the Large Dynasty Lantern is not specifically mentioned, it's pretty much certain that the exploit was fixed while revamping prices in general.
With the exception of Meteorite and Hellstone (and to a lesser degree, Silver), crafting your ore into bars is no longer profitable (nor is it a loss).
Another note is that NPC sale and purchase prices are no longer exact, but can vary according to the NPC's "Happiness" status. When your NPC housing is set up appropriately, this can be a positive; happy NPCs will buy items from you from a higher price, giving more value to your farming or collecting.
All that said, with gems now farmable, Stained Glass has come into its own!
Regularly deposit your money into a Piggy Bank or Safe. This minimizes the loss of coins from Death: When you die you will drop at least half of the coins carried in the inventory, and drop all of them in master mode, and perhaps more depending on difficulty settings. You can freely spend money from "personal storage" at any vendor; there are few reasons for you to carry coins in your inventory any longer than needed.
In general, the standard RPG trope of "collect everything you find" will pay off over time.
Accumulate surplus items in chests until there's enough to be worth selling. Collecting a coin while 99 of that coin’s type are in your inventory will convert the stack from copper to silver, from silver to gold, and from gold to platinum.
Some items can be crafted to be more valuable, including monetizing materials that are otherwise worthless.
Some stuff really is almost worthless, so feel free to trash it in favor of items that are either useful or saleable for decent money. Whether "decent money" means silver or gold will depend on how far along in the game you are, and how much money you have already. Remember that although a material may be worthless alone, combining it with another material may yield a higher profit. See below for examples.
The Skeleton Merchant can offer a chance to unload items without having to go to a base (especially useful for non-stackable items).
Be careful about selling scarce items: A few items found in chests, and some furniture found in special locations (including some of those chests), are found only there, and have a limited supply per world. (See the warning under "Collecting" for more details.)
There are at least three different ways of making a few gold pieces per minute with little effort or risk, representing three different methods of "low effort, high payout". All of them do require investment and game advancement, but can be done well before Hardmode, even before visiting the underworld. These methods include:
Fishing in general is fairly profitable. If you fish in honey, the only thing you will catch is Honeyfins, 15 apiece. That said, fishing in honey will not let you catch crates, nor other high-value catches such as jellyfish or Golden Carp.
A Statue farm with an appropriate enemy, ideally with two or three statues, requires the Mechanic, 10 Gold/Platinum bars for a timer, and Bomb Statues (which need to be found underground). See below for details.
Gem Farming
The introduction of craftable Gemcorns in version 1.4 has created one of the best low-effort high-reward methods of money making in the game, accessible very early in the game.
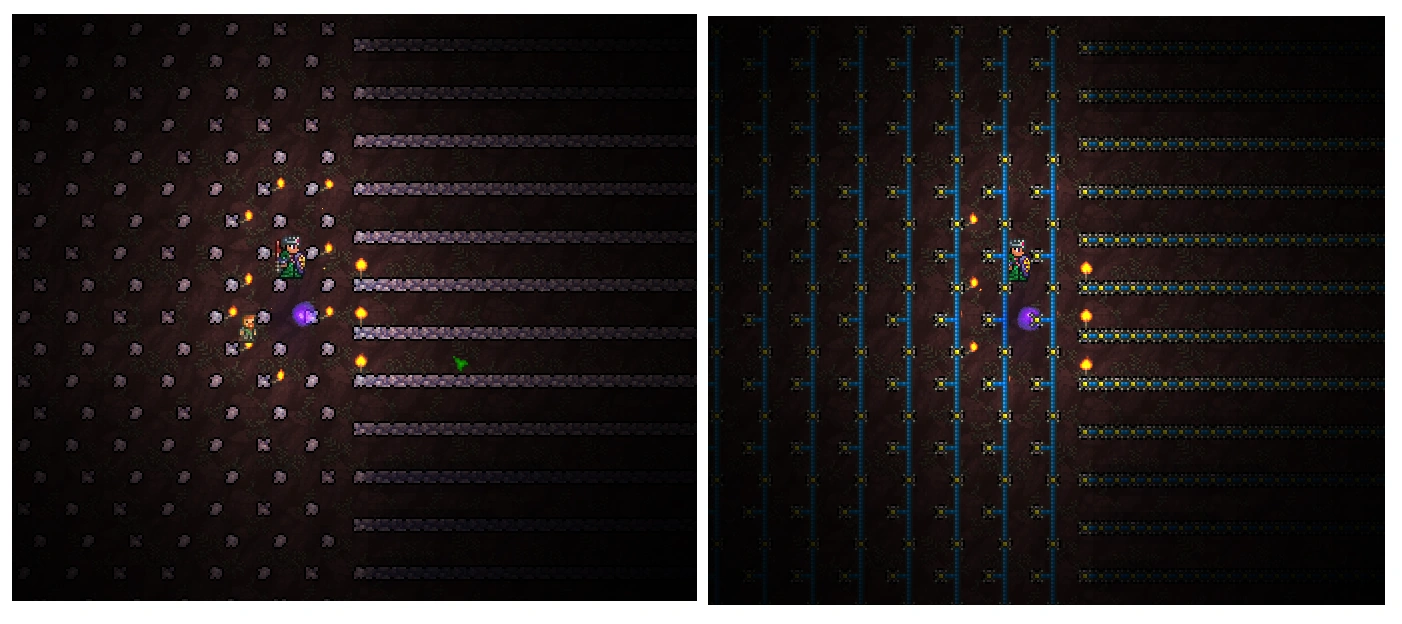
To create a Gemcorn farm, a player can simply dig out a large corridor at least 17 blocks high in a convenient location (such as a branch off of their base's Hellevator). This is more easily done with Sticky Dynamite, which is available even before any bosses have been defeated. Simply throw Sticky Dynamite on walls to expand horizontally. The farm corridor should be lined with stone blocks on the bottom; the top should at least be covered over for safety, but you may want to get a head start on infection-proofing the area by lining the top with wood, and making sure you have space for a three-tile-deep barrier beneath the floor.
Note that the corridor should be mostly unlit (ideally fully dark), since Gem Trees grow fastest in total darkness. Once you rescue the Mechanic, you can wire up some lighting (even torches) and leave it turned off while not harvesting. A Mining Helmet, and later on, an Ultrabright Helmet, is extremely helpful for smooth harvesting and replanting, since your farm will be dark. Shine Potions are an option, though expensive early on, eventually a Light Pets may be helpful.
Gemcorns are trivially craftable, -- any Gem can be crafted into a Gemcorn by simply combining it with an acorn, no crafting station required. Gems may be found naturally, though a more reliable way of obtaining the most valuable Amber and Diamond gems is use an Extractinator and extract Silt, Slush. or Desert Fossils until you get some amber or diamonds. That might be harder than it sounds, as Extractinators are most easily found in the relatively dangerous Underground Desert. On the other hand, in 1.4, Amber itself can also be found there!
Gem Trees, on average, produce more than one Gemcorn for each tree. However, the first few might be tricky, because any one tree is not guaranteed to replace their seed. Save any surplus gemcorns and the first few gems, until you have enough trees of each given type to be sure you will have enough gemcorns to cover. Once you have enough Gemcorns (or gems to make more), you can also expand the farm by planting new trees. (Buying more Dynamite is easy now that you have a steady income....)
A Gem Tree farm about 400 blocks in length (which takes 3-5 minutes to clear and replant) can yield well over 80 , and sometimes more than 1 if all Gemcorns and Gems (minus the ones used for replanting) are sold. While the exact time varies, Gem Trees grow fast enough that it's reasonable to harvest and replant the farm every other in-game day or so. Given that the only work involved in obtaining this money is cutting down a lot of trees and replanting them (and killing a couple basic monsters), this is easily one of the lowest-effort money-making methods in the game, and also one of the most profitable and reliable.
Some additional tips:
Smart Cursor is very useful for fast harvesting and replanting.
In both cases, simply keep your mouse on the opposite side of the screen from the direction you're moving in. For example, if you want to plant many Gemcorns while moving right, then keep your mouse on the left side of the screen. This will automatically space out your Gemcorns perfectly.
Note that you should NOT use a mount while replanting, as the movement speed is fast enough that you will skip blocks. Running with some small movement speed buffs appears to be the fastest way to plant quickly.
The same is not true for harvesting trees: since even the fastest axe requires a small pause to harvest the trees, it can be ideal to use a mount with some height, such as the Zoologist's Saddles, to pick up the tree drops more quickly.
Marking the blocks with colored torches beneath the stone may also be helpful.
Repeating due to importance - the corridor should be dark! Completely dark, ideally. Gem Trees grow fastest in the dark!
Unlike many other block changes, tree growth is updated on the minimap automatically. You can check the progress of your trees by just looking on the minimap, and head down to harvest them when a large portion of them are grown (or when you need some quick cash).
If you are in Expert mode, a Royal Gel is invaluable in making your harvesting/replanting runs smoother. Since your farm must be in darkness, many slimes will spawn and it is extremely convenient to be able to totally ignore them.
Summons are useful for clearing the occasional slime, and later in the game, Possessed Armors that may spawn in your farm (though Possessed Armors are tanky enough that you will probably need to kill them manually).
If you plan to use this as your main method of making money, it is helpful to acquire a good axe like the Molten Hamaxe as soon as possible so that you can harvest more quickly.
While your farm can technically be as wide as you like, it may be wise to keep it in the Forest biome (that is, "plain Underground") so that your farm isn't invaded by stronger monsters. Excessively long farms may also be a bit of a chore to harvest and replant.
Diamonds and Amber are the most valuable gem when sold directly, valued at 30 each. However, due to their relative rarity, it may be more realistic for a player to acquire Ruby or Emerald Gemcorns first, both of which have respectable values. Once Diamond or Amber gems are found, the farm can be slowly transitioned to farm those instead. Amber is also useful as an ingredient for Crate Potions. But don't go completely into Diamonds, since you may want to make stained glass later.
Later in the game, some additions may be useful -- as noted above, the Mechanic will let you provide switchable lighting, and once you have a Sandgun and ammo-conservation equipment, you may want to add a nearby pit for convenient sand farming. Conversion to Stained Glass will make any gem except Diamond worth a gold apiece.
Collecting
Most "found" equipment and other items can be sold for varying amounts of money, just make sure they're outclassed by your current items and can't be crafted into better items. Stackable items can be accumulated, others can be stashed in nearby chests until you have a chance to ferry them to a vendor (or the Skeleton Merchant shows up). Some resources can also be farmed; see Guide:Farming Resources for more details on that.
Finders Keepers
Plain old Mushrooms are probably the first thing you can collect (or farm) for sale, and you'll likely pick a fair number anyway just running around. Their sell price of 250 apiece is a lot for the early game.
As soon as you venture outside the forest, you'll start seeing "rare drops" from various enemies, mostly accessories but with occasional armor and weapons. Generally you need one of each for your own use, the rest are saleable. Crafting the accessories into more advanced items (notably the Cell Phone crafting tree) is good for your own use, but usually not for sale value.
Much the same applies to the contents of various chests -- there are a few items that you may want a spare or two of (again, some only have a few per world), but eventually you'll reach a point where they're just duplicates. Many of these items can be had from fished crates as well.
Breaking Pots found around the world can release coins and other saleable items. A variety of naturally-placed Chests can also contain coins and other loot.
In the Caverns and in Pyramids you may find small sacks of coins spilling over stone. These are Coin Stashes. Breaking them drops their respective content.
Don't be afraid to trash near-worthless items in the field, so that you can keep more valuable items. If you need more of any of these, they can easily be bought, crafted, and/or farmed. Naturally, this only applies once you have enough for your own use, and/or better alternatives. Some prominent offenders here include:
Pot trash: Particular offenders are Shurikens, Ropes, and Glowsticks, which sell for only a few coppers each; even a 999-stack of any of these will only yield a few silver coins, comparable to a single Depth Meter dropped by a passing bat.
Herbs and their seeds, which also stack only to 99. Once you have farms of your own, there's no reason to harvest them in the wild. Even farming them for profit is hardly worth the trouble.
None of these blocks are renewable, (and before 1.4, nor are the gems). That said, there are few other uses for these blocks: Silt can also be used to craft Stucco for building, and Desert Fossils are explosion-proof blocks.
For sale, craft most gems into Stained Glass, except diamonds and amber. Sell the diamonds directly, but save any Amber for Crate Potions. Craft Sturdy Fossils into Bone Throwing Knives for sale. (See "Crafting" below for details.)
With such crafting, a full stack of 999 silt or slush can yield an average of about 45 total, while desert fossils will average about 35 (but more amber). In both cases about a third of that will be in coin, and there is a small chance of getting a jackpot in platinum coins.
The various dye ingredients can be sold for 20 each whether or not they've been crafted into dyes. Strange Plants can also be traded to the Dye Trader for rare dyes, which can be sold. The Strange Plants (at least) prevent others of their kind from spawning nearby, so harvesting them opens up territory for more to spawn. (In 1.4, Strange Plants are limited to Hardmode.)
Crystal Shards are easy to collect or farm (see images) and sell for lots of money. Sold straight, 1000 shards will get you 160, Save a few dozen for crafting with Pixie Dust, below.
Pixie Dust can be sold straight, but it is much more profitable to mass-produce Greater Healing Potions (see "Crafting" below). The dust can also go for Fairy Wings.
Cursed Flames/Ichor can also be sold straight, though some cumbersome crafting can more than double the profit. Worm Teeth are small change regardless.
The various Souls can be sold straight, but most have profitable and/or boss-summoning crafts, see below (or their pages) for details.
A Warning
Be careful about selling too many useful materials: Some items or materials have a limited per-world supply. This is especially an issue for rare items found in chests or special locations. Also, not everything is about money: Blocks can be used for building, and walling off a large area can take a surprising amount of material. Some items may also make good "trophies" in Item Frames, Weapon Racks, or Mannequins/Womannequins.
Many kinds of Soil and a few other blocks are plentiful but cannot be created. While it might take some effort to deplete your world of ice or even dirt, it is possible, especially in a small world. And Cloud blocks (for example), aren't all that plentiful either. (In 1.4, stone and dirt/mud can be farmed after a fashion, but both are still fairly slow laborious)
Stone in particular is used to craft most bricks and "brick-like" blocks, which are unsaleable but decorative. The only way to monetize stone by itself is by crafting statues for a mere 12 per 1000.
In Hardmode, stone paired with wood can yield a moderate payday (over −19998 per pair) by way of arrows, see Crafting below,
There really is no way to make money directly from dirt, mud, or snow, but you can make landscapes out of them.
However, dirt and mud can be transformed into chlorophyte, which does sell for a lot of money.
Ores and bars can be useful for crafting, even after you're past their "tier". Iron/Lead bars in particular are used in a variety of utility recipes, and the other early bars are used in Watches and Timers. All the ores have bricks and/or walls that are useful for building, and some useful potions require ores in their recipes.
Extras of rare (limited) items can also be brought to another world for a head start there.
Avoid selling the materials used for boss summoning items, such as Lenses, Vertebrae and Rotten Chunks. Fighting bosses is much more profitable than selling these materials!
Remember, if you don't need money right now, you can always store potentially-useful stuff, and sell it later when it's clear you have more than you need.
Critters
Once you have a Bug Net and a few NPCs at your base, collecting Critters is trivial (a Water Candle can help), and as they accumulate you can sell them. Their prices range from 250 on up to 10. Top sellers include:
Special mention for Frogs around a Jungle base: With enemy spawns suppressed by NPCs and a Water Candle boosting the critter spawns, these can be remarkably plentiful. They often wander by in armies filling their spawn cap, from 7 (pre-Hardmode day) to 10 (Hardmode night).
Golden Critters have a 1 in 150 chance of spawning in place of an eligible type: Bird, Bunny, Butterfly, Frog, Grasshopper, Mouse, Squirrel, and Worm. Most of these will be regular sights for dedicated collectors, but the Golden Mouse is arguably the rarest non-unique creature in the game. Despite the low odds, the jackpot is big enough to add 667 to the "average" price for these types. Note that critters obey a (varying) spawn cap, so collecting the normal critters allows new, potentially Golden, critters to spawn. The similar Golden Carp is obtained only through fishing.
The Truffle Worm is a special case: They are technically enemies rather than critters, so the usual critter-farming methods will backfire. This is the summon item for Duke Fishron, so save some if you wish to fight him.
In 1.4, many more critters are cookable, and many of the dishes produced can yield rather more powerful (but often shorter) buffs. The culmination of this is that any Golden Critter (including those whose normal forms aren't otherwise edible) can be cooked into Golden Delight, which grants the highest-tier food buff for a full two game days. Note that Golden Delight is itself salable for the same 10 as whichever Golden Critter it was made from.
Fishing
Fishing can provide a lot of saleable stuff, especially once you get better equipment from the Angler; besides the "usual" fish, you will also catch various useful and saleable tools, weapons, and accessories, not to mention the occasional Golden Carp or Crates. If you're getting impatient waiting for the Angler to give you the Golden pole, you can buy, find, or make various intermediate-powered poles. For best results, pay attention to the moon phase, time, and the size of the lake. Note that anything gotten from fishing is renewable by definition.
All the cookable fishes that you're not using for food are best sold uncooked. (5 and up)
Likewise, the fish used for brewing potions all sell for more money than the potions you could craft. (mostly 15, including the Honeyfin)
Quest fishes can't be sold, but if you come up with extras (stash them in a chest or bank as you catch each one), you can turn them in for a later quest.
This leaves the various tools, weapons, and accessories. Use what you need, then sell off the rest.
All Critters used for bait (including Enchanted Nightcrawlers) sell for much more than the Angler Bait that could replace them. As soon as you get Master or even Journeyman Bait, use that instead.
All crates except Wooden can contain Master Bait, and the Angler can also give it as a reward. Once you have enough Master Bait, you can sell off your Apprentice Bait (1) and Journeyman Bait (3) too.
Fishing for Crates with Crate Potions is an easy and safe way to make large amounts of money. Depending on location, fishing power, and if in Hardmode, this can rake in up to 30 per Crate Potion, aside from the useful items you can save for yourself. Use the best bait you've got, with any Angler's equipment you have, and whatever relevant Potions you have.
You will probably get your first Crate, Fishing and Sonar potions as Angler rewards or from previously-caught crates, but once you've got the makings you can also craft them for yourself.
This is one of the two main ways to get your world's "alternate" metals, and in PC, Console, Old-gen console, Mobile, Windows Phone, Old Chinese, tModLoader, and tModLoader Legacy versions, if you save crates for opening in Hardmode, they will also provide both alternatives for the early Hardmode metals. Note that high-tier crates don't have all the metals, and only Wooden crates contain ore.
Never sell unopened Crates -- opening them will average several times their sale price just in coin, plus useful and saleable items. On average, most crate value is from the coins, but especially in quantity the other items can sell for a decent bonus. Hardmode brings more valuable metals and more items. Here is a more detailed rundown on crate values.
Crafting
Almost any craft that requires a purchased ingredient is unlikely to be profitable, no matter how useful the item is in gameplay. Crafting together items that are picked up "for free" is another story, and there are many common materials whose sale value can be sharply improved by the proper recipe.
When crafting large numbers of weapons or accessories, the random modifiers will add a bit to your yield: This bonus averages a bit over 10% for melee weapons, or 20% for accessories. Magic or ranged weapons (rare in this context) fall between those at around 15%. Note that individual weapons can have their value reduced by modifiers, but the average will be above list price. Accessory modifiers can only increase the item's sale price.
Ores and Gems
On version 1.4, most bars sell for the same price as the ores that went into them. The exceptions are Meteorite and Hellstone, whose bars sell for much more -- and, oddly, Silver, which bar sells for slightly more than its ore.
Most ores sell for at least as much, and often more than, the bars made from them. The exceptions are the late pre-Hardmode ores (Meteorite, Demonite/Crimtane, Hellstone), and Chlorophyte, all of which are far more profitable as bars.
The evil ores are dropped by bosses, so they can be easily farmed for sale.
If you have an Autohammer, Converting Chlorophyte bars to Shroomite gets another 10 per bar (11.11% more).
If you also have extra Water Walking Boots, you can upgrade them to Obsidian Water Walking Boots worth 6. Remember that these boots come only from Water Chests, so there is a limited number in each world!
This does use quite a lot of Glass, 5 times the number of gems. However, sand is farmable: Making 1000 sand takes up to a day's work, depending on equipment. 1000 sand +100 gems = 4! Alternatively, you can simply buy a lot of bombs and go to a desert, and begin to blow up and collect the sand from there. Though it slightly reduces the profit, it's far easier to collect sand in that way.
You can create new worlds and go into caves for even more gems.
Remember that silt, slush, and desert fossils can be turned into gems at a low chance at an extractor, but there is a limited amount of these in a world.
Before 1.4, there also is a limited amount of gems to be mined in a world.
Gemcorns can be used to farm gems, making gems unlimited
Diamonds can only be sold directly (30 each). Amber can be sold like diamonds, but it's far more profitable to brew Crate Potions with it and go fishing (see above). Alternatively, as of 1.4, Orange Stained Glass can be crafted out of Amber, allowing you to use that as a quicker method instead.
Biome Materials
Several frequently-surplus materials have optimum but sometimes-cumbersome sale methods. As always, be sure you won't want them for something else.
From the Desert:
Sand: Craft into Glass, then Mugs, then Ale. At 20 per mug of ale, 1000 sand yields 1. (You can do somewhat better with candelabras, and much better with stained glass as above.)
Cactus: 1000 blocks of cactus makes 100 Cactus Swords 360 plus bonuses for modifiers. (Candelabras beat that if you supply the torches, see below).
Ancient Cloth: The only thing to do with it is to add Silk and make pieces of the Ancient Set, 50 each. (A 25% improvement over selling the materials.)
Cobwebs: 994 cobwebs make 142 Silk, 284 (29 per cobweb).
But if you have both Cobwebs and Bones, 1000 of each makes 25 Necro Helmets, which sell for 2250, handily beating candelabras and silk at 225 per pair.
Wood by itself could be monetized as Kegs for 8.6 per block, but this is dwarfed by its usefulness in other recipes (see below):
Wood and gel together are worth at least 150 per paired pieces, representing the purchase price of the torches they replace.
Wood and stone can be crafted into arrows, which in turn can be crafted into Endless Quivers (160 each wood & stone yields 1, or 62.5 per pair). In Hardmode, Cursed or Ichor arrows (see below) yield twice that (see below).
In some cases you will also need an appropriate crafting station; use the Living Loom for plain wood, as there is no plain wood candelabra.
Each 1000 blocks (1 stack +1) plus 600 torches (6 stacks +6) will produce 200 candelabras that can be sold for 6.
Even buying the torches from the Merchant costs only 3, letting you walk away with the other half of the sale price.
Making your own torches will instead use 200 (more) each of gel and wood.
Either way, for Boreal Wood and Ice, you will also need 200 (more) ice blocks to turn the torches into ice torches.
For wood or gel, another way to work the same recipe is as follows: Start with 996 wood and 166 gel, or vice versa. Make 498 torches (5 stacks +3), then use those and 830 wood or slime blocks to make 166 candelabras as above for 498.
However, if you have wood and gel, things get more complex:
To do the above "both ways at once", you could start with 994 each wood and gel, set aside 284 of each to make 852 torches, convert the remaining 710 gel to slime blocks, and continue to make 142 each wood and slime candelabras for 852. However, in this or the Dynasty wood craft below, 1000 each wood and gel can instead replace 15 worth of torches as above, and supplying 5000 other blocks (or 3000 Dynasty wood) can make you 30.
On versions and platforms before 1.4, Dynasty wood provides a true "money for nothing" deal:
The basics of the deal:
Dynasty wood can be purchased from the Traveling Merchant for 50 apiece.
Torches from the Merchant are also 50 apiece, or you can make your own from "free" wood and gel.
The Large Dynasty Lantern requires 4 of each (2 total if you provide the torches, twice that if you buy them). However, before 1.4, it sells for 6 apiece.
This can be done on a large scale: 1000 dynasty wood will cost 5, but with 1000 torches (made from 334 each wood and gel), you can produce 250 lanterns worth 15 (10 profit).
Even if you buy the torches from the Merchant, that only costs another 5, leaving you 5 of profit. And since you also made back what you paid up front, you can buy another 1000 each of Dynasty wood and torches for the next round....
In multiplayer, one player can keep the Traveling Merchant's shop open (preventing him from leaving) while other player(s) buy torches, craft lanterns and ferry the resources around.
Note that Dynasty wood cannot be used to make torches.
As of 1.4, the Large Dynasty Lantern only sells for 32, which effectively patches the exploit.
Hardmode
As usual, the below applies after the usual equipment is made and the materials are actually surplus:
As you fight Wyverns and collect Souls of Flight, craft them into Wings (8). Besides the various "rare" drops that can only be used for Wings, this can soak up extra Souls of Night (25), Souls of Light (25), or Pixie Dust (100), along with Harpy Feathers. This is also the most profitable way to sell off extra Beetle Husks, almost doubling the husks' sale price. With random modifiers, 10 pairs of wings will average almost a platinum piece.
Another way to use up Souls of Light and Night is to summon Biome Mimics for a tough fight with great rewards.
Pixie Dust (1 per piece) can be combined 3-to-1 with Crystal Shards (16 each) to make Greater Healing Potions (3 per recipe gives 30). An Alchemy Table can add another 50% to your output, for an average of 45 per crystal.
With the Alchemy Table, each stack of 99 pixie dust and 33 shards (otherwise worth a mere 627) will yield potions worth an average of 1485, a 137% profit over the ingredients. (Slightly more profit than using the pixie dust for Wings).
The potions only stack to 30, which makes this slightly cumbersome, but that's still 3 per stack.
Cursed Flame (8) and Ichor (9) can most profitably be sold as Cursed or Ichor Arrows (150 arrows for 12 per piece). However, this is cumbersome, and will take 6 times their number in wood and (non-renewable) stone; 100 Cursed Flame/Ichor, plus 600 wood and 600 stone, yields 15,000 arrows worth 12. Each pair of wood and stone returns up to 267 profit.
Similarly, Worm Teeth can double their sale price of 20 as Unholy Arrows (5 arrows for 40 per tooth), at the cost of one-fifth (20%) of their number in wood and stone. (100 teeth need 20 wood and 20 stone. Each wood/stone pair adds 1 of profit.)
Spooky Wood can be sold as Spooky Helmets, which yield 50/block with no gel needed. With gel or stone, it can be used more profitably as "any wood" for torches or arrows as above.
Statue farming
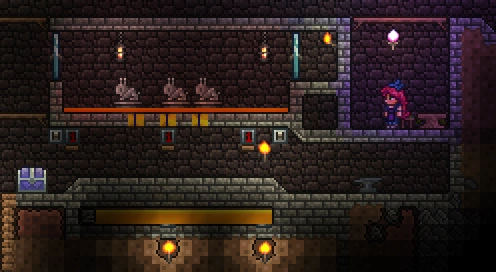
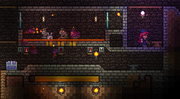
A statue farm with three statue spots and staggered timers. The drain chamber for the lava allows swapping in different statues. The torches at the bottom indicate the Teal Pressure Pads. The anvil is for crafting Chains and Grappling Hooks.
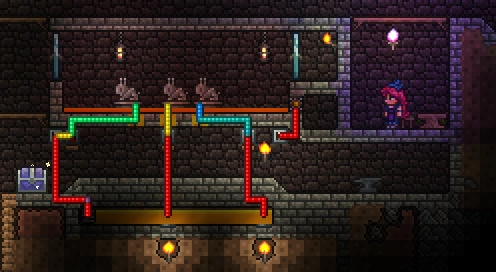
Same statue farm showing the wires. The left switch triggers one timer and a dart trap, which triggers the other two timers via Teal Pressure Pads.
The statue farm in action during a Blood Moon. 15 or so Bunny Hoods far outearn the rest of the event in pre-Hardmode.
The basic setup for statue farming involves connecting a Statue to a 1 Second Timer (or a Crab Engine). Place a shallow layer of lava (recommended) around the statue, or connect a few Dart Traps to kill the spawned monsters. Once you click the switch, all you have to do is wait for drops to accumulate. A tunnel beneath the trap can allow safe collection, and Conveyor Belts can help once they're available. Housing a vendor NPC near the farm is convenient for selling the items quickly. Multiple statues in a lava pit can speed things up. Use of lava warrants some standard comments; while statue farming no longer involves coin drops, the shallow pool is still useful:
This content is transcluded from Lava § Lava Depth.Lava will destroy any item of White rarity (Other than the aforementioned exceptions) including Coins, if it is deep enough for the item to sink past its midpoint. (That is, items with larger sprites can survive deeper lava.) This allows making pits with lava just deep enough to burn copper coins, but (almost) nothing else:
If too many items (over 400) accumulate in the world, the oldest ones will despawn.
Copper coins are among the least valuable objects in the game, but each stack of them still counts as an item. An event or enemy farm can produce huge numbers of copper coins, so it's worth discarding them, against the risk of despawning more valuable items. Fortunately they are also among the smallest items in the game (with a sprite only 12 pixels high).
A notable exception: The far more valuable Lihzahrd Power Cell also has a 12 pixel high sprite, and will be destroyed with the copper coins.
Other notable heights: Silver coins and gel share a 14-pixel height, while block items are 16 pixels tall.
To check if a lava moat has the exact depth required, a player can throw in one copper coin, then one silver coin. The copper coin should burn, but the slightly taller silver coin should not.
In practice, this lava depth can be achieved with 1 Bucket of lava for each 6 to 8 tiles of pit length.
Thus a moat that is 6-8 blocks wide, should have one bucket thrown in, while a moat of 12-16 should have 2.
This implies avoiding lengths where this range can't be achieved: 1-5, 9-11, 17. A moat 18 or more tiles long can always be filled to proper depth.
When filling a very large moat, it is best to drop individual lava buckets over the width of the moat, and not throw it on the same spot, due to unreliable liquid physics.
Unfortunately, since version 1.3, Statue farming is much less convenient for generating money than before.
Statue-spawned enemies do not drop coins, many have reduced rates for their other drops, and some will not drop items if killed by traps. See the Statue page for details.
Sharks and mimics spawned by statues no longer spawn Dungeon Spirits (and mimics drop no loot at all).
Statue-spawned critters cannot be caught. If a Bug Net is used on them, they will disappear in a puff of smoke.
Statues will only trigger twice per second no matter how they are activated, and they will not trigger if there are more than 3 of their creature in the immediate vicinity, 6 within most of the screen, or 10 anywhere in the world.
All that said, there are still options to be had, depending what enemy you are trying to spawn:
A statue farm for a relatively strong enemy -- specifically, one that takes a half-second or more to die in lava -- can't do much better than up to three statues on a single timer. Note that lava does 50 damage/hit to enemies, and hits apparently come 6 times per secondVerify.
However, those spawns killed in less than a half-second can make use of staggered timers to keep more statues in play.
Farms whose spawn is killed almost immediately can use far more statues, triggered in sequence. In fact, if you have enough statues of a single type, you can spawn your targets literally just as fast as they die. (The question is just how quickly a death registers.)
And of course, the spawn limits only apply to a single type; it's entirely fair to mix statue types in a farm depending on what statues you have.
Profitable Statues
Many statues are still good for regularly producing their bonus items, and in some cases the value of these items combined with the drop chance makes them usefully farmable. Note that most of the following do qualify as "weak enemies" by the above standard: Only Unicorns take more than a second to die. Granite Golems only take three lava hits (perhaps half a second) to die, the undead (Skeletons, Hoplites, Undead Vikings) all die on the second hit, and the others are one-hit kills.
Note that many statues drop Hooksoften. While these only sell for 2 straight, they can trivially be crafted with Chains to make a Grappling Hook worth 40. Happily, the raw Hooks do stack, and each upgrade costs less than one piece of Iron or Lead ore. Accordingly, the yields below will credit Hooks at their post-crafting price.
The list includes only the statues with passable drops at reasonable chances, and ignores some rare and/or low-priced drops.
Per spawn, the most profitable statue by far is the Granite Golem, followed by (mostly due to crafting the Hooks as above) the Hoplite, Skeleton, and Piranha statues. In Hardmode, the Unicorn statue comes fifth for its horn drops (but takes much longer to kill), while the Jellyfish trails distantly with an average of one silver piece per spawn. While the Granite Golem is clearly best despite occasional stacks of granite, the Hoplite barely outyields (5%) the Skeleton, and the latter doesn't produce stacks upon stacks of completely unsaleable Javelins.
Bats drop Depth Meters (25, 1%). Note that they spawn on the ground, and so get killed instantly by the lava. Yield is 25/spawn
Using Bunny Statues during a Blood Moon will spawn their evil counterparts, which drop Bunny Hoods (40, 1.33%, yield 53.2/spawn). A Penguin Statue during a Blood Moon will likewise produce pieces of Pedguin's set (30/piece, 2%, yield 60/spawn).
The converted critters don't count towards the Statue's spawn limit, so you can add even more statues for this occasion. Both statues can be crafted from caught critters.
Crediting the granite at 3/1000 (as candelabra, see "Crafting" above), adds an average of 225 (34% of the helmet yield) for a total of 885/spawn.
The crafted profit for the granite can be doubled to 6/1000 if you supply your own torches. A Slime statue makes a Gel supply easy, but you're on your own for wood.
Hoplite Statues produce Gladiator armor (average 28/piece, 1.67%) and Hooks (4%), along with a lifetime supply of unsaleable Javelins (1 stack/33.3 spawns). The yield is 46.76 for the armor, and 160 for the Hooks, total 213/spawn.
Undead Vikings drop Viking Helmets (50,0.5%), Compasses (25, 0.5%), and a few more Hooks (1%). Yield is 37.5, plus 40 for the Hooks, total 77.5/spawn.
Unicorns drop Unicorn Horns (30, 5%), but only in Hardmode. They need a 6x3 space to spawn, but other statues will not block them. Yield is 150/spawn. Note that they take a lot longer to kill than other creatures on this list, due to their high health and defense.
Bomb Statues work a little differently: no lava or traps are required, but only 3 bombs can spawn at once, so you need to stay close to collect the bombs. In any case, you'll want a vendor NPC nearby to quickly sell the stacks of bombs.
Heart & Star Generator
Statues for weak Enemies (those killed in one or two hits from lava) can be used to create a Heart and Star generator for boss fights; when they die they they will drop Hearts and Stars whenever the player is not at full health or mana respectively. These drops do not have the spawn limits of Heart Statues and Star Statues. In this context, Crabs and Wall Creepers have the advantage of not dropping anything else. Other weak enemies, which will produce saleable stuff as a side effect, include:
Note that Jellyfish, Slimes, and Hoplites would otherwise qualify, but should be avoided here, due to dropping large numbers of worthless items.
Fighting bosses and events
Once a player has defeated a given event or boss, they will quickly reach a point where they can kill them easily. Aside from developing skills, the player is accumulating equipment over time, and progressively outclassing their former enemies. It can be quite profitable to repeatedly summon and slaughter prior bosses and events.
A few Hardmode enemies warrant special note because of the generosity of their drops. All of these are powerful enough to qualify as minibosses when first encountered:
Mimics warrant special note because they drop 10 (InvalidNpcinfoStatName) even without use of the Midas debuff, and you can sell the items they drop for up to 5. A continuously swinging sword with enough knockback to keep the Mimic at distance, or ranged weapons, can easily kill them with little risk. As noted below, farming the Golem's room will reliably produce quite a few Mimics.
Biome Mimics drop only 3 upfront, but most of their "special" item drops sell for 8, with another 1 for the potions. They are rarer "in the wild", but can be summoned with Keys of Light or Night.
Wyverns drop 1 , and also drop Souls of Flight. On average, each Wyvern will drop slightly over half the Souls needed for a pair of wings, each pair saleable for 8. Wings will also require an additional "key" ingredient, but many of these can be had as drops from a variety of enemies.
Farming the Eye of Cthulhu will yield about 10 per kill, assuming all drops are transformed and sold.
Even before the player reaches Hardmode, it can easily be defeated multiple times in a row, resulting in lots of money. With Hardmode equipment, it is possible to kill over 100 Eyes in one night.
The Eater of Worlds drops an average of 175 Demonite ore per kill, which sells as bars for an average of about 17. (13.)
Buying Vile Powder for a Worm Food costs only 30 -- for boss farming, even stocking up during a Blood Moon may be more convenient than gathering or farming the mushrooms. However, the Rotten Chunks must be harvested. With Hardmode weapons, the Eater can be summarily dispatched, but the Destroyer becomes a more effective use of those Rotten Chunks.
Buying Vicious Powder for a Bloody Spine costs only 30 -- for boss farming, even stocking up during a Blood Moon may be more convenient than gathering or farming the mushrooms. However, the Vertebrae must be harvested. With Hardmode weapons, the Brain can be killed fairly quickly, but the Destroyer becomes a more effective use of those Vertebrae.
Farming the Queen Bee will yield about 14 per kill, assuming all drops are sold.
The Queen Bee has no time restrictions and only needs to be summoned in a jungle. Like other early bosses, it becomes very easy to fight with hardmode or late-game weapons, even when "enraged". Each Queen Bee drops 5 in coins, plus various item drops whose sale prices average to another 2. On most platforms, Bee Wax can be best sold by crafting it into Bee Headgear, to bring in another 2-3. The Abeemination is rather easy to craft, as (except on ) all the ingredients can be found or made in the jungle, and it doesn't even need an altar to craft.
Farming the Wall of Flesh will yield about 12 per kill, assuming all drops are sold.
Using Hardmode gear, you can kill the Wall of Flesh quickly and cheaply. It can be summoned day or night, but repeated summons do need to wait on the Guide respawning after his death. Timing the first fight for just before dawn (4:30 AM) can allow two or more fights in a morning; the Guide will need about 2 minutes after either dawn or his last respawn before he can reappear. Drops 8 in coins, a Pwnhammer which sells for about 78, and another random item which sells for 2-3.
A decent way to farm the Wall in early Hardmode, even before defeating any mechanical bosses, is by boosting summons (such as the Spider Staff) with the Spider armor, backed up with a good Yoyo and the Yoyo Bag. The Amarok is easy to obtain in the Ice biome and does solid damage as well as the Frostburn debuff. Collecting more Guide Voodoo Dolls is trivial in the Underworld, especially with Hardmode equipment.
Farming the Destroyer will yield about 12 in coin and 34 worth of drops (sold straight) per kill. The key ingredients for the Mechanical Worm must be collected from the Underground evil biome, but are common drops from most or all of the enemies there. You will also want to collect Souls of Light from the Underground Hallow. With Post-Plantera gear, The Destroyer can be killed multiple times in one night, subject only to the supplies for summoning it.
Given a supply of Souls of Light, crafting and selling Light Discs is much more profitable than selling the Souls of Might and Hallowed Bars separately. The materials for each Light Disc are worth 566 if sold separately (4 for 5 Souls of Might + 160 for 4 Hallowed Bars + 6 for 3 Souls of Light). The 15 sell price of the Light Discs nets about 165% more profit. On average you can make a stack of 5 Discs for each kill (and 15 Souls of Light) with occasional extras. Over multiple kills, there will be leftover Souls of Might; these can be crafted with spare Hallowed Bars from the other mechanical bosses, or just sold on their own.
Farming the Golem will yield about 33 per kill, assuming all drops are sold.
However, you can also make quite a bit of money just farming Lihzahrds and Flying Snakes in the Golem's room. Place a Water Candle and banners nearby, grapple yourself to the ceiling, and just shoot downward for awhile, and/or let your minions hunt. After a while the Power Cells and other loot can be collected. This works well with a Coin Ring, Slime Staff, and Tiki Armor.
This method also will yield quite a lot of Solar Tablet Fragments, a fair number of Mimics, (which drop some nice money and items), and some Yelets to boot. You will average about one power cell for each banner earned; the banner messages are a good cue to collect your loot, hopefully including power cells. Conveyor belts can gather the loot into stacks, to prevent items from despawning among the flood of coins.
The solar fragments can be used for Solar Tablets, which summon the remarkably profitable Solar Eclipse (see below)
After repeating the endgame a few times, surplus Lunar Fragments can be crafted into Monoliths for sale; 20 each for 15 Fragments, and each pillar drops an average of 36 of its type, averaging almost 2 worth per round.
The Moon Lord himself drops a Portal Gun worth 10, Luminite worth an average of 2550, and an endgame weapon worth 16 to 20. Combining Lunar Fragments into a Celestial Sigil effectively trades them for more Luminite and other Moon Lord drops, but this is not profitable; even without pro-rating them, one Monolith of each type is worth more than the Moon Lord's drops.
Make a house with a thin layer of Lava on the top and sides so the drops don't burn. You may want lava protection to collect the drops. He drops his own summoning item, and if you have more than one you can summon multiples of the boss. Each kill nets coins and items worth about 5.
During Thanksgiving, Turkor the Ungrateful can be farmed by only attacking his heads, which drop most of a gold piece each. This may not be worth the trouble: Consider that the individual heads have 2000 health (but no defense), and attack for 55 damage, then compare that to the Eye of Cthulhu's stats and drops.
Holidays
If the Halloween season is upon your game, treats are in store. Goodie Bags commonly drop costumes with 2 to 3 pieces, each piece worth 60, or the bags can be sold directly for 1. Pumpkins also become plentiful; they can be crafted into chandeliers as above, or baked directly into Pumpkin Pies (2 for 10 pumpkins) . In the Christmas season, Presents can't be sold directly, but many of the gifts within are saleable.
Much as with bosses, once you have mastered an event, you can effectively farm it as desired. Suitable use of lava pools and other traps can allow killing off most of an invasion automatically, leaving you to deal with minibosses, flying enemies, and spot defense. While the pre-Hardmode events are basically small change, Hardmode offers some better opportunities, especially with a Lucky Coin, Gold Ring, or both (as a Coin Ring). Gold Dust items will also improve drops.
Even the lowly Blood Moon has rather better coin drops in Hardmode.
The Solar Eclipse can be particularly profitable -- with a Gold Ring (to rapidly gather coins) and powerful weapons, they can approach 1 even before use of Gold Dust items or a Lucky Coin (which can double or triple the yield). The Moon Charm and Neptune's Shell can be profitably combined into a Moon Shell.
The Pirate Invasion can yield a bit of cash and some saleable Golden Furniture. Initially, its greatest attraction is the rare drops:
The Gold Ring is comparatively common, and very useful for collecting coins swiftly.
A Discount Card can save a lot on purchases and reforging.
The scarce Lucky Coin is an actual license to coin money (a Slime Staff can help).
The Coin Gun is usually considered an eccentricity, and it does take some inventory management to make it work. That said, with the techniques in this guide, you can have enough money that you can afford to use gold coins as ammunition, and perhaps even platinum!
For getting rare drops, it's best to "farm" for Flying Dutchmen. Once you do have those drops, farming a Pirate invasion from shelter with a Coin Ring, Slime Staff, and Tiki Armor (if you don't kill the Dutchman, you'll get more pirates) can yield up to 4.
Martian Invasions are difficult to arrange on demand, but putting a Water Candle on a Floating Island will eventually lure in a Probe, and with a suitable base they can be farmed in fair safety, especially for the Saucer drops.
The Pumpkin Moon is probably the most effective event to farm coin. Late game, a player using the Last Prism, a Stardust Dragon, Nebula armor, and appropriate buffs, can easily farm over 30 per moon (over 10 in coins and over 20 after selling gear).
The Frost Moon is more difficult to farm: it's harder than the Pumpkin Moon, also Ice Queens appear only one at a time and are harder to kill quickly.
Monster Farming
Once in Hardmode you can buy Gold Dust to craft ammunition or Flasks which will increase the amount of money monsters drop on death. Also, don't forget mobs spawn as much below you as above, so filling in any caves below your farm can increase spawn rates within the farm.
Slime Staff Farming
If you have a Lucky Coin and Slime Staff (Slime statues do drop Slime Staffs) you can farm for money very easily at the rate of about 10 Gold/Minute. Making full use of the spawning mechanics, it is possible to make the speed exceed 1 platinum per minute. A simple way to apply the slime staff is to create a space in the Lihzarhd Temple where you can stand in a box in an open space with all of the Lihzarhds crowing below you. Then summon all of the slimes you can. The slimes hit very quickly and only do about 1 damage a hit, with each hit giving a chance to drop several gold coins due to the Lucky Coin. You can do a similar farm by creating a box in the Ocean and putting 80 Lihzard blocks around you (to spawn Arapaimas and increase spawn rate).
However, minions are treated as projectiles, and since the slime won't vanish after hitting a monster, it counts as a piercing projectile: This means that each monster hit by a slime will get 1/6 second's invulnerability against more piercing attacks. This limits the effect of adding more slime minions, unless there are plenty of targets to go around.
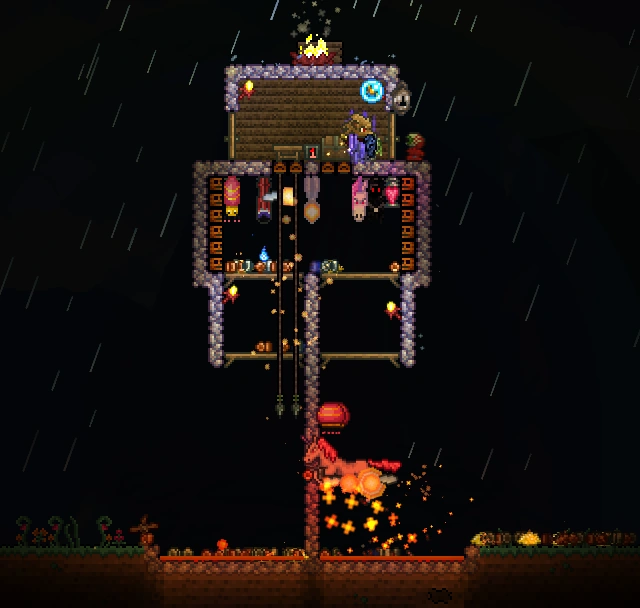
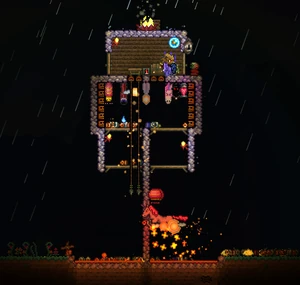
Hallow Farm
An example of a Hallow Farm.
Once you enter Hardmode, it may be a good idea to farm The Hallow. The best way to do this is to make an AFK Hallow Farm:
The first thing to do is to clear out a flat area in The Hallow, which will help the spawn rate. Then create a pillar, at least 15 blocks high.
After that, clear out two wide pits on both sides of the pillar with a thin layer of lava, thin enough to not destroy drops. This will kill the Unicorns and other ground enemies. Conveyor Belts may be helpful to collect coins into stacks. If you have a Gold Ring or upgrade, use that.
The next step is to make the part to kill the Pixies and Gastropods. It should have two box shaped parts, the first part thinner than the second, which will help catch the pixies in the trap. Some players may want to separate the parts with platforms. There should be Dart Traps, Super Dart Traps, or Spear Traps on both sides of the second section, to kill the Pixies and Gastropods. These traps should be connected to a 1 Second Timer with wires.
The next step is to set up the player room. This room should have doors to allow the player to exit, but not allow enemies in, and a switch to control the traps.
For maximum efficiency, the player room should have a Water Candle, a Heart Lantern, a Campfire, Banners for the enemies, and a chest to store items. It should also qualify as an NPC Home, so that you can pull in a vendor if needed to sell off your loot quickly. While having an NPC there would decrease spawn rates, any time during the night you can assign a vendor there and immediately move off-screen from the farm to teleport them in. After selling off the current loot, if it is still night you can void the house (e.g., break the chair) and head off-screen again to make them teleport to a vacant home and restore your spawn rate.
The player should also have a minion to help with the slaughter and deal with passing enemies.
The major items for sale from this farm are: Unicorn Horns, (2970 per stack of 99), Blessed Apples (5 each), Fast Clocks (2) and Megaphones (2). All the enemies also drop money. You will also get Pixie Dust and gel, which can can be used for crafting more profitable items.
Hardmode Dungeon
A very fun and effective way to grind money is to gear up with endgame gear and farm the Hardmode Dungeon. After killing Plantera go in there and farm all the monsters you see. Armored Bones drop over ten silver each, and they are so common that you can easily rack up a lot of money fast. Also, sell the Ectoplasm and drops you don't need for even more money. In one hour, you might be able to get five platinum with water candles and battle potions and maybe even a lucky Blood Moon. Another way to use the dungeon for money-making is to use a farm. Lihzahrd Temple-type traps can prove to be very useful in this method, and will make fighting in the dungeon a lot safer.
Black Recluses drop 5 directly, Spider Fangs (craft into Queen Spider Staffs, which sell for 5 each), and Poison Staffs (4 each). Both sorts of staff will average about 15% above their standard price due to random modifiers. Over time, the return (mostly from the Queen Spider Staffs) will average nearly half a gold piece per spider killed.
Cheating
⚠
The entries below feature methods to obtain money by non-conventional standards. They are all ways of cheating, and may as such not be accepted by certain players. As they can easily ruin the gameplay (no matter how tempting unlimited money may seem) they should mainly be utilized by players for testing purposes, preferably on single-player worlds to avoid ruining the game for other players. They may also include the possibility of damaging your game and/or computer - use at your own risk!
⚠
Crafting glitch
If you craft a stack of copper, silver, or gold coins using a silver, gold, or platinum coin, the crafting menu allows you to craft it back into a single coin. As it turns out, if you take at least one coin from the stack while the rest are in your inventory, put the coin in a storage item such as a chest, safe, or piggy bank, then press deposit all or quick stack on the storage item, the option to craft the original coin still exists as long as you do not exit the inventory screen. You can then craft this coin without it taking away any coins as long as you do not have a separate stack of the lesser coins in your inventory or in the storage item. This gives you a new second coin for free. This glitch does not, however, allow many duplicates to be made at once. If you attempt to do this by making multiple stacks of coins and depositing all of them, the game will not let you craft the original coin as many times as you had stacks. Instead, once you use the option once, the game seemingly realizes that there are no stacks of coins to use to craft a new original coin, therefore the option disappears. Despite this limit, this method still allows for quite quick duping of coins and is one of the few options that does not require another player, joining a server, or editing files.
Note: May only work on console.
Player duplication
When a character (or world) is created, it is saved as a file on your computer/device. This means that it can be copied like any other file. The default directory for such files are C:\Users\USERNAME\Documents\My Games\Terraria\Players for Windows and Files>On My iPad>Terraria>Players for iOS, though this may change with other OSs. Characters are stored as .plr files; a character called "Manbearpig" will be saved as "Manbearpig.plr". If this file is copied (into "Manbearpig2.plr", for example) the in-game character selection menu will feature two characters named "Manbearpig". (Note that there is no need to copy "Manbearpig.plr.bak". Also note that the order of the .plr files in the Players-folder is representative for the in-game character list.) Any character that has items stored in portable storage, such as a Safe or Piggy Bank will also have an associated folder with the same name as the character (e.g., a folder named "Manbearpig"). If the character's folder is also copied, the player will be able to duplicate items in portable storage.
The copy will feature all items held and worn by the original (and the accompanying folder will contain all items kept in portable storage), allowing the player to duplicate money and items by repeatedly copying Manbearpig.plr (and Manbearpig folder) and deposit the copies' inventories in a storage item in-game. Creating money like this makes it increase exponentially: if you start with 1 and copy it 31 times, you will have a little more than 999 (1*2=2 (one copy) → 230=1073741824 copper coins = 1073 platinum coins).
Copied character files can afterwards be deleted with no issues arising, though you may wish to also delete each copy's respective .plr.bak file and folder (keeping obsolete .bak files and folders will not impact the game, but it may cause yourself some confusion later). Though arguably being somewhat cumbersome, this method is convenient as it requires no third-party software. Patched 1.4.
Read-only world file
Set your world to "read-only" while you have all your coins in a chest, then load the world. Take the coins, and exit. Set "read-only" off and play again. The coins you took while the world was "read-only" will be in the chest, and you can take them out. If you had, say, about 50 gold, you could get a platinum, and, if you do it again, you can get 2 platinum. And you can do this method whenever needed to get coins back.
Item servers
Certain servers are dedicated to distributing free items and coins, placed in automatically-refilling chests. These items and coins can be taken freely. Some servers also grant you access to free command of every items in the game.
TShock server
Instead of using the dedicated server software that ships with Terraria, you can set up a more powerful and advanced server up with TShock. As an admin, you can give yourself free items through Item IDs.
World Edit Tools
World edit tools, like TEdit or some other tool, is easy to add or manipulate coins.
Terrasavr Inventory Editor
Using inventory editors such as Terrasavr can be a way to get money for experimental purposes.
Soft duplication method
You need: 4 Bars of any kind, 2 item frames, a work bench, and 1 chest. You also have to host a multiplayer server. (Because being in single player mode doesn’t work for this method).
Place the 4 bars down in a square, place the chest on them, destroy the bottom 2 bars. Put the work bench where you just destroyed the bars, mine the chest and replace it with an item frame. Then mine the right side of the work bench, the item frame should be floating. Place the other item frame below the first item frame. Click the first item frame with a item you have at least 2 of.
It should duplicate like this: 2 coins, 4 coins, 8 coins, 16 coins.
(Also can be used on items other than coins. Breaks when you leave meaning you have to build it up each time you join.
Note:You can also duplicate rare items and sell them.
Another note: Sometimes you might place coins on top of the top item frame, breaking it.
Item Duplication with TerrariaServer
1. Place the item(s) you want to dupe in a chest in a world (can be any world, it wont affect the items in it afterwards) and exit the world, but not the game.
2. Run start-server-steam-private (can be found in C:\Program Files (x86)\Steam\steamapps\common\Terraria).
start-server-steam-private will open the TerrariaServer console window, but it won't close the console window every time you exit like TerrariaServer.exe does.
3. In the TerrariaServer console window, select the world where you stored the item(s) you wish to dupe.
4. In the Terraria game, join multiplayer game and type localhost in the ip page.
5. Take all the items you want to duplicate using your character (do not exit the world).
6. In the TerrariaServer console window, type exit-nosave (it disconnects your character but doesn't save the world, so your items will still be as it was before you loaded the world).
7. In the Terraria game, go to a world and unload all your duplicated items, and exit the world.
Repeat steps to do it over and over again. This only works if you are the server host, it won't work on anyone else's world.
Magic Mirror Duplication
Note: Doesn't work if you're the host.
Note: Items have a chance of disappearing.
First, in your inventory highlight the coin(s) you want to duplicate. Then, exit out of your inventory. After that has been done, you use the magic mirror and while the screen turns black, you pull up your inventory and pick up the coin(s).
An easier method of duplication if timing is a problem is to turn auto-save off in settings and toss the coins out at spawn, go off the server, re-enter, pick up the coins, and save manually, and repeat until the satisfactory amount is reached.
Exit+Rejoin
Note: To make it easier, be the host.
Note: Does not work with a piggy bank/safe.
Put the items you need in a chest, then save the game.
Turn autosave off.
Leave the game without saving.
Go back into the world you were in, and take the items and loot from the chest.
Exit without saving again.
Repeat steps 4 and 5 as needed.
This is expected to duplicate the item, as it will be in the player's inventory and chest at the same time.
Note: No longer works as of the 1.2.4 update.
Exit+Rejoin 2.0
Note: Doesn't work if you're the host.
Note: Requires either online multiplayer or a second controller and account.
Note: Will work with multiple players.
Note: It can be extremely slow.
First, gather the items you want to duplicate, and give them to the other player. Make sure they have autosave off, and they save with the items in their inventory. (WARNING: Doing the previous part the other way around (saving without the items, exiting when you have them) will not duplicate and instead DELETE the items!) Then, have them give you back the items. Next, they have to exit the game without saving, then rejoin. You and them will have the items and their amounts, doubling the amount you both have. And You can use this trick for almost every item.
Depending on what items you duplicating, you can sell them for a lot of money.
Exit+Rejoin 2.1
Note: You will need 2 players.
Place a chest, and turn autosave off. Have a second player join with autosave on. Put the amount of money to be duplicated into any chest, then save the game. After the game finishes saving, have the second player leave the game, then have the host leave WITHOUT SAVING. Then, have both players rejoin. The money would still be in the chest, and in the second player's inventory. Have the second player take the money, leave the game, then have the host leave the game without saving again. Repeat until the wanted amount is reached.
Every after duplicating, put the duplicates in the chest you're using, then save the game, take all the money, & have the second player leave and the host leave without saving. Then have both of them rejoin, and then have the second player put the new duplicates in the chest and then save it. And then take the money. then have the host leave the game. Repeat until the wanted amount is reached.
The money can also be replaced by any item you like to be duplicated.
Chest/World Save Copying
Note: Requires 2 locations to save, works vise-versa (character save copying), and Super tedious.
Like the Desktop versions of Terraria, the world saves and the character inventory saves are separate. To do this, Place a chest, and put the amount of money you want to duplicate into the chest and save both hard drives (you may need to copy it into the 2nd hard drive). Place the items into your character's inventory, and save and exit the game entirely. Go into the system setting and access storage. Copy the world save from the 2nd hard drive into the 1st. Collect duplicated items. Repeat until the wanted amount is reached.
 PC,
PC, 


