![]() "The master and core of the world..."
"The master and core of the world..." ![]()
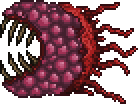
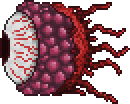
The Wall of Flesh is the final Pre-Hardmode boss. It is composed of two eyes which will blast the player with lasers, and a mouth in between. Defeating it is required to enter Hardmode.

| Type | |
|---|---|
| Environment | |
| AI Type | Wall of Flesh AI |
| Damage | 50/150/225 (melee) |
| Max Life | 8000/11200/14280 |
| Defense | 12/18 |
| KB Resist | 100% |
| Immune to |
| Debuff | |
|---|---|
| Debuff tooltip | You have seen something nasty, there is no escape. |
| Duration | While the player is within 1800 feet (900 blocks) from the boss. |
| Debuff | |
|---|---|
| Debuff tooltip | You are being sucked into the mouth |
| Duration | When the player is within 1800 feet (900 blocks) behind the boss. |
| Coins | 820 |
|---|
- Item (Quantity)Rate
- 100%
- Two (see the note below)
/ oneof the following 8/ 7/ 6items will always be dropped One of the following weapons will always be dropped- 25%
14.29%
16.67% - 25%
14.29%
16.67% - 25%
14.29%
16.67% - 25%
One of the following 4 emblems will always be dropped- 25%
14.29%
16.67% - 25%
14.29%
16.67% - 25%
14.29%
16.67% - 25%
14.29%  Healing Potion (5–15)100%
- Badger's Hat(when defeated on the same day
as the Eye of Cthulhu)100% - 14.29%
- 10%
- 100%
- Treasure Bag
(Wall of Flesh) - Demon Heartwhen no Demon Heart used yet
- 14.29%
- 100%
- One of the following 4 items will be dropped
- 25%
- 25%
- 25%
- 25%
- One of the following 4
/ 3items will be dropped - 25%
33.33% - 25%
33.33% - 25%
33.33% - 25%
- 100%

| Hurt | |
|---|---|
| Killed | |
| Spawn Leech |
- Internal NPC ID: 113
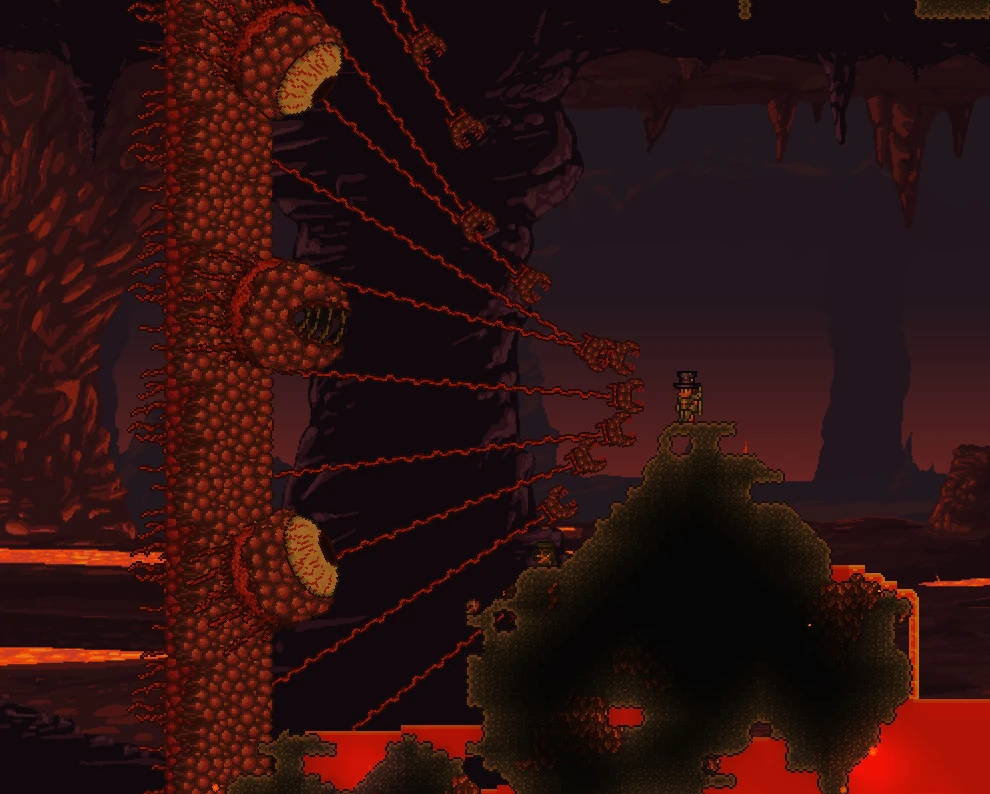

A player facing the Wall of Flesh.
The Wall of Flesh is the final and strongest pre-Hardmode boss, spawnable only in The Underworld. Once it is defeated, the world permanently converts to Hardmode, which brings new content and challenges. This means that once the Wall is defeated, new biomes will spawn, new monsters will attack you, and the game can be beaten.
To defeat the Wall of Flesh, the player must attack either its eyes or its mouth. They all share the same life counter, so attacking any of the two will deplete the total health of the boss. However, the eyes have less defense (thus take more damage) than the mouth. No other parts of the Wall can be damaged.
See below for information on the two exclusive debuffs from the boss, Horrified and The Tongue.
While the Wall of Flesh is alive, the music Boss 2 will play. When Otherworldly music is enabled, the track Wall of Flesh (Otherworldly) will play instead.
Summoning
The Wall of Flesh is summoned immediately 75 blocks away from all visible players when a Guide Voodoo Doll is destroyed by being dropped into lava in the Underworld while the Guide is alive, killing the Guide. Dropping the doll into lava outside of Underworld, regardless if the Guide is alive, will not spawn it, and the Voodoo Doll is destroyed with no effect. In the ![]() PC version,
PC version, ![]() Console version,
Console version, ![]() Mobile version, and
Mobile version, and ![]() tModLoader version, the Wall of Flesh can also be summoned by letting the Guide be killed in the Underworld while the Guide is in contact with lava. Using this method, the Guide can die by any means, either from a player, an enemy or the environment, as long as he is touching lava when he dies.[1]If a Mediumcore player dies in lava (in the Underworld, and Guide is alive) with a Guide Voodoo Doll in their inventory, the Wall of Flesh is summoned.
tModLoader version, the Wall of Flesh can also be summoned by letting the Guide be killed in the Underworld while the Guide is in contact with lava. Using this method, the Guide can die by any means, either from a player, an enemy or the environment, as long as he is touching lava when he dies.[1]If a Mediumcore player dies in lava (in the Underworld, and Guide is alive) with a Guide Voodoo Doll in their inventory, the Wall of Flesh is summoned.
The Wall of Flesh's sweep direction is determined by its spawn location. Spawning it on either side of the world will cause it to sweep in the opposite direction (regardless of the direction the Doll was thrown). Maximum fight space can be achieved by spawning it at the extreme right or left of the world, though these areas have fewer natural structures and may require additional lava survival gear or construction. Be aware of the fact that The Wall of Flesh might not fight but just leave the battle if you spawn it too close to the edge.
The Wall of Flesh will spawn level with the tile of lava that destroys the Guide Voodoo Doll, then begins adjusting to the player's current tile height, though there is a limit to this. Digging a tunnel near the bottom of the world can leave the player unable to deal damage to the Wall of Flesh, and it's recommended such setups stay relatively near to the Underworld's surface elevation.
Attacks
The Wall of Flesh is very large, occupying the entire screen vertically. Once spawned, it slowly sweeps across the map in a single direction, forcing the player to constantly move away for the duration of the fight, while also contending with the Underworld's usual hazards, if possible. It must be killed before it reaches the other end of the map, otherwise, it will despawn and all players in The Underworld will die (with the unique death message "").
Once the Wall of Flesh has spawned, all players within 1800 feet will be inflicted with the Horrified debuff. The debuff lasts until either the player or the Wall of Flesh dies. If a player dies and then returns to the battle, they will again be inflicted with the debuff. While this debuff is active, players cannot flee the battle, i.e. attempting to escape the Underworld via a Magic/Ice Mirror, Recall Potion, Teleporter, or running far ahead of the Wall and leaving, will cause the player to die instantly with the unique death message "<Player name> tried to escape." Exiting the game and re-entering the world allows for escape, but causes the Wall of Flesh to despawn.
Attempting to leave the Underworld or to get behind the Wall of Flesh will inflict The Tongue debuff. When it is activated, a tendril will snatch the player and draw them into the Wall of Flesh's mouth up to a speed of 56 mph, ignoring blocks in the way, and dealing high damage to the player (50 damage per second). The player will be unable to move or use items while the debuff is active.
The Wall of Flesh moves faster as its health depletes, increasing in speed after reaching 75% (6000 / 8400 / 10710), 50% (4000 / 5600 / 7140), 25% (2000 / 2800 / 3570), and 10% (800 / 1120 / 1428) of its health. In Expert Mode, it accelerates even further with additional increases at 66% (7392 / 9424), 33% (3696 / 4712), 5% (560 / 714), 3.5% (392 / 499), and 2.5% (280 / 357) maximum health.[2] At extremely low health levels, it can reach up to 41 mph in Classic Mode and 50 mph in Expert Mode (as compared to the Hermes Boots at 30 mph, Lightning Boots at 34 mph, and the Bunny Mount at 39 mph).
Additionally:
- The Wall of Flesh has small mouths called The Hungry, each attached by a long vein, which move towards and damage players. As the Wall of Flesh's main body takes damage, they deal more damage and become more resistant to attacks. When sufficiently damaged, they detach and fly towards players at high speed.
- The Hungry has a 100% (20%) chance to drop a Heart when killed.
In Expert Mode, The Hungry respawn as long as the Wall of Flesh is alive.
- The Wall of Flesh's eyes fire lasers. As its health depletes, the lasers increase in damage and frequency.
- The Wall of Flesh "burps" Leeches from its mouth that chase players.
Aftermath
When the Wall of Flesh is killed, it leaves its drops in a midair frame of Demonite Bricks for Corruption worlds, or Crimtane Brick for Crimson worlds. It will always drop the Pwnhammer, which is required to break Altars and generate Hardmode ores in the world.
- In the Old-gen console version, Windows Phone version, and Nintendo version, the frame is always made of Demonite Bricks.
- In Expert Mode
, its dropped Treasure Bag includes a Demon Heart (only if the player opening it has not consumed one yet), which provides the player an additional (6th) accessory slot.- In Master Mode
, the player starts out with a 6th accessory slot, so the Demon Heart adds a 7th. - The Demon Heart can only be obtained and used once. If the player has already consumed one, additional Treasure Bags will not yield additional Demon Hearts. If the player somehow obtains a second Demon Heart, i.e. from another player or from researching in Journey Mode, they will be unable to consume it.
- In Master Mode
Hardmode
After defeating the Wall of Flesh for the first time, the status message "The ancient spirits of light and dark have been released." displays and the world permanently converts to Hardmode. Hardmode brings new biomes, new and tougher enemies, and a vast array of new equipment.
Two diagonal stripes of Hallow and Corruption or Crimson form in a "V" pattern from the center of the Underworld, all the way to the surface. These biomes will also begin to spread to more blocks and spread at a much faster rate, eventually covering large areas of the world if no action is taken.
Components

| Type | |
|---|---|
| Environment | |
| AI Type | The Hungry AI |
| Damage | 30/60/90 (WoF health >75%) 4590135 (WoF health 75–50%) 60120180 (WoF health 50–25%) 75150225 (WoF health <25%) |
| Max Life | 240/336/503 |
| Defense | 10/16 (WoF health >75%) 20 (WoF health 75–50%) 30 (WoF health 50–25%) 40 (WoF health <25%) |
| KB Resist | -10%/1%/12% |
| Immune to |
| Hurt | |
|---|---|
| Killed |
- Internal NPC ID: 115
In Expert and Master modes, the health of bosses depends on the number of players in multiplayer. Please enter the number of players (a whole number between 2 and 256) on your server in the input box below. If you don't see the input box and the This calculator is synchronized with the Desktop version of Terraria: 1.4.4.9. Unfortunately, this script works doesn't work on mobile devices. You could switch to desktop version of the page. |
Wall of Flesh strategies
Notes
- Being able to summon the Wall of Flesh depends on the Guide being alive. He cannot respawn if it is nighttime or there is an event in progress. Due to this, the waiting time between multiple fights is often much greater than with other bosses. Timing the fight to finish just before dawn has a chance to allow two or even more fights, especially if the Guide already has an assigned House.
When directly killing the Guide to summon the Wall of Flesh, its mouth, eyes, and the Hungry will spawn relative to the Guide's position. For example, if the Guide fell deep beneath the surface of the lava, the parts that can be damaged will spawn there. This can be very inconvenient when fighting it.- It is possible for the Guide to respawn while the Wall of Flesh is alive, although more copies of the boss will not be spawned if one is alive in the world.
- Throwing the Guide Voodoo Doll into a lava pool above The Underworld will not summon the boss. It will, however, kill the Guide.
Like The Destroyer and Moon Lord, Wall of Flesh is one of the few bosses that does not despawn based on player distance. Once summoned, it only despawns once it reaches the far edge of the world, which also kills the player if they were there.This also means that it will not despawn upon player death, possibly allowing one to carry on with the fight if they reach The Underworld quick enough before the Wall of Flesh reaches the end.
- The Wall of Flesh's eyes move up and down on its body to avoid any blocks they encounter. Solid blocks and liquids 4–5 tiles above and beneath the eyes will cause them to shift their positions.
- Although the eyes and mouth of the Wall of Flesh are immune to numerous debuffs, The Hungry are only immune to Confused.
- In a For the worthy
world, the Wall of Flesh's eyes and mouth are much smaller, while The Hungry are much larger. The Wall of Flesh will despawn if there are no players alive in the Underworld.- In a For the worthy
world, the Wall of Flesh constantly spawns Fire Imps that shoot much faster burning spheres compared to the normal Fire Imps found in The Underworld.
Achievements


Tips
- Using a Magic Mirror or a Recall Potion while the fight is ongoing will result in your player dying and the death message of "[player name] tried to escape." to pop up on your screen. The Wall of Flesh will still be on the map unable to hurt you unless you go back to The Underworld.
- Due to the amount of lava present in The Underworld, mobility during the fight can become difficult. It is recommended to use Obsidian Skin Potion or anything else that makes the player immune to lava while fighting Wall of Flesh.
- If you are not ready to fight the Wall of Flesh, avoid both killing a Voodoo Demon while it is above lava, or on the PC version, Console version, Mobile version, and tModLoader version letting the Guide get killed in lava.
- For this reason, try to avoid killing Voodoo Demons in the outer quarters of the world, as there are no Ruined Houses, and thus more lava on the far edges of the world.
- If you accidentally do end up summoning the Wall of Flesh, note that it is slow to start, and can be easily outrun via the use of speed enhancers, such as a Swiftness Potion.
- If the Wall of Flesh was recently summoned or the Guide was recently killed in some other way, make sure the Guide has respawned before attempting to summon the Wall of Flesh again. The housing menu, as well as the map, can be used to quickly check if the Guide is present within the world.
If one wishes to farm the Wall of Flesh, consider making a house in The Underworld above lava with actuators on the floor, or wire a teleporter. The Demon Conch can also be used to teleport to The Underworld.- As soon as the Guide is inside the housing, activate the actuators then quickly deactivate them. This way, the Guide can respawn in the same housing and you can farm the boss.
- Mobility-enhancing items, such as Gravitation Potion, Rocket Boots or one of their upgrades, and various hooks can make traversing The Underworld much easier. Also, flying mounts such as the Honeyed Goggles are good to go over the pools of lava. Similarly, items like Obsidian Skin Potions, Lava Charm, Lava Waders, or an Obsidian Rose can mitigate The Underworld's many lava pools and other ambient hazards.
- Using both the Magiluminescence and the Lightning Boots increases the player's top speed to 41 mph, enough to always outrun the Wall of Flesh in classic mode.
- Heart Arrows
will freeze the Wall of Flesh in place, as long as the arrows hit its mouth. - Beenades and Molotov Cocktails are highly effective throwing weapons against the Wall of Flesh, especially in Expert Mode
. - Melee weapons are not recommended for fighting the Wall of Flesh for the first time, because the close range of this class results in a sizable amount of contact damage. Certain melee weapons with extended range, like the Dark Lance, Yoyos
and Flails might prove useful. - Equipment that inflicts On Fire! are effective against The Hungry.
- An effective and common terrain preparation consists of building a long bridge (at least 500 tiles long in Normal Mode and even more in Expert or Master). Wood Platforms or Hay blocks are suitable materials due to their abundance. Ruined Houses and hills of Ash Block on the bridge should be cleared to avoid getting stuck during the fight.
- Making the bridge out of Explosion-proof tiles (such as Dungeon Bricks) and using Dynamite can be extremely effective if a player times their throws well.
- For rangers, a hilly platform can help avoiding the boss's lasers. Shoot at the Wall of Flesh from the top of one hill (or slightly behind it) and move to the next hill once it gets too close.
- The Wall of Flesh will always try to stay above land at least 2 blocks thick. Using a bridge that thick will cause both eyes to constantly stay above it.
- In the past, there was a myth that this was a feature unique to Ash Blocks, but this has been disproven multiple times. This technique works with any block type, so long as it is 2 blocks thick.[3]
- Build a long Minecart Track instead of a plain platform because the player can keep up with the boss. This is even more useful in Expert Mode
because of its high speed (50mph) towards the end of the fight. Even when using the default Wooden Minecart, the player can travel faster than the Wall of Flesh, at 51mph.
- Focus on The Hungry first before significantly damaging the Wall itself. The Hungry's damage and defense are boosted as the body takes damage, which will make them more difficult to kill if left for later.
- Attacking the eyes deals the most damage, as they have the lowest defense.
Trivia
- – According to the official game lore, the Wall of Flesh is the world's guardian. Once it is defeated, the world itself will search for a new guardian to take its place, and the Hallow is released as a temporary guardian.
- The Wall of Flesh was inspired by the Demon Wall from the Japanese science fantasy video game series Final Fantasy.[4]
The Wall of Flesh will not despawn when the player dies in singleplayer.- The Hungry are the only Underworld enemy not immune to the On Fire! debuff.
- Because killing the Wall of Flesh creates strips of Hallow and Corruption/Crimson, if it is defeated near the middle of the map, it has a chance to drop a Soul of Light or Soul of Night on death, proving that the world is in fact converted to Hardmode before the status message displays.
- The lead developer of Terraria, Redigit, has confirmed that the Guide is the Wall of Flesh on the official Terraria Discord.[5] This explains the relevancy of his death to the appearance of the boss.
- The aforementioned confirmation is consistent with the fact that the Wall of Flesh is directly referred to as male with the use of "him" in a loading screen tip.
- However, the Steam Trading Cards, and even the Guide himself, say that he is instead a sacrifice to the Wall of Flesh. In addition, the Guide respawns after the Wall of Flesh is defeated.
- The Wall of Flesh is one of two pre-Hardmode bosses that have at least 10,000 HP in Expert Mode, the other being the Deerclops
.- Although Skeletron and the Eater of Worlds can have more, they are not single-unit enemies, as Skeletron has two hands as separate targets, and Eater of Worlds has a number of segments that causes it to break into multiple worms if destroyed.
- It is one of the three bosses that do not make the classic roar when summoned, the others being the Lunatic Cultist
and the Empress of Light. - The Wall of Flesh is commonly abbreviated as WoF.
- The loot's frame is always spawned at the wall's mouth, and its size is correlated with the size of the mouth. If the mouth's size changes (e.g. via external mods or the For the worthy
seed), the frame's size changes accordingly. - It is the only boss that drops a mount-summoning item in Master Mode
. All other Master Mode-exclusive mount-summoning items are dropped by mini-bosses. - The veining at the back of both eye and mouth is identical to the veins trailing the Eye of Cthulhu.
- It is one of the two bosses that need a town NPC to be alive before being summoned. The other is Skeletron.
- In Journey Mode
, if Godmode is activated, using a Magic Mirror or similar to teleport out will not kill the player. Instead, the Wall of Flesh will somehow use its tongue to drag them back. - The Guide's Steam Trading Card describes the Wall of Flesh as "the god of eternal nightmares".
- The Wall of Flesh can only be killed once pre-Hardmode, and is the only pre-Hardmode enemy that drops Hardmode-exclusive items, as defeating it converts the world to Hardmode immediately. This also means the Still Hungry and It's Hard achievements will typically be earned simultaneously, unless Wall of Flesh is fought on a Hardmode world.
Bestiary entries
- Wall of Flesh: "Serving as the world's core and guardian, the towering demon lord exists to keep powerful ancient spirits sealed away."
- The Hungry: "The Wall of Flesh's many mouths, attached by bloody veins. As a last resort, they can tear away and hungrily chase down threats."
History
- Desktop 1.4.4:
- Hungries no longer gain a 3rd stat bonus after 25% Wall of Flesh health. They will continue to use the 2nd stat bonus from 50% WoF health for the remainder of the fight.
- Wall of Flesh's tongued debuff pull speed now scales with the boss' speed in Expert/Master, to prevent the Wall from moving faster than it pulls you in at the end of the fight
- Desktop 1.4.3.3: The Wall of Flesh will always drop 1 weapon and 1 emblem when defeated in Classic Mode.
- Desktop 1.4.2: Fixed an issue where it could drop below the worlds boundary.
- Desktop 1.4.1.2: No longer immune to Poisoned
- Desktop 1.4.1: Now causes the screen to fade to black and despawns if all nearby players are dead, or there are no players nearby.
- Desktop 1.4.0.5: Fixed an NPC smoothing issue.
- Desktop 1.4.0.1:
- Added Wall of Flesh Relic, a Master Mode exclusive drop that acts as a trophy-like item.
- Added Goat Skull, a Master Mode exclusive drop that summons a goat mount.
- Can now drop the Firecracker whip.
- Can now drop Badger's Hat.
- Can now also be summoned by letting the Guide die in the Underworld while he is in contact with lava.
- Desktop 1.3.5: Sprite updated.
- Desktop 1.3.0.1:
- Can now drop the Summoner Emblem.
- Drops will now be encased in Crimtane Bricks if the world was generated with Crimson.
- Desktop 1.2.3: Now has a chance to drop the Wall of Flesh Mask.
- Desktop 1.2: Now has a chance to drop the Wall of Flesh Trophy.
- Desktop 1.1: Introduced.
- Console-Release: Introduced.
- Switch 1.0.711.6: Introduced.
- Mobile-Release: Introduced.
- 3DS-Release: Introduced.
References
- ↑ Information taken from the
 PC 1.4.0.5 source code, method
 DoDeathEvents()inTerraria.NPC.cs. There may be inaccuracies, as the current PC version is 1.4.4.9.
- ↑ Information taken from the PC 1.4.0.5 source code, function
AI()Terraria.NPC.csaiStyle == 27part There may be inaccuracies, as the current PC version is 1.4.4.9.
- ↑ Wand of Sparking's YouTube video demonstrating the property with non-Ash Blocks
- ↑ Terraria's 8th Anniversary - Ask Redigit and Cenx! May 20, 2019
- ↑ Redigit's message in #journeys-end-chat on the official Terraria Discord server (link to message)
- Anomura Fungus
- Antlion
- Bat
- Bee
- Blood Crawler
- Crab
- Crimera
- Demon Eye
- Devourer
- Eater of Souls
- Face Monster
- Fungi Bulb
- Giant Worm
- Granite Elemental
- Granite Golem
- Harpy
- Hoplite
- Hornet
- Jellyfish
- Man Eater
- Meteor Head
- Mushi Ladybug
- Piranha
- Skeleton ()
- Shark (
- Orca
-
- Slime
- Snatcher
- Snow Flinx
- Tomb Crawler
- Undead Viking
- Vulture
- Wall Creeper
- Zombie
- Angler Fish
- Angry Trapper
- Arapaima
- Armored Skeleton
- Armored Viking
- Bat
- Black Recluse
- Blood Feeder
- Chaos Elemental ()
- Clinger
- Corruptor
- Derpling
- Digger
- Floaty Gross
- Gastropod ()
- Giant Fungi Bulb
- Giant Tortoise (
- Ice
-
- Herpling
- Ice Elemental
- Ichor Sticker
- Icy Merman
- Jellyfish
- Jungle Creeper
- Moss Hornet
- Pigron
- Pixie
- Possessed Armor
- Skeleton Archer
- Slime
- Unicorn
- Wandering Eye
- Werewolf
- Wraith
- Wolf
- Alien Skater
- Baby Dinosaur
- Baby Eater
- Baby Face Monster
- Baby Grinch
- Baby Hornet
- Baby Imp
- Baby Ogre
- Baby Penguin
- Baby Red Panda
- Baby Skeletron Head
- Baby Snowman
- Baby Truffle
- Baby Werewolf
- Black Cat
- Bunny
- Cursed Sapling
- Destroyer-Lite
- Dynamite Kitten
- Eater of Worms
- Estee
- Everscream Sapling
- Eyeball Spring
- Fennec Fox
- Flying Piggy Bank
- Glittery Butterfly
- Hoardragon
- Honey Bee
- Ice Queen
- Itsy Betsy
- Lil' Harpy
- Lizard
- Mini Minotaur
- Mini Prime
- Moonling
- Parrot
- Phantasmal Dragon
- Plantera Seedling
- Plantero
- Puppy
- Propeller Gato
- Rez and Spaz
- Sapling
- Shadow Mimic
- Shark Pup
- Skeletron Jr.
- Slime Prince
- Slime Princess
- Spider
- Spider Brain
- Squashling
- Sugar Glider
- Suspicious Eye
- Tiki Spirit
- Turtle
- Tiny Fishron
- Void Bag
- Volt Bunny
- Zephyr Fish
- Bat
- Guinea Pig
- Slime
- Lua error: too many expensive function calls.
- Lua error: too many expensive function calls.
- Lua error: too many expensive function calls.
- Lua error: too many expensive function calls.
- Lua error: too many expensive function calls.
- Lua error: too many expensive function calls.
- Lua error: too many expensive function calls.
- Lua error: too many expensive function calls.
- Lua error: too many expensive function calls.
- Lua error: too many expensive function calls.
- Lua error: too many expensive function calls.
- Lua error: too many expensive function calls.
- Lua error: too many expensive function calls.
- Lua error: too many expensive function calls.
- Lua error: too many expensive function calls.
- Lua error: too many expensive function calls.
- Lua error: too many expensive function calls.
- Lua error: too many expensive function calls.
- Lua error: too many expensive function calls.
- Lua error: too many expensive function calls.
- Lua error: too many expensive function calls.
- Lua error: too many expensive function calls.
- Lua error: too many expensive function calls.
- Lua error: too many expensive function calls.
- Lua error: too many expensive function calls.
- Lua error: too many expensive function calls.
- Raven
- Lua error: too many expensive function calls.
- Lua error: too many expensive function calls.
- Lua error: too many expensive function calls.
- Lua error: too many expensive function calls.
- Lua error: too many expensive function calls.
- Lua error: too many expensive function calls.
- Lua error: too many expensive function calls.
- Lua error: too many expensive function calls.
- Lua error: too many expensive function calls.
- Lua error: too many expensive function calls.
- Lua error: too many expensive function calls.
- Lua error: too many expensive function calls.
- Lua error: too many expensive function calls.
- Lua error: too many expensive function calls.
- Lua error: too many expensive function calls.
- Lua error: too many expensive function calls.
- Lua error: too many expensive function calls.
- Lua error: too many expensive function calls.
- Lua error: too many expensive function calls.
- Lua error: too many expensive function calls.
- Lua error: too many expensive function calls.
- Lua error: too many expensive function calls.
- Lua error: too many expensive function calls.
- Lua error: too many expensive function calls.
- Lua error: too many expensive function calls.
- Lua error: too many expensive function calls.
- Lua error: too many expensive function calls.
- Lua error: too many expensive function calls.
- Lua error: too many expensive function calls.
- Lua error: too many expensive function calls.
- Lua error: too many expensive function calls.
- Lua error: too many expensive function calls.
- Lua error: too many expensive function calls.
- Lua error: too many expensive function calls.
- Lua error: too many expensive function calls.
- Lua error: too many expensive function calls.
- Lua error: too many expensive function calls.
- Lua error: too many expensive function calls.
- Lua error: too many expensive function calls.
- Lua error: too many expensive function calls.
- Lua error: too many expensive function calls.
- Lua error: too many expensive function calls.
- Lua error: too many expensive function calls.
- Lua error: too many expensive function calls.
- Lua error: too many expensive function calls.
Summoning
To summon the Wall of Flesh, you must throw the ![]() Guide Voodoo Doll in the lava in The Underworld while the Guide is alive, or (in
Guide Voodoo Doll in the lava in The Underworld while the Guide is alive, or (in ![]() PC version,
PC version, ![]() Console version,
Console version, ![]() Mobile version, and
Mobile version, and ![]() tModLoader version) have the Guide die in lava in the Underworld.
tModLoader version) have the Guide die in lava in the Underworld.
Its sweep direction is determined by its spawn location. Summoning it anywhere left of the center of the world will cause it to sweep from left to right, while spawning it right of center will cause it to sweep right to left, regardless of the direction the doll was thrown into lava from. Maximum fight space can be achieved by spawning it at the extreme right or left of the world, though these areas have fewer natural structures and may require additional lava survival gear or construction.
The Fight
The Wall will steadily move toward you, so keep your distance and run. If you get behind the Wall, it will pull you in front of it. You will be a little bit disoriented and possibly heavily damaged, so staying in front of it is absolutely a top priority. On the other hand if you move too far away from the Wall it will also pull you back. Be cautious, as this can sometimes fling you into hazards such as Lava, which will usually easily kill a player without items that give immunity to lava, e.g. a ![]() Lava Charm or an Obsidian Skin Potion.
Lava Charm or an Obsidian Skin Potion.
At the start of the fight you should focus on killing ![]() The Hungry, preferably using piercing weapons or Explosives. When they get killed however, they detach, meaning that they will come to you. Kill them as fast as possible, while trying to damage the rest of the swarm.
The Hungry, preferably using piercing weapons or Explosives. When they get killed however, they detach, meaning that they will come to you. Kill them as fast as possible, while trying to damage the rest of the swarm.
When the Hungry have been mostly eradicated, you can now focus on the Eyes and Mouth. They share health, and the Eyes don't have defense. Prioritize Eyes over Mouth.
Close-ranged players may take hits from newly spawned Hungry in Expert/Master and the occasional direct hit from the Wall. Dodging the Eye lasers is easy: Jump up and down when the lasers are shooting, you'll avoid most of them. Just remember that the lasers come from both Eyes.
Be careful though, as you will have to deal with the ![]() Leeches. As they're worms, they need solid blocks in order to navigate around. Be mindful of the terrain (and bridge), and use your penetrating or melee weapons against these. They drop helpful heart pickups, so make sure to take them.
Leeches. As they're worms, they need solid blocks in order to navigate around. Be mindful of the terrain (and bridge), and use your penetrating or melee weapons against these. They drop helpful heart pickups, so make sure to take them.
As the Wall takes more damage, it moves faster and increases the fire rate and damage of the lasers. Keep dodging, and make sure to never stop running, even once.
The Horrified debuff has the effect of instantly killing you when you use your ![]() Mirror or
Mirror or ![]() Recall Potion. It does so after you return to spawn, allowing you to recover your money (and items on Mediumcore) instantly. Do that if you ran out of space to defeat it. However, it's not useful on Hardcore difficulty.
Recall Potion. It does so after you return to spawn, allowing you to recover your money (and items on Mediumcore) instantly. Do that if you ran out of space to defeat it. However, it's not useful on Hardcore difficulty.
Expert Mode
The already hard-to-obtain hearts are now more rare: Leeches have a 20% chance of dropping at least one, meaning that you get healed from the boss less often.
The Hungry will respawn over time, making non-penetrating ammo less effective against the Wall.
Not only does the Wall of Flesh have more health, but it's also faster. At low health, it'll almost outrun you, while lasers can reach extremely high fire rates, to the point of the lasers having no usable gap between them. You can minimize the chance of getting caught by making the last stretch more open beforehand.
Master Mode
In addition to the health and damage boost the Wall of Flesh recieves, instead of flinging forward the player when in contact with the wall, it will instantly kill the player.
General Strategies
General Tips
Terrain preparation
The Wall of Flesh benefits from having an arena prepared more than other bosses.
The simplest arena is a long bridge of about 750-1000 blocks with some space above it for the player to maneuver. Placing the player out of danger from falling into lava and ensuring that they can keep a steady pace of progression allows the fight to go quickly and smoothly. Players may also wish to place lights and make holes to drain Lava from Lava Slimes along the bridge; alternatively, Obsidian Platforms can be used, as they do not break when contacting lava, and the materials to make them can be obtained in bulk by demolishing the Ruined Houses.
However, one can skip the whole terrain preparation process by consuming Water Walking Potions or wearing Lava Waders instead. In 1.4 the Terraspark Boots may be preferable.
Note that Underworld map generation tends to place Ruined Houses towards the middle third of the map, leaving the eastern and western wings mostly clean.
The Wall of Flesh begins its attack from whichever side of the Underworld's map edge you're closest to. This allows you to control its direction of approach. Fight in the direction you're most comfortable with.
Killing the Wall of Flesh will generate a bricked-in treasure box above your bridge. The bricks can serve as kill-markers, but they may interfere with movement if your next fight runs close to that spot.
Alternatively, you can build the arena with ![]() Minecart Tracks, because you can keep a safe distance with a
Minecart Tracks, because you can keep a safe distance with a ![]() Minecart with decent speed. However, take note that jump mobility is limited in a Minecart.
Minecart with decent speed. However, take note that jump mobility is limited in a Minecart.
While tedious, risky, and generally not worth it. You could use the Superheated Blood Mount to collect all the nearby lava. However, it does require a lot of mining and setting up. And it is generally much easier to just use accessories, potions and other items that provide invulnerability against lava and/or fire.
Gearing up
Having 400 health is pretty much required at this point, especially since Hardmode will start immediately after the Wall's defeat.
Armor
Molten Armor has the highest defense and melee damage bonuses. If the fight is done with a Sword or a Spear, Shadow armor with its extra melee speed can prove to be useful as well.
Crimson armor provides a very noticeable boost to life regeneration and a small amount of extra damage. For a defensive build, this is the most efficient option.
The Necro armor is the best pure set for a Ranger. If a Gi is available, it can be replaced for the Necro Breastplate to get more offensive bonuses in exchange for its set bonus, which has no effect in combat as it only affects ammo consumption ().
The Wizard set, consisting of a Wizard hat is the strongest magic set available. Jungle and Meteor armor have weaker bonuses but they can also be efficient choices.
A summoner's only choice is the Bee armor.
Weapons
For Melee users: Due to Melee's relatively short range, this fight can prove to be extremely difficult, however players can make the fight much easier by simply running away, turning the tussle into a trivial trifle.
- The Falcon Blade has autoswing and doesn't turn the player around in the direction they are facing, making it the most efficient sword for the fight. Since it attacks in an arc, it can hurt the Wall of Flesh and keep the Hungries away in the same swing, unless they come from below.
- The Bee Keeper can be use to maximize bee damage against the Hungry and the Wall of Flesh, as the bees can also damage the Wall of Flesh itself.
- The Dark Lance has stronger DPS than the sword above, however it's incredibly inefficient against the Hungries due to its small hitbox, making it more efficient near the end of the fight.
- The Cascade
has much more range than a close range sword, especially with a String. However, due to the nature of Yoyos it is easy to get overwhelmed by the Hungries if not playing carefully. - The Starfury may be used to damage both the Wall and Hungries if your arena is low enough (and sufficiently far from the Underworld ceiling) so that its stars don't get stuck.
- The Sunfury pierces with medium range, making it effective at both the hungry and the wall, and on Template:Eversions can prevent the Hungry from touching you at all.
For Ranged users:
- The Template:Item is the strongest bow available due to its rapid fire and piercing projectiles. Since it only requires Wooden Arrows to shoot its bats, ammunition for it will be pretty easy to obtain. Template:Item has similar properties but is overall weaker.
- The Template:Item does a very efficient job when used with Template:Item.
- The Template:Item is the best gun available. Use Template:Item for maximum effectiveness.
- While it's hard to get ammo for it, the Template:Item is an extremely efficient weapon to use due to its great stats and piercing. It can kill the Wall of Flesh in mere seconds.
For Magic users:
- The Template:Item is one of the strongest weapons against the Wall, as its projectiles can hit the Wall and the Hungries multiple times per hit.
- The Template:Item is also extremely efficient, being able to hit all 3 body parts in one cast if shot into the ceiling to make it ricochet.
- The Template:Item is always an efficient combo when paired with Meteor armor, due to the rapid fire and piercing.
- The Template:Item is great choice because of its ×10 damage attack. Even more so, it is also affected by Meteor armor's set bonus.
For Summoners:
- The Template:Item is the strongest minion available.
- Of the sentry weapons sold by the Tavernkeep, the best options are the Template:Item and the Template:Item. The Ballista Rod has incredibly high damage and their bolts are capable of piercing, while the Explosive Trap Rod inflicts damage in an area of effect. While the sentries themselves are slow to attack, you can continually re-summon them to make them immediately attack, significantly reducing the cooldown time.
- The Template:Item can be used to attack any Hungry that gets too close. However, this will cause your summons to switch to attacking the Hungries instead of the Wall of Flesh.
For Throwing users:
- Template:Item can be used to kill some of the Hungry. The fire left behind by the Molotov Cocktail will do some extra damage to the Wall. These are recommended if you are not very accurate with your explosive throwing skills(100-150 to kill the WoF).
- The Template:Item is arguably the most effective weapon against the Wall of Flesh of any class. They deal consistent and rapid damage to all of the boss's parts, including The Hungry, and can do so from a great distance.
- Explosives, such as the Template:Item, may work as well, quickly clearing the Hungry. Even Template:Item can be used to great effect, although the timing may require some practice. The drawback is that using explosives this way will cause major environmental damage.
- Although expensive, Template:Item is a great option. They deal extreme area of effect damage, capable of quickly killing The Hungry and hitting multiple parts of the Wall itself.
Accessories
- Variants of the Template:Item and Template:Item will help you maneuver around the lasers shot by the Wall.
- Template:Item or Template:Item allow you to walk on the surface of the underworld's many lava lakes unharmed, which is necessary without a hellbridge.
- The only true offensive accessory in Pre-Hardmode is the Template:Item and its upgrade, the Template:Item, which increases damage dealt by 2-3 points, and the stinger necklace also releases bees when you're hit. Melee users have Template:Item, but their help will only be noticeable when using a Sword or Spear.
- The Expert exclusive Template:Item and Template:Item help greatly with mobility and survivability respectively. On , the Template:Item's dodge ability and increased crit chance are a must for worlds that generate with Crimson.
- An Template:Item is mandatory if doing the fight with a close ranged melee weapon, as knockback is a great issue when standing close to the Wall.
As always, make sure to have your accessories reforged to Warding, Menacing or Lucky to get the most out of each slot.
Potions
- Ironskin, Endurance and Regeneration Potions do wonders for survivability. If obtained from a Shadow Chest or an Underworld Pot, the Lifeforce Potion can also be used to great effect.
- The Heartreach Potion is invaluable for collecting the hearts dropped by the Hungries.
- The Inferno Potion can help deal extra damage to the hungry and leeches, both of which are vulnerable to On Fire!, and takes care of any stray Fire Imp projectiles
- An Archery Potion is extremely useful when using a Bow.
- The Ale or Sake give significant Melee bonuses with a very insignificant downside.
- The Magic Power and Mana Regeneration potions should always be used when doing the fight with Magic weapons.
- A Wrath Potion or Rage Potion increase overall damage against the Wall.
- The Titan Potion has an use for keeping the Hungries away, especially when Melee weapons are being used.
- Swiftness Potion helps a bit with mobility.
- Obsidian Skin Potion and Water Walking Potion are good if you have no full arena preparations or if you meet the end of your arena.
- Also using Gravitation Potion and Featherfall Potion will help you if you have no full arena preparations.
- A food item such as Cooked Fish, a Bowl of Soup, or Pumpkin Pie will give you a small buff in most stats.
- A Calming Potion works well too, as the player will be able to mainly focus on the Wall most of the fight.
- Template:Eicons If you have defeated Turkor the Ungrateful, using the Horn o' plenty should work well if you don't have many healing potions.
Specific Strategies
Boulders Head-start
If you can jump Template:Item, then you should set up a few at the beginning of the run and Wire them to a Pressure plate in the course, so you can step on the pressure plate, and the Wall of Flesh gets hit by a few boulders. However, mistiming your jump can be deadly, as Boulders deal high damage. Explosives (or just thrown Dynamite) can be used in a similar manner for even greater damage.
Mouth-only Tunnel Strategy
One strategy which has worked for some players is to build a 3-7 block high tunnel so that the WoF can not use the laser eye attack since it cannot shoot through blocks. For regeneration purposes, use full Crimson armor and Campfires every 20 blocks to help. A good weapon to use is the Diamond Staff, but if you have multiple people, the Ruby Staff will work as well. If you intend to solo the WoF, use Molten armor or Shadow/Crimson armor.
Autofarm Strategy with Boulder Statues Template:Eicons

An example of a Guide's house for a farm


An example of WoF farm in Singleplayer Classic
One more strategy could be to set up an farm that can kill the Wall of Flesh without the player even being in the Underworld. This strategy involves killing the Guide in Lava so that Wall of Flesh spawns, and then killing it with Boulder Statues.
To do this, you must make a house for the Guide in the Underworld at the edge of the world and set up Timers that actuate blocks to make him fall in the lava at least every 20 seconds. Put Lava beneath the blocks that are actuated and make sure that there is always a floor so that the Guide will never spawn somewhere else. Place a Pressure Plate in Lava to detect when the Guide falls in it. You should also put some other kind of trap to be sure that the Guide dies quickly in Lava, as it could take a while if he has a lot of Defense.
After setting up the Guide's house, you just have to set up the Boulder Statues. The Wall of Flesh speeds up when it's damaged, so place Boulder Statues with space between them varying: 10 with a space of 2, 5 with a space of 4 and 10 with a space of 6. This should beat it every time in Classic Mode. The Wall of Flesh will be killed endlessly, and you can let this farm run while continuing to play, gathering the drops as you see fit.
Aftermath
After defeating the boss, the loot will be enclosed suspended in a box, so that lava is not a problem. However, your world will enter Hardmode if it has yet to enter it.
After defeating the Wall of Flesh, you will have access to stronger weapons and emblems, making the fight a lot easier when you come back to it. Furthermore, after killing the WoF, you can immediately summon him again (of course waiting for the Guide to respawn). This can be a great source of income or loot.