A hoik is a sawtooth series of sloped blocks, sometimes referred to as "teeth", which rapidly bounce an entity's sprite along.
When a character sprite shares space with a sloped block, the character is immediately displaced a couple of tiles in a predictable direction. By chaining these glitches together with a line of strategically placed shaped blocks, entities can be moved in any direction. It becomes easy to achieve horizontal travel at 60 or 120 tiles per second and vertical travel at 180 tiles per second provided by legitimate means (aside from Teleporters or the Portal Gun).
Hoiks are most commonly used as a method of fast travel, but also allow for the creation of mechanisms, such as fast binary counters that are not available with standard game features.
Since 1.3, hoiks are officially considered a "feature" by Re-Logic.[1] As such, it is ensured their functionality remains in the game. They are not planned to be removed.[2]
Hoiks are part of Terraria since version 1.2, which introduced sloped tiles. While there have been individual prototypical exploits of this feature, a forums thread by ZeroGravitas has made hoiks widely known. Much of the current knowledge presented in this article and standard applications of hoiks are based on his research.
Displacement in Terraria
Hoiks are based on the displacement system of the game. When an overlap of block and entity is detected, the entity is displaced, in order to resolve the overlap. For sloped blocks, the displacement direction is indicated by the location of the slope within the tile.
The game determines the displacement direction following these rules:
- If the slope is facing upwards, move the entity straight upwards (provided there are no blocks directly above the head).
- If the slope is facing downwards, move entity straight downwards (provided there are no blocks directly under the feet).
- If either of the above are blocked (by blocks directly above or below, respectively), then move the entity sideways (in the direction the slope faces) ignoring any solid blocks to side.
- Exception: Upward-displacement is always the first choice for blocks at foot height. Blocks directly above the head (or ▼ Down is held) negate this.
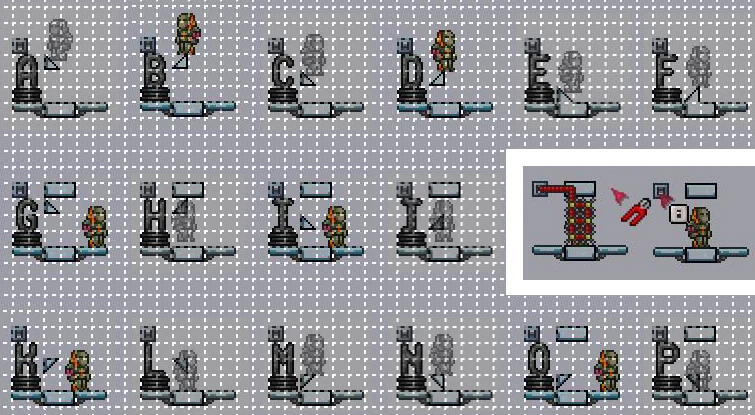
This behavior is visualized in the diagram on the right. The diagram was created by actuating a sloped block into existence behind the player's sprite, having started by standing in the middle of the 2 Glass Block base, in each case. Equally, the diagram shows the jump made by hammering a previously square tile into the depicted shape (while behind the player).
Hoik-useable instances are highlighted in color.
Template:Item/options
- Complete displacements are helpful for hoiks:
- Unhelpful instances show incomplete displacements (
 A, C, E), jams (H, J), no effect (L, P), or a single-tile rise which can not be strung onto further hoik steps (F, M, N).
 - Square blocks or half-tiles in any of the empty spaces behind the player, or to the sides, have no effects.
Template:Item/options Terraria detects collision every "tick" (1/60th of a second). Thus, stringing together a series of these displacements, with each jump landing the player on top of another sloped tile, creates a "track" which is capable of moving an entity at the speed of 60 displacements per second. This is the quintessence of a hoik.
Mounting a Hoik
A hoik is entered by positioning the (player) sprite in front of the first tooth. This can be achieved using the following methods:
- Stepping up onto a square block or a platform hammered into "half" position.
- Actuating the first tooth, positioning in front of it, and turning it back on.
- Placing a sloped platform, sloped inactive block, or inactive platform against the upright edge of the first tooth. The game's collision detection then ignores the adjacent horizontal surface.
- Teleporting onto the tooth.
- Constructing another hoik which leaves the player in front of the tooth.
- Grappling, in certain cases.
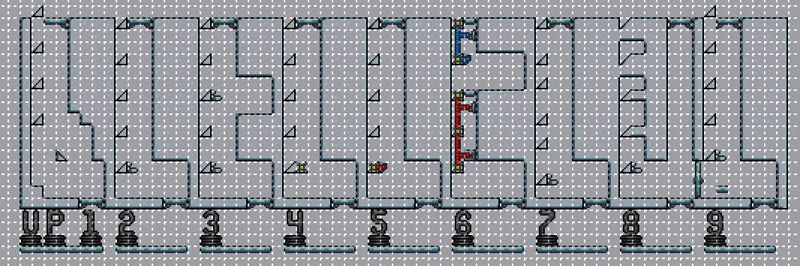
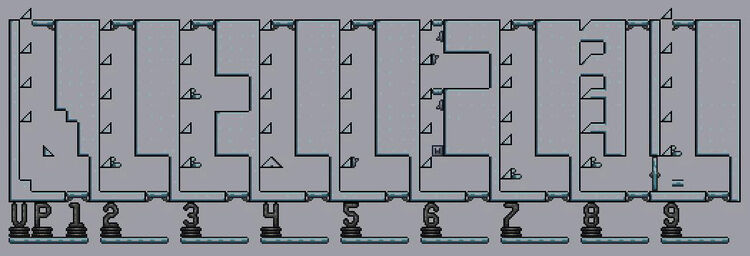
Vertical Hoik Examples
Template:Item/options
Upwards
Examples of upward hoiks.
.jpg)
Examples of upward hoiks without grid and wiring.
![]() 1 Step-up mounted standard elevator. Jumps up 3 tiles per game tick.
1 Step-up mounted standard elevator. Jumps up 3 tiles per game tick.
![]() 2 Sloped platform mounted hoik elevator.
2 Sloped platform mounted hoik elevator.
![]() 3 This elevator can be joined anywhere along its length. To bypass the sloped platforms (including avoiding fall damage), ▼ Down needs to be held while falling.
3 This elevator can be joined anywhere along its length. To bypass the sloped platforms (including avoiding fall damage), ▼ Down needs to be held while falling.
![]() 4 Inactive sloped tile mount.
4 Inactive sloped tile mount.
![]() 5 Actuated first tooth mount.
5 Actuated first tooth mount.
![]() 6 Sectional elevator (up one section per click). For a two-way use in a two-block wide hellevator, all teeth need to be actuated. If used in a three-block wide shaft, only the first tooth at each mounting point needs to be actuated.
6 Sectional elevator (up one section per click). For a two-way use in a two-block wide hellevator, all teeth need to be actuated. If used in a three-block wide shaft, only the first tooth at each mounting point needs to be actuated.
![]() 7 Tooth spacing variations: A single gap can be left (e.g. to help adjusting the exact starting/ending points). One-tile gaps can only be used on alternate teeth, otherwise the entity's head will jam against the third tooth.
7 Tooth spacing variations: A single gap can be left (e.g. to help adjusting the exact starting/ending points). One-tile gaps can only be used on alternate teeth, otherwise the entity's head will jam against the third tooth.
![]() 8 Tooth width variants: Stepping up through entirely solid rows (up to two tiles thick) is possible, e.g. to hold water, lava, or NPCs in place.
8 Tooth width variants: Stepping up through entirely solid rows (up to two tiles thick) is possible, e.g. to hold water, lava, or NPCs in place.
![]() 9 This hoik is mounted by walking past the entrance or holding ▲ Up while walking left.
9 This hoik is mounted by walking past the entrance or holding ▲ Up while walking left.
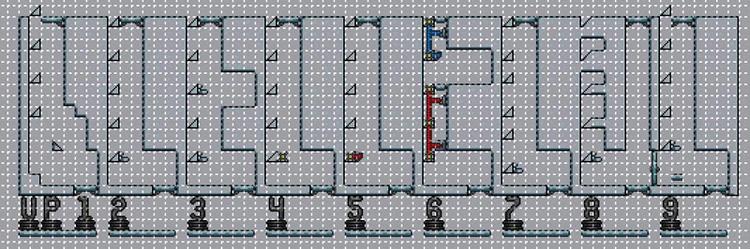
Downwards and Bi-directional


Examples of downward and bi-directional hoiks.
.jpg)
Examples of downward and bi-directional hoiks without grid and wiring.
- Downwards
![]() 10
10![]() 10 Hold ▼ Down while walking slowly through the sloped platform. Continue holding ▼ Down over the edge (otherwise the player will step up on top of the mounting tooth).
10 Hold ▼ Down while walking slowly through the sloped platform. Continue holding ▼ Down over the edge (otherwise the player will step up on top of the mounting tooth).
![]() 11
11![]() 11 Mid-run mounting. (There is no known way to walk through a down hoik, like
11 Mid-run mounting. (There is no known way to walk through a down hoik, like ![]() 9 in the diagram above, without actuating a tooth.)
9 in the diagram above, without actuating a tooth.)
![]() 12
12![]() 12 Walk in from the left. The hoik uses inactive sloped block and ceiling. Like upward hoiks, every other downward tooth can have 1 vertical space, instead of 2, but the first gap must be 2 tiles high.
12 Walk in from the left. The hoik uses inactive sloped block and ceiling. Like upward hoiks, every other downward tooth can have 1 vertical space, instead of 2, but the first gap must be 2 tiles high.
![]() 13
13![]() 13 All tiles except the row directly below the each tooth can be filled in.
13 All tiles except the row directly below the each tooth can be filled in.
![]() 14
14![]() 14 Actuated mount. The first tooth comes in as a block/platform directly underneath and is actuated out. Must be a one-tile gap beneath, otherwise the player will just step down.
14 Actuated mount. The first tooth comes in as a block/platform directly underneath and is actuated out. Must be a one-tile gap beneath, otherwise the player will just step down.
- Bi-directional
![]() 15
15![]() 15 Activate the Switch to move upwards/downwards. Actuated upward teeth (and mounting teeth) allow two-directional travel through a two-tile wide shaft.
15 Activate the Switch to move upwards/downwards. Actuated upward teeth (and mounting teeth) allow two-directional travel through a two-tile wide shaft.
![]() 16
16![]() 16 Standard three-tile wide up- and downward hoik. Hoiking downwards places the entity on the platform at the bottom.
16 Standard three-tile wide up- and downward hoik. Hoiking downwards places the entity on the platform at the bottom.
![]() 17
17![]() 17 A four-tile wide shaft allows up- and downward hoiks to be entirely independent.
17 A four-tile wide shaft allows up- and downward hoiks to be entirely independent.
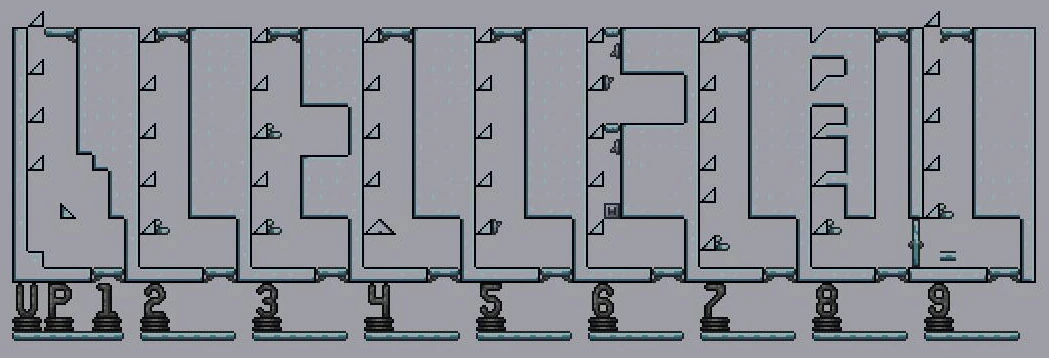
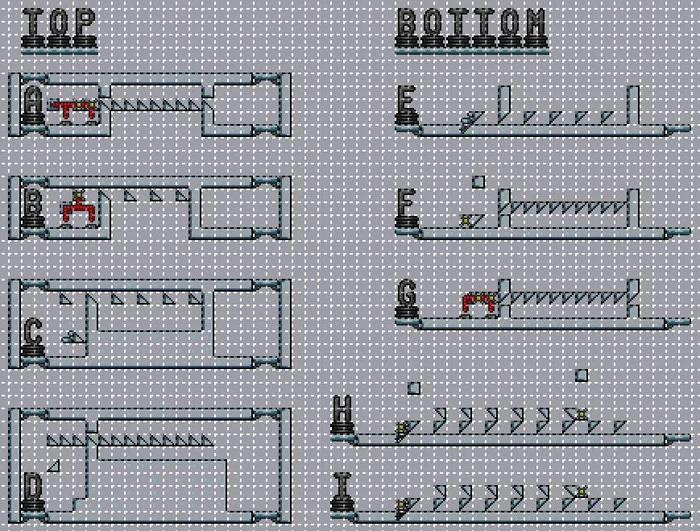
Horizontal Hoik Examples
While all entities are moved from left to right here, the layout can be inverted to enable right-to-left transport. As soon as the entity is mounted, all tiles except the teeth are irrelevant. This allows a horizontal track through entirely solid ground.
Examples of horizontal hoiks.

.jpg)
Examples of horizontal hoiks without grid and wiring.
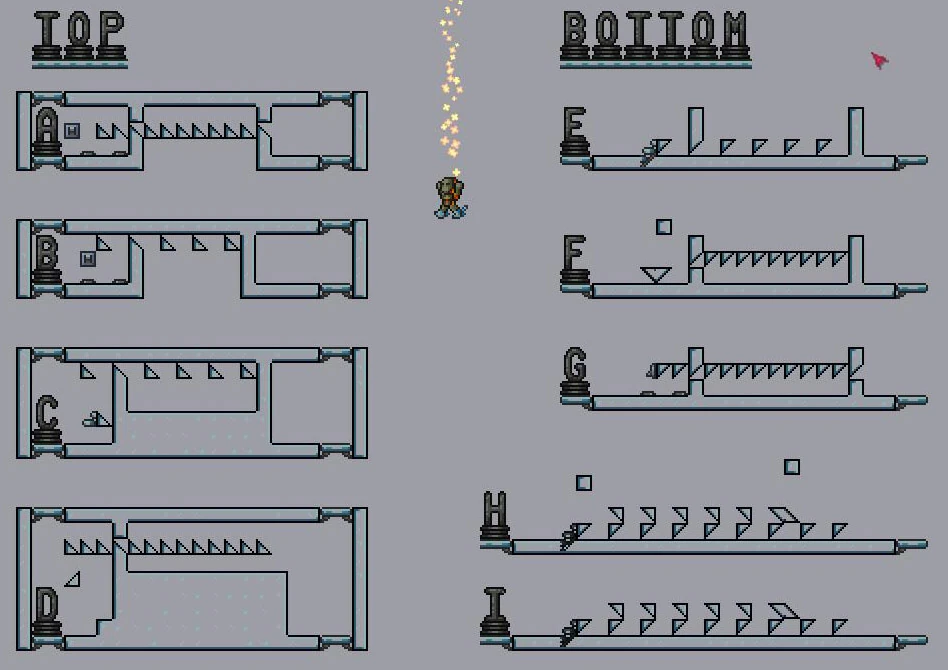
Top (Against Ceiling)
All entities are moved along the ceiling, hence no floor is required. Actuated mounting variants are more space-efficient, thus shown first.
![]() A Waist-height teeth variant, 1 tile/tick.
A Waist-height teeth variant, 1 tile/tick.
![]() B Head-height variant, 2 tiles/tick. Actuated mount.
B Head-height variant, 2 tiles/tick. Actuated mount.
![]() C Head-height, 1 tile/tick. Sloped platform 1-step elevator mount.
C Head-height, 1 tile/tick. Sloped platform 1-step elevator mount.
![]() D Waist-height, 1 tile/tick. Step-up elevator mount. (An elevator section of any length can be used, provided the last step up puts the player's head directly under (against) the ceiling.
D Waist-height, 1 tile/tick. Step-up elevator mount. (An elevator section of any length can be used, provided the last step up puts the player's head directly under (against) the ceiling.
Bottom (Against Floor)
All entities are moved along the floor, hence no ceiling is required (except for specific mounting instances).
![]() E Foot-height variant, 2 tiles/tick. To mount, hold ▼ Down before reaching the sloped platform (will walk over the top otherwise).
E Foot-height variant, 2 tiles/tick. To mount, hold ▼ Down before reaching the sloped platform (will walk over the top otherwise).
![]() F Waist-height teeth, 1 tile/tick. Inactive sloped block mount. Just walking towards it to mount is sufficient, as the block above prevents stepping up.
F Waist-height teeth, 1 tile/tick. Inactive sloped block mount. Just walking towards it to mount is sufficient, as the block above prevents stepping up.
![]() G Waist-height, 1 tile/tick. Actuated teeth mount variant. Waist-height is preferable over actuated foot-height which will push up the sprite (unless a ceiling is placed) and requires more precise positioning.
G Waist-height, 1 tile/tick. Actuated teeth mount variant. Waist-height is preferable over actuated foot-height which will push up the sprite (unless a ceiling is placed) and requires more precise positioning.
![]() H Bi-directional, foot-height, 2 tiles/tick. Automatic mounting in either direction, just walk towards it.
H Bi-directional, foot-height, 2 tiles/tick. Automatic mounting in either direction, just walk towards it.
![]() I Bi-directional, foot-height, 2 tiles/tick. The absence of ceiling in the mounting area here requires to hold ▼ Down while mounting, otherwise the player will just walk straight over the top, in either direction.
Template:Item/options
I Bi-directional, foot-height, 2 tiles/tick. The absence of ceiling in the mounting area here requires to hold ▼ Down while mounting, otherwise the player will just walk straight over the top, in either direction.
Template:Item/options
Comparison to Alternatives
- Hoiks have a higher top speed which is achieved immediately: 48.4 tiles/sec (regular Minecart); 60 or 120 tiles/sec (horizontal hoik).
- The track of hoiks is much less flexible and not intrinsically two-way (possible, but more fiddly).
- It is difficult to manually dismount a top hoik mid-run (but one can step out of the bottom hoik at any point, if there is no ceiling).
- Hoiks have a higher top speed which is achieved immediately: 30.75 tiles/sec ascending, 38.25 tiles/sec descending (Rope); 180 tiles/sec (vertical hoik, both directions).
- At this speed, however, it is hard to dismount at the right point without inserting gaps.
- Mid-run entry and break points need to be engineered in.
- A hoik's foreground blocks possibly obstruct open space.
- Hoiks are free and available at all points of game progression.
- Using a hoik does not despawn the player, which means NPCs will not be auto-relocated.
- Hoiks do not require long wire routes that may interfere with other devices.
- Teleporters are faster in nearly all cases.
- Using a hoik discharges momentum, as each displacement counts as a collision with a tile, therefore running/Minecart speed cannot be carried over to the destination.
- Constructing a hoik is far more fiddly for any significant distance, especially for bi-directional travel.
- Hoiks are much less flexible.
Item Hoiks
Dropped items can be hoiked, i.e. displaced due to overlap with sloped blocks, as well. While item transport is more limited than player and NPC transport, there are numerous common use cases, such as more efficient farms (e.g. an automated Fallen Star farm) or a Heart/Mana Star extractor for event fights.
See the following forums thread for further reading: Item Hoiks! - [Guide + Video] Move & Seperate Drops, Trawl Fallen Stars and More...
Notes
- Regular hoiks can be used by players, enemies, NPCs, the Eternia Crystal, and the invisible Target Dummy entity.
References
- ↑ Cenx' message in #terraria-chat-1 on the official Terraria discord server Apr 5, 2019
- ↑ Cenx' message in #terraria-chat-1 on the official Terraria discord server Apr 5, 2019