| Progress bar icon |
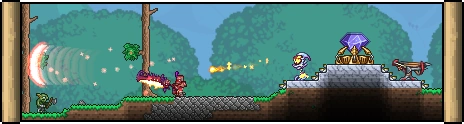
![]() "The old one's army is approaching!"
"The old one's army is approaching!" ![]()
The Old One's Army is a unique Dungeon Defenders 2 crossover event that can be triggered by placing an Eternia Crystal on the Eternia Crystal Stand. There are three versions (Tiers) of the event, the second and third of which are triggered by defeating a Mechanical Boss and Golem respectively.
Once the Eternia Crystal is placed, and after a five-second countdown, the objective is to protect the Eternia Crystal NPC from waves of enemies seeking to destroy it. If the Crystal is destroyed, the event terminates. If it is kept "alive" until all waves are cleared, the event is defeated.
This event makes use of Defender Medals, a unique currency dropped by the Eternia Crystal after its later waves are cleared. Defender Medals are used to purchase special corresponding weapons and armor from the Tavernkeep NPC.
This event can be exceptionally difficult, not only due to the toughness of its enemies, but because of the various anti-cheat/exploit methods it employs. The terrain requirements for summoning the event, and the Creative Shock debuff, prevent most of the usual arena tricks. Event enemies are not moved by Teleporters, and they don't take damage from Lava. Even if one manages to circumvent the Creative Shock debuff by using items like the Ice Rod to place blocks, enemies can enter a ghost-like state wherein they can phase through any blocks obstructing their path.
Summoning
An Eternia Crystal Stand must be placed, and then an Eternia Crystal must be placed on it by right-clicking the stand with a Crystal in the player's inventory. Both the Crystal and its Stand are purchased from the Tavernkeep NPC for coins. The Tavernkeep can be found randomly in a world after the Eater of Worlds or the Brain of Cthulhu has been defeated.
Terrain requirements
Summoning this event has some unique requirements for the terrain around the summon area. If they are not fulfilled, the Eternia Crystal cannot be placed successfully, and a status message appears informing the player that the surface is inadequate.
- A minimum clearing of 61 tiles horizontally is required on each side of the Eternia Crystal Stand, measured from the center of the Stand (a 123-tile clearing in total, with the Stand at the center tile). The enemy portals will spawn further away if given the space however, up to 120 tiles away from the center of the Stand on each side.
- A minimum clearing of 10 tiles vertically is required (ie. between the "floor" and the "ceiling," if there is one).
You can build up to a height of three tiles before blocks are considered obstructing the necessary space. Platforms and inactive Actuated blocks do not count as part of a flat floor, and will count against the three-tile height allowance; but floor blocks with Actuators on them that are solid when the Crystal is placed will count as flat, and can be successfully actuated after the event has started.
Anti-cheat mechanisms
- The Creative Shock debuff prevents placing or mining blocks during the event. It also prevents using Buckets to spill or collect any liquids.
- All Blocks: Blocks cannot be used to completely prevent event enemies from advancing. Old One's Army enemies are able to go to enter a "ghostly" state where they can move through blocks. They initially spawn in this state, then re-enter it whenever there is no clear path between them and the player. For example, if the player enters a tunnel below the arena, enemies will fall through the blocks to enter the tunnel.
 Teleporter: Event enemies are not affected by Teleporters.
- Lava: Event enemies take no damage from Lava.
- Traps: While traps will damage event enemies normally, they are less efficient than sentries; Traps can additionally make sentries less effective, since trap attacks cause invincibility frames in the enemies they hit, while sentries don't. Traps may still be useful in areas out of the reach of sentries.
Things that are still possible:
- Actuators can be used to transform the arena after the event has started. Keep in mind that walls can result in the enemies simply moving through, but this can help protect the Crystal from projectiles.
- Ice Rod can place temporary ice blocks.
- Sandgun will still produce placed Sand Blocks when fired. However, these cannot be removed with tools until the event is over.
- Explosives can destroy blocks that are not explosion-proof.
- Conveyor Belts
can be used to move Etherian Mana towards the player. Note that they do not move enemies. - Dirt Rods can be used to move Dirt Blocks in the area and create obstacles for enemies.
- Etherian Mana can be placed in a chest, where it remains for use in the next Old One's Army, as long as the chest is not opened until then.
Waves
The event consists of a set number of waves, with each wave becoming progressively more difficult (see wave chart). At the end of each wave, there is a 30-second countdown to the next wave, signified by a timer appearing over the Eternia Crystal.
The event comes in three possible tiers, depending on game progression when the event is triggered:
- Tier 1 consists of five waves, with one or more Dark Mages serving as mini-bosses in the final wave. Tier 1 is triggered when the event is summoned before any Mechanical Bosses have been defeated in Hardmode. The final wave ends when one Dark Mage is defeated. Completing Tier 1 awards 5 Defender Medals in total.
- Tier 2 consists of seven waves, with one or more Ogres serving as mini-bosses in the final wave. Dark Mages will not appear in this tier. Tier 2 is triggered when the event is summoned in a Hardmode world after at least one Mechanical Boss has been defeated. The final wave ends when one Ogre is defeated. Completing Tier 2 awards 25 Defender Medals in total.
- Tier 3 consists of seven waves, with the boss Betsy spawning in the final wave. The Dark Mage and Ogre will also spawn during the previous three waves. Tier 3 is triggered when the event is summoned after the Golem has been defeated. The final wave ends when Betsy is defeated. Completing Tier 3 awards 100 Defender Medals in total. In Expert mode worlds, an additional bonus of 30-49 Defender Medals is dropped by Betsy's Treasure Bag.
In addition to the difference in bosses, the common event enemies also differ between Tiers, with stronger statistics and a more menacing appearance in higher tiers.
Defender Medals and Sentries
The completion of each wave, beginning with the third, awards the player Defender Medals, a special currency used to purchase items from the Tavernkeep NPC that can help players defeat future Old One's Armies. Among them are special sentry summon weapons, which are fueled by Etherian Mana, a resource that drops only during this event. Etherian Mana allows multiple sentry minions to remain placed simultaneously and permanently until the event is over, with more Etherian Mana allowing more sentries to be placed. All Etherian Mana disappears once the event is over, whether uncollected or within the player's inventory.
At the beginning of the event, the player will receive 10 Etherian Mana, allowing them to place one sentry. Note that sentries not obtained from the Tavernkeep (such as the Queen Spider Staff) do not and cannot use Etherian Mana, but can be summoned separately.
Each sentry type available from the Tavernkeep (Flameburst, Explosive Trap, Lightning Aura, Ballista) comes in three different tiers: Rod, Cane, and Staff, with the Staff being the most expensive and the most powerful.
Once the event is completed successfully in a world, the weapons can then be used outside the event.
Drops
Each boss and mini-boss in the event has a trophy (10% chance) and a mask (14.29% chance). Betsy also drops a Treasure Bag in Expert mode only (100% chance).
Several enemies also drop pets, vanity items, and powerful weapons and accessories. All enemy banners dropped during this event are non-functional, and do not provide the player with any of the usual defense or damage boosts that other enemy banners provide.
Enemies will not drop biome-specific drops, such as Biome Keys, or coins, even when wearing the Lucky Coin or its derivatives. They also do not drop Presents during Christmas, nor Goodie Bags during Halloween.
Content
| Type | |
|---|---|
| Max Life | T1: 1000 T2: 3000 T3: 5000 |
| Defense | T1: 14 T2: 18 T3: 45 |
| Debuff | |
|---|---|
| Debuff tooltip | You have lost the power of Creation! |
| Duration | During the entire event |
- Item (Quantity)Rate
- Defender Medal
(Amount depends on wave)100%
| Old One's Army | |||||||||||
|---|---|---|---|---|---|---|---|---|---|---|---|
| Characters | Unique Drops | ||||||||||
|
Structures Pre-Mechanical Boss:
After Killing One Mechanical Boss: Post-Golem: |
From all: Banners:
From Dark Mage: |
From Ogre:
From Betsy:
From Eternia Crystal (NPC): | |||||||||
Wave chart
| Key | ||
|---|---|---|
| Pre-Mechanical Boss (T1) | After Killing One Mechanical Boss (T2) | Post-Golem (T3) |
| Enemy | Wave 1 | Wave 2 | Wave 3 | Wave 4 | Wave 5 | Wave 6 | Wave 7 | ||||||||||||||
|---|---|---|---|---|---|---|---|---|---|---|---|---|---|---|---|---|---|---|---|---|---|
| 1 | 1 | 1 | 1 | 3 | 3 | 3 | 11 | 6 | 25 | 15 | 60 | ||||||||||
Equipment chart
The Old One's Army event brings associated equipment. The armor and sentry weapons are available from the Tavernkeep in exchange for Defender Medals, while other weapons and accessories are dropped by event enemies.
Tier 2 items become available after one Mechanical Boss is defeated, and Tier 3 items become available after Golem is defeated.
| Class | Sentries | Tier 2 Armor | Tier 3 Armor | Tier 2 Weapon | Tier 3 Weapon | Accessory |
|---|---|---|---|---|---|---|
| Apprentice
(magic) |
||||||
| Huntress
(ranged) |
||||||
| Monk
(light melee) |
||||||
| Squire
(tank melee) |
Notes
- The Eternia Crystal regenerates its health very slowly when not taking damage.
- Bringing a Mechanical Boss summoning item to a pre-Hardmode world and vanquishing one will still only produce Tier 1 of the invasion.
- Traps like Spiky Ball Traps or Super Dart Traps can do a small amount of damage to the Eternia Crystal.
- At the start of the 7th wave at T3, Betsy will spawn off screen on the ground instead of the mysterious portals.
- The event is considered cleared once the final boss of each Tier is defeated, regardless of how many enemies are left at that point. The "cleared" status is indicated by white light surrounding the Crystal, as well as a change in music, by which point the event is considered won even if enemies then proceed to touch the Crystal or the player dies. The event can even be won posthumously, if the remaining sentries finish off the last boss.
Tips
- Because of the Creative Shock debuff, any building work to prepare the arena must be completed before. It is not possible to place or remove blocks or furniture while the event is happening, not even between waves.
- If you are just starting a pre-mechanical boss world, and you have found the Tavernkeep, the first item you should buy is the Lightning Aura Rod, because if you place two lightning auras next to each portal, it is impossible for any enemy except the Dark Mage to get through the auras. Note that this only works in T1 (pre-Mechanical Boss).
- If you are doing all 3 tiers of the event, it is recommended to save up 25 defender medals from doing Tier 1 before defeating a mechanical boss and moving to Tier 2. That way, you'll be able to buy a Tier 2 sentry summon weapon before attempting to do the Tier 2 version of the event. Attempting to defeat the Tier 2 event with only Tier 1 equipment puts you at a significant disadvantage. Saving up enough defender medals from Tier 2 to buy some Tier 3 gear once it becomes available is recommended for the same reason.
- There are a few sentry summoning weapons not sold by the Tavernkeep: the Queen Spider Staff, the Staff of the Frost Hydra, the Rainbow Crystal Staff, and the Lunar Portal Staff. These are quite useful, because they use regular mana rather than Etherian mana, so using them enables you to have more sentries placed than would otherwise be possible. The Lunar Portal can also easily kill flying enemies, allowing you to focus on ground enemies. The armor sold by the Tavernkeep will increase how many of these sentries you can summon at one time.
- If you are in a Hardmode world but have yet to defeat a mechanical boss, you can easily farm the event with a Blessed Apple or Ancient Horn mount. Simply run back and forth. The damage the mounts do while charging will one-hit kill all enemies besides the Dark Mage.
- Endgame strategies: A maxed out Summoner with 11 Stardust Cell Staff minions and a Legendary Star Wrath can finish the event through wave 6 trivially. Wave 7 requires a lot of dodging, but the boss will probably die before it destroys the crystal. The S.D.M.G. with Luminite Bullets, or the Phantasm with Luminite Arrows, are also very useful. Other useful endgame items: Last Prism, Shadowbeam Staff, Snowman Cannon, Toxic Flask, Meowmere, Spore Sac, Staff of Earth, Scutlix mount
- Keep the area above the lanes clear, as flying enemies will phase right through the ceiling anyway; blocks in the way only serve to make them unreachable by player attacks.
- Players can use a one-block thick ceiling to their advantage, however, as it allows air enemies to be targeted by dedicated elevated towers, where they are more likely to score hits.
- Platform blocks can support sentry summons, by using free-standing platforms, you can elevate your turrets without blocking off your own attacks.
- If you use the Clinger Staff, it can act as a barrier. Combined with a single Lightning Aura sentry, it can take down one side of the army until around Wave 4.
- The Nimbus Rod is extremely effective in Tier 1, as it kills all enemies in one hit except the Dark Mage. If you place the cloud towards the crystal-facing side of a pillar, no enemies will get through aside from the Dark Mage, which the player can handle. You will need to replace the cloud every so often, though.
- The Seedler, when used with a completely flat arena, can be useful because the projectiles from the weapon can shoot out horizontally allowing you to stand in the center and have the projectiles fire towards both sides, killing enemies from both portals.
- If the player enters a tunnel below the arena, enemies will fall through the blocks to enter the tunnel; this behavior can be exploited to make them unable to damage the Crystal as they move themselves behind barriers to attack the player instead.
- Hoiks can be used to some extent to fling Etherian Mana your way, however only to the right. A slower alternative are Conveyor Belts. This is of limited use since the break timer between waves offers plenty of time to gather Etherian Mana manually.
- Hoiks can be used on the Eternia Crystal itself, and a hoik-loop can move the Crystal continuously so that it cannot be easily hit.
Trivia
- If you look closely, the Eternia Crystal slowly develops cracks as it gets more damaged.
See also
- Old Ones at the Dungeon Defenders 2 Wiki
History
- Desktop 1.3.4.1: Hotfixes to bugs regarding the invasion.
- Desktop 1.3.4: Introduced.